10 Best Raspberry Pi Projects To Check Out In 2025
For over a decade, the Raspberry Pi has been the go-to for a variety of creative projects, as it allows you to get started from a blank canvas. It costs about as much as a night out, yet it's powerful enough to rival a modest desktop PC and flexible enough to become almost anything you can dream up. With the Raspberry Pi 5 now out, you're getting faster processors, more RAM options, and better graphics support, making this little board even harder to resist for hobbyists, teachers, and tinkerers.
Affordability is only half the story. The real magic comes from the community. Whether you're a first-time coder or building your 10th hardware project, you'll find forums, tutorials, and open source projects to guide every step. The official Raspberry Pi site and its tutorials hub are overflowing with resources for projects that range from weekend experiments to full-scale prototypes.
Here are 10 standout projects you can try on one of the newer models or a way to repurpose an older Raspberry Pi in 2025. Each one shows how a credit-card-sized board can power serious ideas, from home automation to robotics and AI. Pick the one that excites you most, grab a Pi, and see just how far you can take it.
Smart home hub with Home Assistant
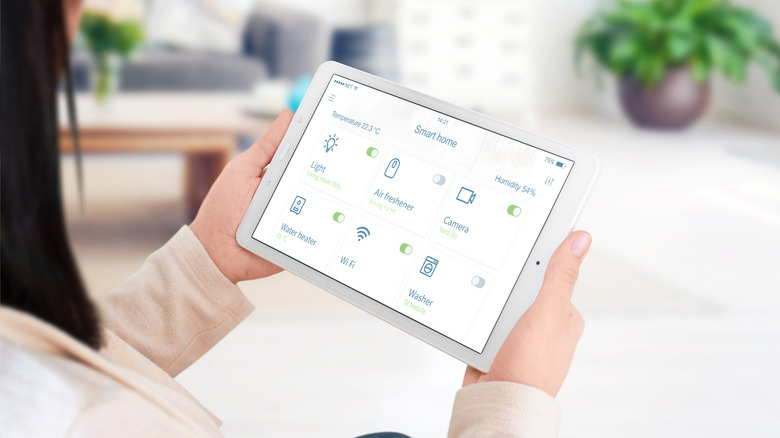
If you've ever wanted all your lights, thermostats, and sensors to work together without sending your data to a big tech cloud, a Raspberry Pi running Home Assistant is the way to go. Home Assistant is an open source platform built by a global developer community that specializes in privacy-first automation.
To get started, obtain a Raspberry Pi 4 or Raspberry Pi 5 with at least 2 GB RAM, and a 32 GB micro-SD card with Application Class 2 rating. Flash the Home Assistant OS image to your micro-SD card and connect the Pi to your home network over Wi-Fi or through Ethernet. From the web interface, you can link popular smart home devices such as light bulbs, smart plugs, or door sensors. You can then create automation rules like "turn on the porch light when the door unlocks after sunset." The platform only runs on your home network, which means commands are faster and your data never leaves the house.
The flexibility is almost limitless, with dashboards for live energy usage, voice assistants for control, and advanced scripts that react to multiple triggers. As your device network grows, Home Assistant scales with it, letting you migrate the same configuration to more powerful hardware if needed.
Retro gaming console with RetroPie

Old-school gaming never goes out of style, and if you prefer a setup with a larger display than what's offered on the best retro handhelds, then the RetroPie is a great alternative. ReroPie is an open source project maintained by a team of volunteers that lets you relive the classics on a Raspberry Pi. RetroPie bundles emulators for consoles like NES, SNES, Sega Genesis, and PlayStation into one polished interface.
Getting started is straightforward. Flash the RetroPie image to an SD card, boot the Pi, and follow the on-screen instructions to pair controllers. Add your legally-owned ROMs and you're ready to dive into decades of gaming history. The EmulationStation front-end gives you that classic console feel, complete with cover art and custom themes.
Because the Pi handles HDMI output and USB controllers, you can connect it to any modern TV and play with friends just like the old days. Community forums offer tips for tweaking performance or adding shaders for that authentic CRT look. Whether you grew up with Mario and Sonic or just want a weekend nostalgia trip, a Raspberry Pi running RetroPie turns retro gaming into a compact, affordable time machine.
Personal cloud storage with Nextcloud

A personal cloud server is a great way to keep your files private, avoid costly cloud-storage fees, and personally control server downtimes. All you need is a Raspberry Pi board, a reliable microSD card, and an external hard drive for storage. The heart of the project is Nextcloud, an open source platform created by Frank Karlitschek and maintained by a large community of contributors.
Running Nextcloud on a Raspberry Pi is easier than you might think. Start by installing the Raspberry Pi OS onto your microSD card or use the dedicated NextcloudPi OS that's pre-configured for cloud storage. After the Pi boots, use the browser-based setup wizard, or follow the NextcloudPi web interface to configure your domain, enable encrypted connections, and connect the external drive. Nextcloud offers built-in apps for collaboration, video conferencing, document editing, and even an AI assistant that runs entirely offline.
After installation, your Pi becomes a fully fledged personal cloud accessible from phones, tablets, and desktops. You can sync files across devices, share links with friends, and even stream media directly from your own server. Because you own the hardware, you control your privacy and data retention with no monthly subscription required.
AI-powered security camera

An AI-powered security camera is a great weekend project if you want to combine low-cost hardware with real-world artificial intelligence. Getting started only requires a Raspberry Pi board, a compatible camera, and a microSD card. The open source motionEyeOS turns your Pi into a fully-fledged video monitoring hub, while models like OpenCV or LiteRT (formerly TensorFlow Lite) handle face detection, object recognition, and other AI tasks.
To set up the system, flash the motionEyeOS image onto the microSD card and boot the Pi. Your browser opens up to a web interface from which you can tweak settings such as motion check interval, video quality, and storage options. The software, which is based on an official Pi distro, supports multiple cameras so you can connect extra Raspberry Pis or USB webcams without juggling different apps. If you're ready to experiment with AI, motionEyeOS lets you stream the video output to lightweight models that run alongside motion detection. You can also configure automatic uploads to Google Drive or Dropbox, and set up email or push alerts for detected movement.
Once running, the camera quietly monitors your space and can stream live footage to your phone or computer. Adding AI recognition lets it distinguish between a passing pet and a human visitor, giving you both practical security and a crash course in computer vision.
Portable media center with Kodi
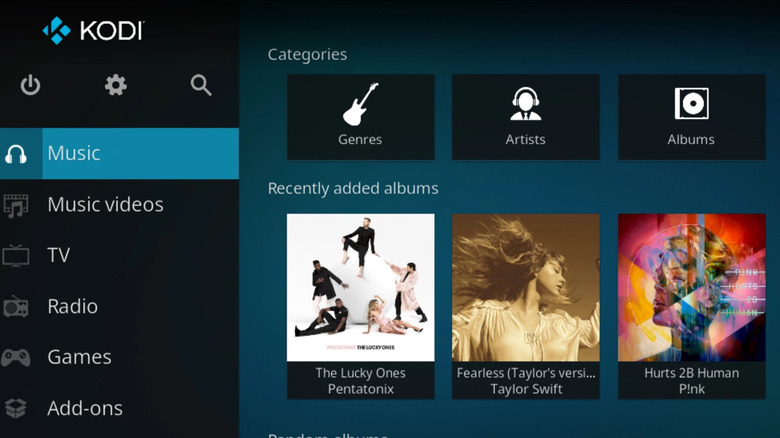
A Raspberry Pi paired with Kodi — the popular open source media platform — can become a portable media center you can slip into a bag and take anywhere. This small but powerful combo streams movies, TV shows, and music, while replacing the bulk of a traditional home theater PC. Remember that Kodi doesn't supply any media itself; you'll need to provide your own collection or connect it to existing streaming services and apps.
Kodi runs on many operating systems, and even comes preinstalled on certain Raspberry Pi distributions like LibreELEC and XBian. After flashing one of these images and booting the Pi, you'll be greeted by Kodi's clean interface, where you can organize videos, music, and live TV streams. You can plug in a USB or external hard disk for local files, or point Kodi to a home server or network share, which can be as simple as plugging an external hard drive into your router's USB port. The platform also supports a variety of remote controls via HDMI CEC to RF receivers or infrared sensors wired directly to the Pi.
This setup turns your Raspberry Pi into a pocket-sized entertainment hub that plays nearly every audio and video format. You can even configure game emulators and connect controllers for retro-gaming sessions. With an active community continually developing new add-ons, a Kodi-powered Pi is both a fun weekend project and a long-term upgrade for home entertainment.
Weather station and environmental monitor
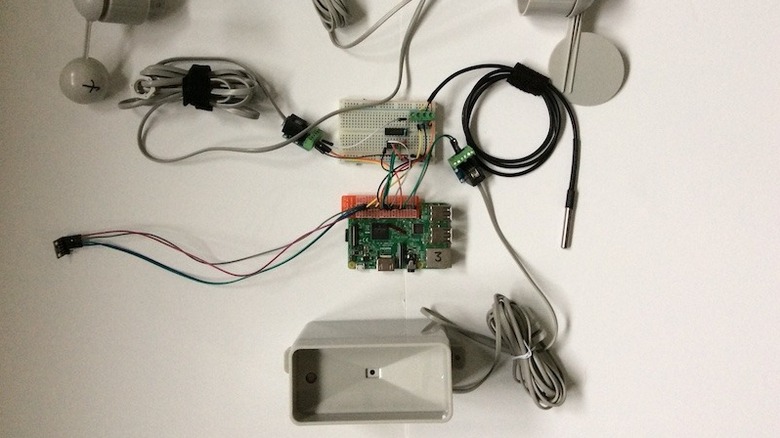
Fair warning: This project is a lot more hands-on than flashing OS images or installing software. A Raspberry Pi weather station helps you track what's happening in the air around you and teaches you about environmental monitoring. To build one, you'll need a Raspberry Pi board and a set of sensors — typically a DHT22 or BME280 for temperature and humidity, and PMS5003 or SDS011 for air quality.
A detailed tutorial on Raspberry Pi Projects shows how to wire up the hardware and install the necessary Python sensor drivers. You can log readings to a simple spreadsheet or send them to a database such as InfluxDB for more advanced analysis. To make the data easy to understand, pair the database with a visualization tool like Grafana, which creates a dashboard you can view from any web browser. Many hobbyists also configure their weather station to publish data to public networks like Weather Underground so neighbors can benefit from the readings.
With the system running, you'll see live graphs of temperature, humidity, and particulate matter right from your Pi. The setup is surprisingly accurate for its cost and can be expanded with rainfall gauges or wind sensors. Aside from the practicality of checking local weather, this project teaches skills in data collection, database management, and IoT dashboards.
Low-cost robotics platform
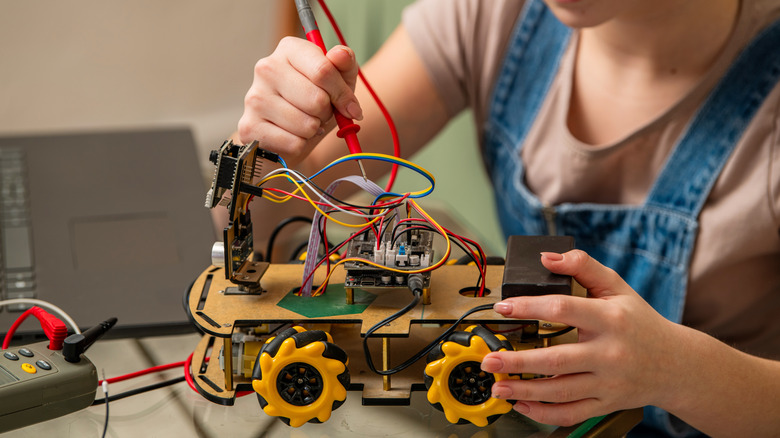
A Raspberry Pi can be the brain of a mini robot, giving you an affordable introduction to programming and electronics. To start, you need a Raspberry Pi board, a motor drive board such as the L298N, a pair of DC motors with wheels, and a power source like a rechargeable battery pack. Add an ultrasonic distance sensor or infrared line sensor, and you have the basic components for a line follower or obstacle-avoiding robot.
The Raspberry Pi Foundation offers a variety of robotics projects that walk you through each step with clear diagrams and code samples. Many of them are built around the Build HAT or gpiozero Python libraries, letting you control the motors and read sensor inputs with simple scripts. For wireless control or data logging, you can connect over Wi-Fi and even add a camera module for live video streaming. A tutorial by Christopher Barnatt shows how to use a lightweight web interface to steer the robot, making it easy to experiment with different movement patterns or autonomous behaviors.
Expanding your designs with more advanced sensors, machine learning models, or computer vision opens the door to far more complex robotics challenges. This kind of project helps you develop practical skills in design, coding, electronics, and problem solving — skills that can lead to future opportunities in engineering and automation.
DIY network-attached storage
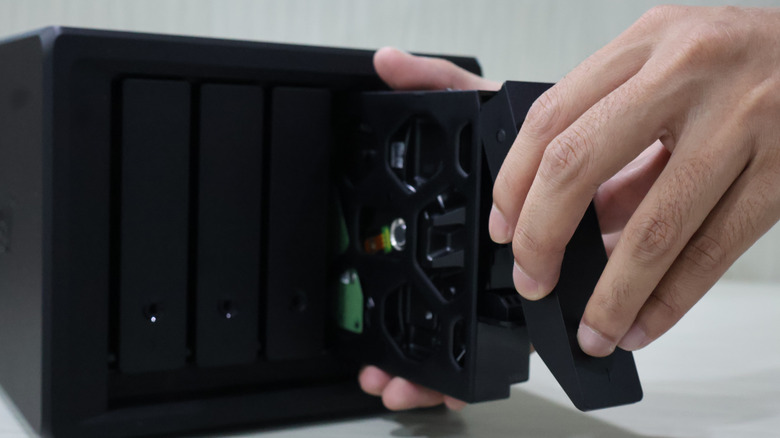
A network-attached storage (NAS) server is one of the most practical ways to put a Raspberry Pi to work. The open source OpenMediaVault project, maintained by Volker Theile and a vibrant community, provides the software foundation for this build. It's designed specifically for small home servers, making it a perfect fit for the Pi's compact footprint.
Start by flashing the OpenMediaVault image onto a microSD card and booting the Raspberry Pi. The setup wizard guides you through adding storage drives, creating shared folders, and configuring user permissions. OpenMediaVault supports file sharing protocols for Windows, macOS, Linux, and remote sharing, so every device in your household can connect without extra plugins. You can also enable built-in services such as SSH for remote control, Rsync for scheduled backups, or the dashboard to view information about your NAS server.
When the configuration is complete, you can store and stream your media library, back up laptops and phones, or even set up remote access to reach files while traveling. If you're looking to learn about server management while gaining a reliable storage platform, this project delivers both practical value and a better understanding of networked systems.
Personal VPN server

Running your own VPN server on a Raspberry Pi is a great way to keep your browsing private and secure without paying for a commercial service. The only requirement is a home router that allows port forwarding so outside devices can connect back to your network. PiVPN provides an open source installer that works with trusted protocols such as WireGuard and OpenVPN.
After setting up Raspberry Pi OS, you simply launch the PiVPN script from the terminal and follow the on-screen prompts. It will guide you through choosing a VPN protocol, opening the right port on your router, and generating client profiles. When the process is complete, you can grab the configuration files to add your phone, laptop, or tablet. Managing access later on — whether adding a new device or removing one — takes just a single command.
Once live, your Raspberry Pi encrypts all traffic from connected devices, protecting you on public Wi-Fi and allowing secure remote access to your home network. This means you can safely reach files or smart home gadgets as if you were sitting at home. With no monthly subscription or outside provider involved, you end up with a private VPN that you fully control and a lesson in networking and internet security.
Smart Mirror with MagicMirror²

Using a Raspberry Pi hidden behind a two-way mirror, MagicMirror² lets you create a display that shows the time, weather, calendar events, and live news feeds right on the surface of the glass. The project began as an open-source creation by Michael Teeuw and is now maintained by an active community that keeps adding modules and features.
To create the smart mirror, install Raspberry Pi OS and run the MagicMirror² installation script, which sets up the core software. Configuration is done through a single JavaScript file where you choose which modules to display, from basic clock and weather panels to integrations for Google Calendar schedules. You can also adjust fonts, colors, and layouts to your tastes. For a more polished look, many builders frame the mirror using wood or metal and power the Pi with a simple USB adapter hidden behind the frame. The full mirror setup is available as an official Raspberry Pi tutorial.
The mirror functions as a regular reflective surface while still displaying real-time updates. You can expand it with modules for traffic reports, voice control, or even facial recognition for a truly personalized dashboard. Beyond the wow factor, building a MagicMirror² is an excellent way to learn about web technologies, modular software design, and hardware integration. It's also a fun and great Raspberry Pi project to upgrade your bedroom.
From weekend hacks to full-scale innovations
The next step after trying a few Raspberry Pi projects is to treat them as more than one-off builds. Start by keeping detailed notes and uploading your code or configuration files to a public GitHub repository. This simple habit not only helps you remember what you built but also creates a portfolio you can show to collaborators or potential employers.
As you grow more comfortable, look for ways to incorporate different accessories to supercharge your next project or combine what you've learned. For example, pair the weather station's sensor data with the MagicMirror² interface to create a live environmental dashboard, or link your personal VPN with a Nextcloud server so you can access private cloud storage securely from anywhere. These crossovers teach you how to integrate multiple systems, an essential skill for anyone interested in IoT or home automation.
Finally, explore the hardware upgrades now available. The Raspberry Pi 5's faster CPU and PCIe expansion allow you to attach high-speed SSDs or dedicated AI accelerators like Google's Coral TPU. That means projects such as AI-powered security cameras or real-time image processing can now run entirely on the Pi.