How To Take Instagram-Worthy Photos Of The Moon With Your iPhone
The iPhone offers one of the best camera experiences in mobile phones, especially the newer models, and especially the latest Pro and Pro Max models. That said, the iPhone camera has limitations and can't quite match the capabilities of professional gear in specific situations. Taking photos of the moon is one such example. Getting the perfect shot of a full moon for Instagram and other social media apps is more difficult with the iPhone. But it's not an impossible ask.
The default Camera app on the iPhone does not have as many manual controls as a professional camera to help photographers take great photos of the moon. Combined with the hardware limitations, like the iPhone's inability to provide the same level of zoom as a DSLR, taking the perfect shot of the moon might be more difficult if all you want to do is point and shoot your iPhone at the night sky and hope that Night Mode will get you the perfect shot for your Instagram followers.
Taking a fast photo of the moon will result in a blurry, bright blob of light in the middle of the sky, instead of the beautiful crescent moon or the crater detail expected from full moon photography. The iPhone's Night Mode algorithms will try to brighten the shot, and that's what will make the already bright moon appear as a smeared blob in the sky. But there are ways to take great photos using nothing but the iPhone in your pocket and the default Camera app. One method involves manually controlling camera settings. The other will have you recording 4K video of the moon and then saving screenshots from it.
How to take a good photo of the moon with the iPhone
You'll also want to ensure the following camera features are set before taking photos of the moon:
- Disable the camera flash: tap the flash icon in the top left corner (iOS 18) or top right corner (iOS 26)
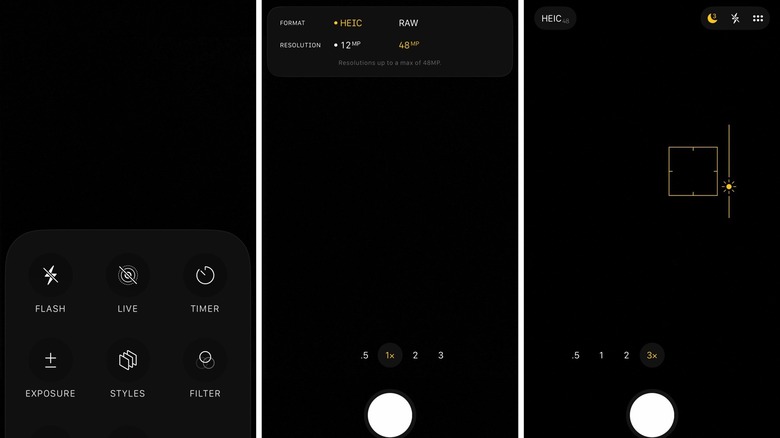
- Disable Live Photos: cross out the icon with circles around it in the top right corner (iOS 18) or tap the dotted menu in the top right corner and then cross Live button (iOS 26 – first screenshot above)
- Use the best photo quality: Go to Settings > Camera > Formats > Photo Mode and choose the best possible setting (iOS 18) or tap the top left button in the Camera app and select the maximum resolution (iOS 26 – second screenshot above)
With these settings out of the way, you can prepare for the actual shot. Here's what you need to do while in the Camera app:
- Zoom to the maximum optical zoom option your iPhone supports. That's 2x, 3x, 5x, or 8x (iPhone 17 Pro models).
- Tap the moon to focus on it
- Long-press the moon to bring up the AE/AF Lock menu (third screenshot above)
- Slide your finger down on the sun icon to lower the exposure until you get a good look at the moon (third screenshot above)
- Tap the shutter button to take a photo (or set a timer if you're using a tripod)
- Hold still until the iPhone captures the image (or wait if you're using a tripod with a timer).
Record 4K video of the moon to get a great photo
The other popular method of taking a good photo of the moon involves recording a 4K video and then taking a screenshot of the moon to obtain that Instagram-ready image you want. Before you start recording, you may want to select the best possible video quality. You'll look for 4K video at 60 frames per second (fps) in the Camera app in iOS 18 and iOS 26:
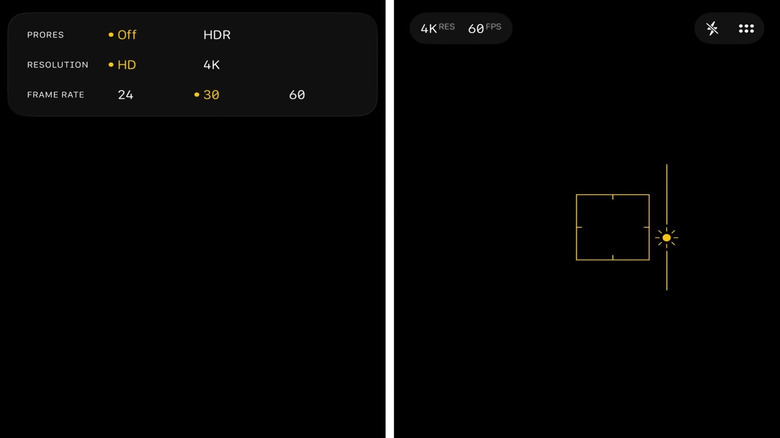
- Select the Video mode and tap the menus in the upper-right corner to select "4K" and "60" (iOS 18)
- Select the Video mode and tap the menu in the upper-left corner to set the Resolution at 4K and the Frame Rate at 60 (iOS 26 – above)
After that, you'll need to follow these steps to record a video of the moon:
- Zoom to the maximum optical zoom option your iPhone will support. That's 2x, 3x, 5x, or 8x (iPhone 17 Pro models).
- Tap the moon to focus on it
- Long-press the moon to bring up the AE/AF Lock menu
- Slide your finger down on the sun icon to lower the exposure until you get a good look at the moon
- Tap the shutter button to record video for a few seconds, then tap it again to stop the recording
The final step involves extracting a photo of the moon for Instagram from the iPhone's Photos app:
- Select the video recording
- Use the slider at the bottom of the screen to move back and forward (iOS 18) or use the playback progress bar to move back and forward (iOS 26)
- Tap the screen to make the video controls disappear
- Zoom in on the paused clip to increase the size of the moon
- Take a screenshot
Bonus tips
When trying to capture that perfect shot of the moon with the iPhone for Instagram, you should consider your setting. Choose a place that gives you a good look at the night sky and avoid having too many light sources around you. While you only need the iPhone and the Camera app, you might consider using a tripod if you have one or finding a place to set the iPhone with the cameras pointing at the moon to eliminate camera shake. A stabilizer is advisable for the video method, as the iPhone will have to record a few seconds of continuous footage.
No matter what method you use to capture the perfect photo of the moon, you can use the resulting image to upload it to Instagram and other social networks. You can repeat the procedures outlined above for future moon photo sessions, regardless of the moon phase or sky illumination.
The video above covers variations of the previous two methods. Photographer Shayne Mostyn uses an iPhone 16 Pro to shoot a photo of the moon by manually controlling the exposure and focus, while using maximum digital zoom (instead of maximum optical zoom) with an iPhone placed on a tripod. The YouTuber uses the same video trick to photograph the moon, but records in HD mode at 30 fps instead of 4K 60 fps video. Also, Mostyn selects the maximum digital zoom to record the clip, lowers the exposure, and keeps the iPhone steady on the tripod.