5 Secret Windows 11 Features Everyone Should Be Using By Now

Windows 11 has been out since October 2021, and by now, you're likely familiar with its most noticeable changes. You already know about — and probably frequently use — the centered Start Menu and its redesigned layout, the convenient Snap layouts popup, the updated File Explorer look and functionalities, and the customizable widgets panel. These features are central to Windows 11, so they're hard to miss.
But beyond these highlights are actually a host of other tools tucked away in the system apps and settings menus. Yes, Windows 11 hides some nifty Easter eggs that might not be specifically advertised, but are helpful nonetheless. If you're looking for ways to make the most out of your PC, here are five Windows 11 secret features to try out, whether you're on Windows 11 Home or Pro. These options can make tasks more convenient, increase productivity, and enhance your overall user experience.
Remove objects and background from photos in the Photos app
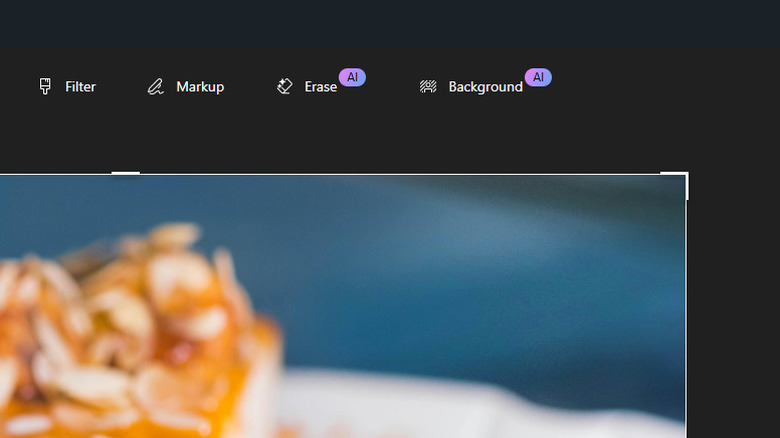
If you ever need to erase an object or remove the background from an image, your first instinct might be to turn to Photoshop. However, you actually don't need to purchase third-party software just to do these edits. Windows 11 offers a free Photoshop alternative you might not know about — the Photos app.
Photos is more than just an image viewer. It also comes with a basic editor, complete with tools for erasing objects and backgrounds. Both are powered by AI, so they're quick and easy to use, and require almost no manual work. To edit out specific objects and the background from your images on Windows 11, here's what you need to do:
- Open the image in Photos.
- Press the Edit button in the upper left corner.
- To remove an object from the image:
- Click on Erase.
- Change the brush size to a smaller number if you're working on tiny objects, or to a larger one if you're erasing large areas.
- Brush over the object you want to remove. Once you let go of the brush, it will automatically proceed with the erasure.
- Wait for the process to finish.
- If you're not satisfied with the result, swipe over the object several more times.
- To delete the photo background:
- Select Background at the top.
- Press Remove on the right side panel.
- To manually select the background, enable Background brush tool and use the brush to add or remove the mask from the image.
Once you're happy with your edits, you can go ahead and save the photo.
Switch to a different Calculator mode

You're probably so used to doing only basic math on Windows Calculator that you don't realize it actually offers more. You can use it to solve advanced trigonometry questions, convert from one currency to another, or find out how many days are between June 12 and December 29 without manually counting. To do so, simply switch to one of its many hidden modes:
- Standard: Offers basic math operations.
- Scientific: Comes with more advanced operations, including trigonometry functions.
- Graphing: Displays your equations in graphs.
- Programmer: Calculates figures in binary code.
- Date calculation: Lets you find the difference between dates, and add or subtract days.
- Converter options: Converts a measurement in one unit to another unit. This includes options like Pressure, Area, Currency, and Temperature.
You can find these modes by pressing the hamburger icon in the upper left corner of the Calculator app. Another nifty trick that Calculator can do is stay on top of other apps. This can be useful when you're shopping online and want to keep track of your spending, or when you're working on a recipe and need quick conversions. Instead of repeatedly opening and closing Calculator, you can just leave it as a small overlay on your current window. To enable this feature, choose Standard mode and click the icon next to the label "Standard." The window will then shrink to a miniature size, and you can keep it floating on the side while you work.
Copy text from screenshots with the Snipping Tool
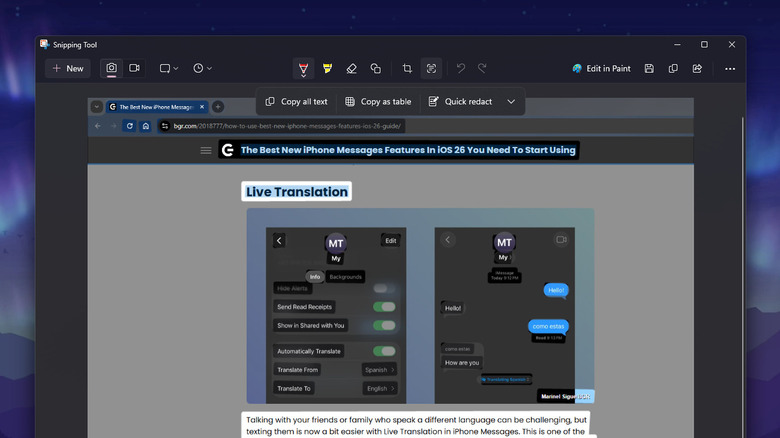
Whenever you need to copy some text, it's typically as simple as selecting it and hitting Ctrl + C. But there are some instances where this isn't possible. For instance, you can't grab the text from an error message or system dialog box. The same is true for text in videos, images, and even some websites and PDFs.
The usual workaround for this is to either type the text manually, or install an OCR program — short for Optical Character Recognition — that scans the material and extracts the text automatically. Both methods have their drawbacks, though. Manually typing everything out is too time-consuming, while OCR programs aren't always accurate, nor free of charge.
Thankfully, Windows 11 features a built-in OCR program in the form of the Snipping Tool, specifically the Snipping Tool photo editor. It lets you copy text from your screenshots with ease — and without costing you a dime. To use Snipping Tool's OCR function, follow this guide:
- Take a screenshot on Windows 11 by pressing Win + Shift + S and selecting your target area.
- Click on the popup that appears in the bottom right of the screen. This will open the Snipping Tool photo editor.
- Select the Text actions icon in the top menu bar.
- To copy only a part of the screenshot, highlight the text, right-click on it, and choose Copy text.
- To copy all the text found in the screenshot, press Copy all text at the top.
From here, you can simply paste the copied text anywhere you need.
Add new timezones in the Notification Center
Working with an international team, or keeping in touch with your family and friends abroad, means you're frequently on Google typing "time in [city]." It's easy and convenient enough. But having to do the same Google search several times a day can get old quickly. If you're looking for a faster solution to see what time it is in a different part of the world, you can add the new time zone in your Notification Center. This is one Windows 11 setting you probably didn't know existed. Here's how to set it up:
- Launch the Settings app.
- Tap on Time & language on the left side panel.
- Go to Date & time.
- Expand the option for "Show time and date in the System tray."
- Press Change next to Additional clock 1.
- Select the other time zone.
- Enter the display name for Additional clock 1. You can name it after the city, or a person in that time zone — say, your mom or your client. Feel free to add emojis to the display name, too.
- Hit Change to save your setting.
- Repeat the same steps for Additional clock 2.
- To make it easier to compare your local time and the other time zones, enable "Show time in Notification Center."
Now, when you open the Notification Center from the system tray, you'll immediately see the local time at the very top and the two additional clocks underneath. You can also hover over the date and time in the taskbar to quickly view these three clocks. To remove the additional clocks, navigate to Settings, then Time & language, then Date & time, then Show time and date in System tray. Then, click the dots next to Additional clock 1 or 2 and select Reset.
Format your text in Notepad
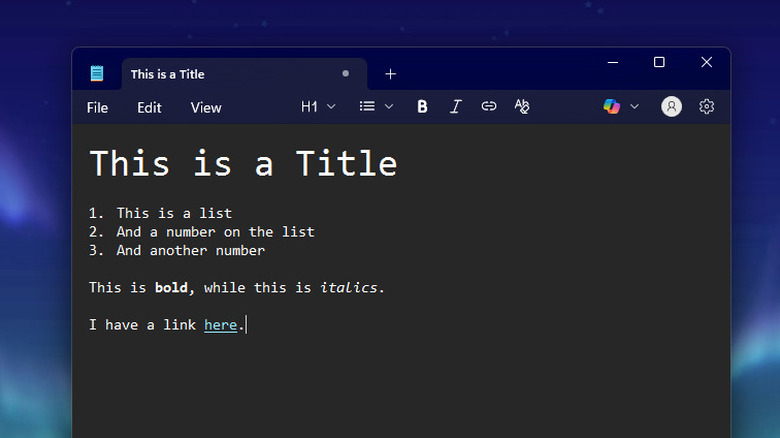
For the longest time, Windows Notepad has been known as a no-fuss app with basic functionalities. Plus, its interface is minimal and clear of any complicated menus. That's why it's many people's go-to for quick notes and pasting text.
With Windows 11, though, Notepad is quietly being revamped with some exciting updates. One of the latest new features integrated into the app is text formatting. Don't worry, though — these text formatting functions aren't as elaborate as apps like Evernote and Obsidian. In fact, Microsoft refers to the introduced functions as "lightweight." If you want to try it out, here's how to turn on and use text formatting in Notepad:
- Go to Notepad.
- If you don't already see the text formatting options in the top menu bar, click Settings and toggle on Formatting under Text Formatting.
- Start typing your text.
- To change the size of the text, click on H1 and choose from the options. The default size is Body.
- To make a numbered or bulleted list, select the list icon.
- To turn a text bold or italics, press on the B or I icons, respectively.
- To attach a link to the text, choose the link icon and paste the URL in the Address field.
- To view your formatted text in Markdown syntax instead, press Formatted at the bottom.
- To remove the formatting, hit the Clear formatting icon.
You can save your note, with the text formatting applied, by pressing Ctrl + S and selecting Save as Markdown file. This will save the file as .MD instead of the usual .TXT.