You Can Calibrate Your Smart TV Without Any Fancy Tools - Here's How
When you first bring home a brand new smart TV, there's a distinct possibility it won't have the ideal picture the first time you turn it on. Everyone watches TV a little differently, including different lighting and different seating arrangements, so to get your new TV optimized for your unique setup, you'll need to do a bit of calibration. While a detailed calibration does require specialized equipment, you can perform a simpler calibration with nothing but the TV's settings, some test images, and your own eyes.
Getting a new TV professionally calibrated requires time, money, and special equipment like a calibration disc. Some models of smart TV, like Apple TV, have built-in calibration features and procedures, but unless you're a die-hard videophile setting up the ultimate home theater experience, you don't really need to bother with all that. If you just want your TV to look good from your favorite perch on the couch, you can perform a quick D.I.Y. calibration by bringing up a test image on the screen, then adjusting the TV's display settings until you have everything the way you like it.
All you'll need are some test images and your eyes
Performing a D.I.Y. TV calibration is all about adjusting the basic display settings to create a balanced picture, one optimized for your seating arrangement. All you really need to facilitate this is some test images and patterns, as well as your own eyes. You're the one who's going to be watching the TV, after all, so it's most important that it looks clear to you, though you can also ask anyone else who will be using the TV regularly to assist you. Just make sure you're seated directly across from the TV while calibrating, looking right at the center of the screen.
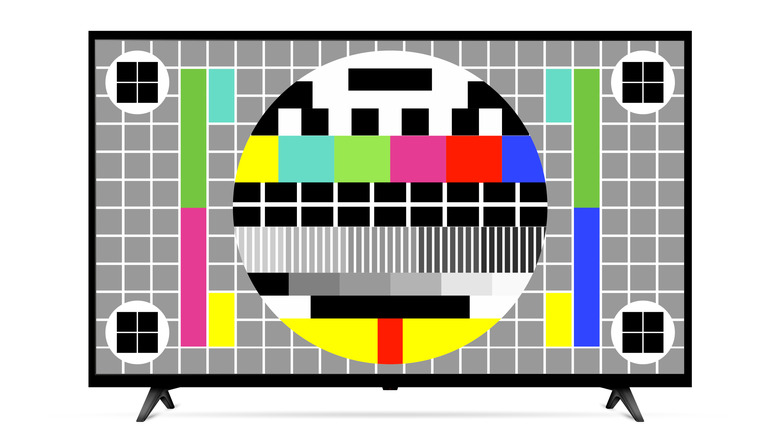
For test images, you can actually find a variety of test images and patterns on YouTube for testing things like black levels, brightness, contrast, and more. Just load up one of these videos via the YouTube app on the TV, pause it, and remove the YouTube interface. In addition to these patterns, you can also load up a show or movie you like for a similar point of comparison. If you're going this route, try to pick something that's particularly vibrant, like an animated film. Just make sure whatever you load up is in high quality, as older, low-quality films and streams may lead to incorrect calibration.
Choose a neutral preset, then adjust the individual settings

Once you've got your test image or pattern of choice loaded up on your TV, you can begin the calibration process. Open your TV's display settings and check the presets. If this is the first time you're doing this, it will probably be on a default, no-frills preset with a name like "Natural" or "Cinema." You want it to be on a neutral preset to get the most accurate calibration possible. If it's on a preset with more vivid, exemplified colors or brights, your end results may end up skewed, so switch it to a neutral one. You should also disable any enhancement settings like motion enhancement or dynamic contrast.
With the preset established, you can then go through the individual settings one by one to find the optimal levels. Check the contrast, brightness, color, tint, sharpness, and whatever other miscellaneous meters are present, adjusting them against the test patterns or images until it all looks right to your eyes. Brightness in particular should be specifically tested with a test pattern, turning the meter all the way up or down and then adjusting it until only part of the image is visible.
Once you've gotten all the levels where you want them, consider writing the levels down on a note or taking a picture of them with your phone. If, for example, you performed a factory reset on your Fire TV, you can use that note to quickly restore the levels to your custom preferences.