5 Windows 11 Features That Are Slowing Down Your Computer
Your Windows 11 computer used to go from zero to 60 in a few seconds. Your apps loaded instantly, input didn't lag, and you could multitask without your computer feeling like it needs a moment to catch its breath. But now your computer feels like it's constantly overwhelmed by something, making it run super slow. It might have gotten so bad that it freezes or crashes occasionally, especially during heavy use.
Everyone knows the common culprits that slow down Windows PCs, like resource-intensive apps and a full system drive. But sometimes the problem can be the features that Microsoft includes within the operating system itself. For instance, OneDrive could be syncing files, visual effects could be turned on, or too many apps could be running at startup or in the background.
You can get this fixed quickly by pinpointing the culprit and disabling or pausing it. Windows 11 gives you that much control over the features that are running on your computer. And as long as your computer isn't crashing every time you boot it up, the problem is highly fixable.
OneDrive
OneDrive is one of the best cloud storage apps for Windows because it provides peace of mind. Specifically, it backs up important folders like Desktop, Documents, and Pictures, as well as your settings. This allows you to quickly get up and running on a new PC, whether your old one crashed or you're upgrading. All you need to do is simply sign in to your Microsoft account, and OneDrive will sync everything you backed up.
However, that syncing when creating the backups comes at a price. Firstly, uploading data can be a resource-intensive task that puts a strain on your computer's RAM and CPU. Secondly, it's a bandwidth hog that can slow down your internet activities (e.g., web browsing and streaming). Depending on the number and size of the files it has to upload, the whole thing can disrupt your workflow or enjoyment to varying degrees.
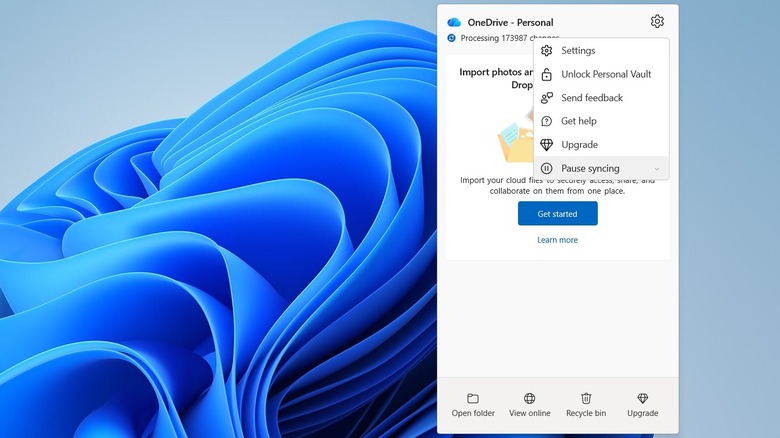
You can pause the syncing process temporarily to free up your computer's resources. Follow the steps below to do that:
- Click the OneDrive icon in the taskbar or system tray.
- Click the gear icon in the top-right corner.
- Select "Pause syncing."
- Choose how long to pause the syncing: 2, 8, or 24 hours.
Visual Effects
Windows 11's transparency effects give your installation a modern, glossy look. For instance, it makes your desktop's background appear behind the taskbar, Start menu, and the borders around windows. It's faint and blurry instead of fully transparent, giving you the feel of looking through frosted glass. You also have those smooth animations that give windows a sliding and fading effect when you open, close, and minimize them. This makes them smoothly appear and disappear instead of just popping in and out.
While all this enhances the user experience, there's a performance cost on the RAM and GPU. If you're using older hardware or your computer has less than 8 GB of RAM, you will feel it the most. You can disable both visual effects and animations in settings to make everything more snappy and responsive. Here's what you need to do:
-
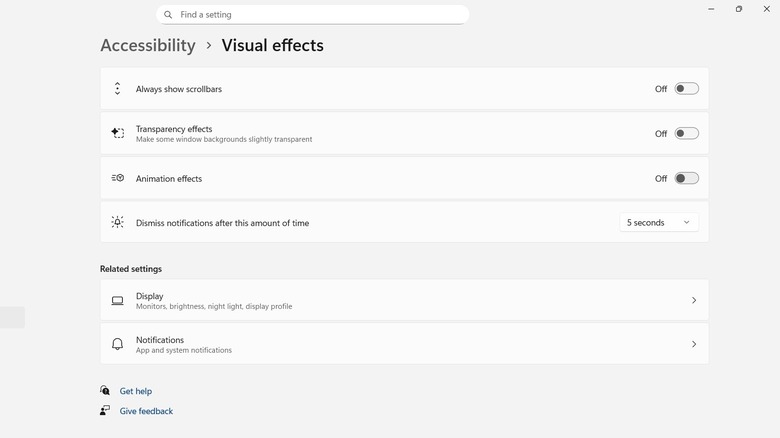
Open the Settings app.
-
Go to Accessibility > Visual Effects.
-
Toggle off Transparency effects and Animation effects.
Startup Apps
Startup apps is a feature that automatically loads your essential tools right after your Windows PC boots up. It's great to have productivity apps like Slack, Docker, OneNote, or Notion ready when you start using your computer instead of launching them manually. This is very convenient, especially if you need real-time updates from them.
You can add apps to the startup list manually by placing them in the Startup folder. Some apps add themselves automatically once you install them. If too many apps are starting up at once, your computer can take longer to finish the startup process. Furthermore, the apps can affect performance if they're using a lot of RAM and CPU from the beginning.
Luckily, Windows gives you control over which apps launch at startup. Here's how you can disable unnecessary startup apps:
-
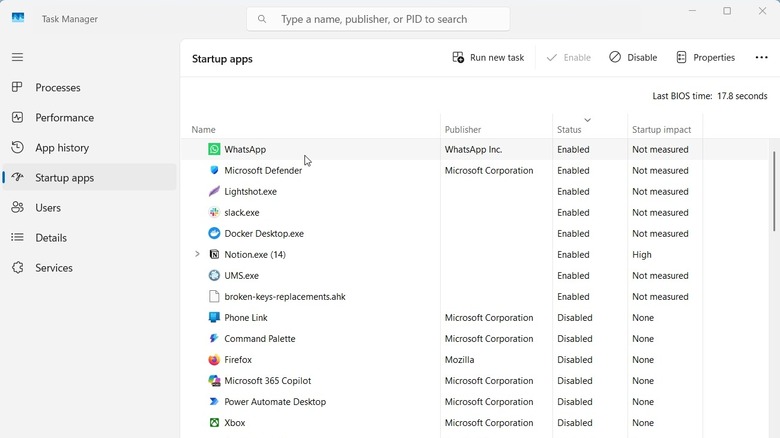
Right-click the Start button.
-
Click Task Manager.
-
Select the Startup app tab.
-
Click the app you want to disable.
-
Click the Disable button.
Background Apps
Windows allows certain apps to run in the background so they can perform useful tasks when you're not actively using them. This is how apps send you notifications, sync data, and update themselves. It's more convenient than remembering to trigger these actions by yourself. But if you have too many apps running in the background, it can turn this convenient feature into a resource-hogging nightmare.
Fortunately, you can prevent individual apps from running in the background. Here's how to do that:
-
Open the Settings app.
-
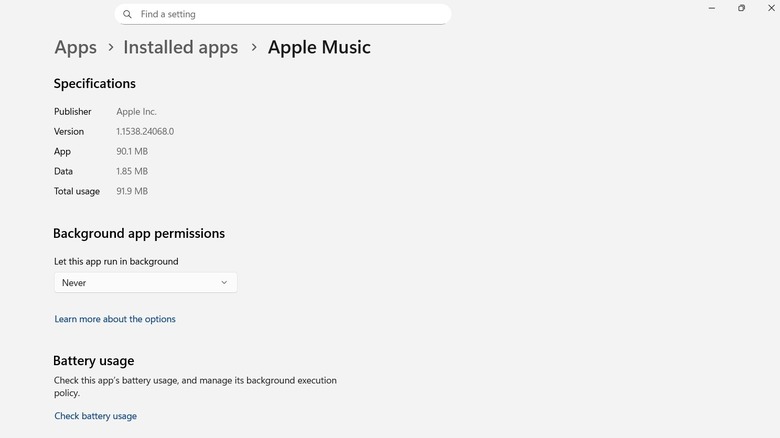
Go to Apps > Installed Apps.
-
Click the three-dot icon next to an app.
-
Select Advanced options.
-
Set the dropdown under Background app permissions to "Never."
Keep in mind that Advanced options will only appear if you downloaded the app from the Microsoft Store. If you got it elsewhere, you will have to check its settings or the Startup apps list to ensure it's not running when you don't need it.
Windows Update
Even with OneDrive disabled, you can still notice a dip in system and network performance at times. If this happens right around the time Microsoft releases an update, it could be that Windows Update is doing its thing in the background. The time it takes for the lag to stop depends on the kind of update it is, with feature updates taking longer since they add new features and performance improvements.
You can block Windows Update by tweaking the registry, but it's not recommended since these updates can be critical to performance and security. Instead, let your computer sit idle so it can finish downloading them. Afterward, restart it so it installs the updates, as well as finish some post-update configurations before you use it again.
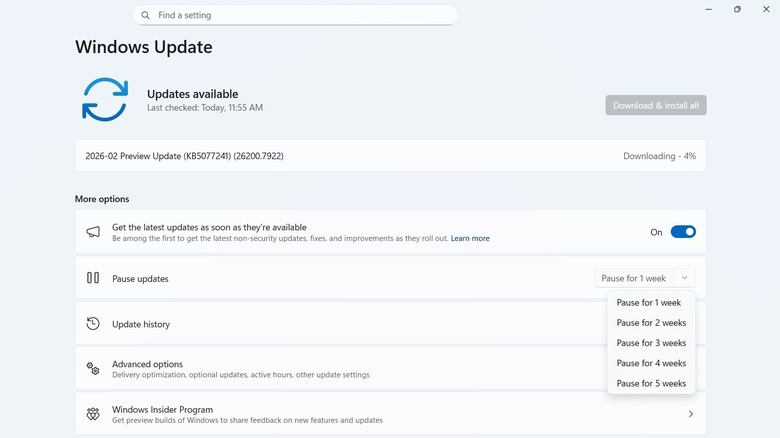
You can, however, temporarily pause the update between one and five weeks if it's being particularly disruptive. It will automatically resume after the set period has ended (you can keep extending it as needed). Here's how you can do that:
-
Open the Settings app.
-
Select Windows Update.
-
Click the dropdown arrow next to Pause Updates.
-
Select the length of time you want to pause updates for.