5 Essential Windows 11 Settings You Should Change Immediately
In October 2025, Microsoft officially ended support for Windows 10. This means your computer will stop receiving software updates, security fixes, and even technical support moving forward. To make sure your PC still runs smoothly and stays protected from malware, Microsoft encourages users to migrate to Windows 11. Not only does it provide continuous support, but it also offers improvements like new Windows 11 AI features, Android and iOS integration via Phone Link, and better security.
But the thing is, Windows 11 isn't automatically optimized for your needs right out of the box. Some of the default settings can slow down your PC's performance, while other settings are simply unnecessary and can even make things inconvenient for you. Thankfully, like its predecessors, Windows 11 is easy to customize and gives you control over what you want and don't want to use. If you've just installed Windows 11 and are looking to fine-tune your computer, here are five of the settings you might want to change.
Turn off Search the web results in the Start menu
The Windows Start menu has significantly evolved throughout the years, integrating new handy features like pinned apps, recent files, and smart recommendations. But not every change in the Start menu is actually helpful. Some additions — like the "Search the web" results — just clutter the space, especially since most people use the Start menu to look for local files and apps, not search the web. The good news is that you can turn it off, though it isn't as easy as going into Settings. Plus, there's a different way of disabling the "Search the web" results in the Start menu when you're on Windows Home versus Windows Pro.
To remove the web results in the Start Menu on your Windows Home, here's what you need to do:
- Launch Registry Editor from the Start Menu.
- Click Yes when prompted.
- Under Computer, expand the folder HKEY_CURRENT_USER.
- Open the Software folder.
- Go to Policies.
- Select Microsoft.
- Double-click on Windows.
- Right-click an empty space in the right-hand panel.
- Click on New.
- Choose Key.
- Name the Key as Explorer.
- Open the Explorer folder.
- Go to the right side panel.
- Right-click on an empty space again.
- Select New.
- Go to DWORD (32-bit) Value.
- Name it "DisableSearchBoxSuggestions."
- Double-click on DisableSearchBoxSuggestions to open it.
- Change the Value data from 0 to 1.
- Hit OK to save the change.
- Reboot your computer.
From here, when you try using the search bar in the Start Menu, only your local files and apps will show up in the results. If you're on Windows Pro and Enterprise, there's a quicker workaround to turn off web results from the Start Menu. Go to "Edit group policy" in the Start Menu and open Administrative Templates under Computer Configuration. Double-click on Windows Components, and then Search. Open "Do not allow web search" and set it to Enabled. Do the same for "Don't search the web or display web results in Search." Finally, restart your PC to apply the changes.
Customize the apps and position of the taskbar and Start Menu
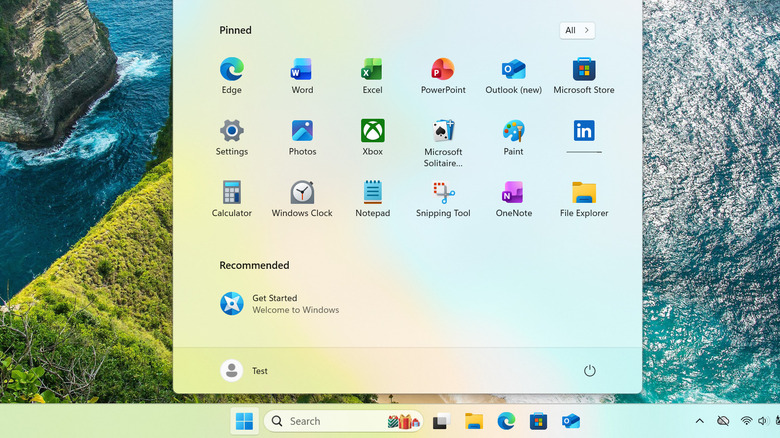
Windows 11 did a bunch of redesigns on the taskbar and Start Menu. Probably the most obvious change is the centered taskbar that resembles the Dock in macOS. The Start Menu now also comes with pinned apps, some of which aren't even installed on your computer. If you're one of those people who aren't a fan of the centered taskbar or the default pinned apps in the Start Menu, you can change these settings in Windows 11.
You can customize the taskbar in a variety of ways. To hide the search box, follow these steps:
- Right-click on the taskbar.
- Select Taskbar settings.
- Under Taskbar items, set Search to Hide instead of Search box. This removes the search box from the taskbar. You can also toggle off Task view from the same settings.
- Expand Taskbar behaviors.
- Change Taskbar alignment from Center to Left.
- Right-click on the app you want to delete from the taskbar.
- Select Unpin from taskbar.
- In the Start Menu, search for the app you want to pin to the taskbar.
- Right-click on the search result that pops up.
- Select Pin to taskbar.
To edit the Start Menu, here's what you need to do:
- Launch the Start Menu.
- Right-click on the apps you want to take off from the Pinned section.
- Choose Unpin from Start.
- In the search bar, type the app you prefer to add to the Start Menu.
- Right-click on the app icon that appears.
- Go to Pin to Start.
Uninstall unnecessary apps
Like most other operating systems out there, Windows 11 comes pre-installed with loads of apps from both Microsoft itself and the computer manufacturer. Some of these are essential Windows apps worth keeping, such as Clipchamp if you're into video editing and Edge if you don't want to install another browser (after all, Edge is now far better than the previous native browser, Internet Explorer). A few OEM apps can also be quite handy. For instance, Lenovo Vantage lets you set a battery threshold for your laptop, while HP Audio Center helps you enhance your computer's sound.
However, not every single one of these preloaded apps will actually be useful to you. Most of them might just be added clutter. So to save space, you're better off uninstalling the apps you find unnecessary. To do so, follow this guide:
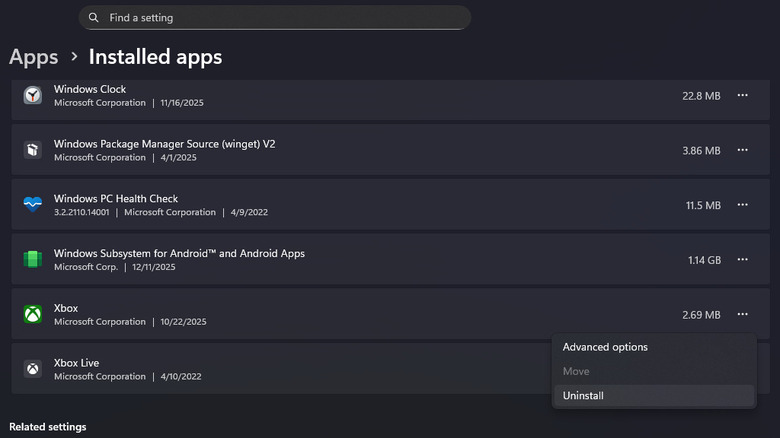
- Go into Settings.
- Select Apps.
- Click Installed apps.
- To uninstall Microsoft apps, type 'Microsoft' in the search bar.
- To uninstall OEM apps, search for your computer manufacturer (e.g., Lenovo for Lenovo computers/laptops, Dell for Dell computers/laptops).
- Browse through the list of apps to find the ones you don't want to keep. You can even opt to uninstall all the OEM apps as Windows will still run fine without them.
- Click the three dots next to the app you want to remove.
- Choose Uninstall from the menu.
The app should be uninstalled from the system after a couple of seconds. If the app you want to delete isn't in the Settings, though, you can try looking for it in the Control Panel instead.
Switch to your preferred default apps
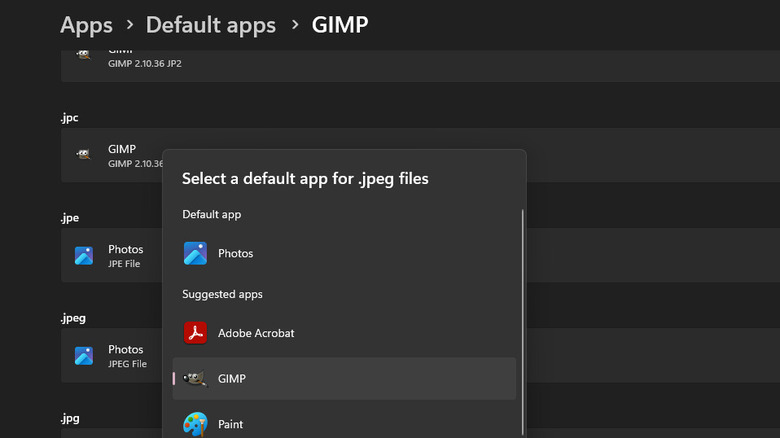
By default, Windows 11 uses Microsoft apps to open files. For instance, TXT files open in Notepad, JPGs in Photos, and DOCs in Word. While this generally works for some users, there are certain file types that are better used with third-party apps. You might want to access PDFs in Adobe Acrobat instead of Edge, or play MP4s in VLC instead of the Media Player.
The good news is that Windows 11's default apps aren't really set in stone. If you prefer to use a different app for your files, you can easily set them as the new default. Simply install the app on your Windows PC as you normally do. Then, change the default app from the Settings. Here's how:
- Launch Settings.
- Go to Apps.
- Select Default Apps.
- Go to the app you want to set as default.
- Find the file type that you want the app to open. For instance, for Chrome, you'll usually use WEBP and HTML.
- Click the arrow next to the file type.
- Choose the app from the suggested options.
- Hit Set default.
Another way to switch to your preferred default app in Windows 11 is by going to the file itself. Open File Explorer and navigate to the file. Then, right-click on it, select Open with, and click on Choose another app. Pick the new app you want to use and hit Always to make it the new default app for that file type.
Adjust the privacy settings
As you use your Windows PC, Microsoft can track your data and activities and use them in different ways. For one, there's the advertising ID. This unique user identifier is what installed apps rely on to deliver ads that are more relevant to you based on your interests. Microsoft also works with your diagnostic data, account information, and other collected data like your web activity and purchase history to provide you with personalized offers. These offers include relevant product ads, feature recommendations, and usage tips. To disable both of these settings, do the following:
- Open Settings.
- Navigate to Privacy & security.
- Click on Recommendations & offers.
- Toggle off Advertising ID and Personalized offers.
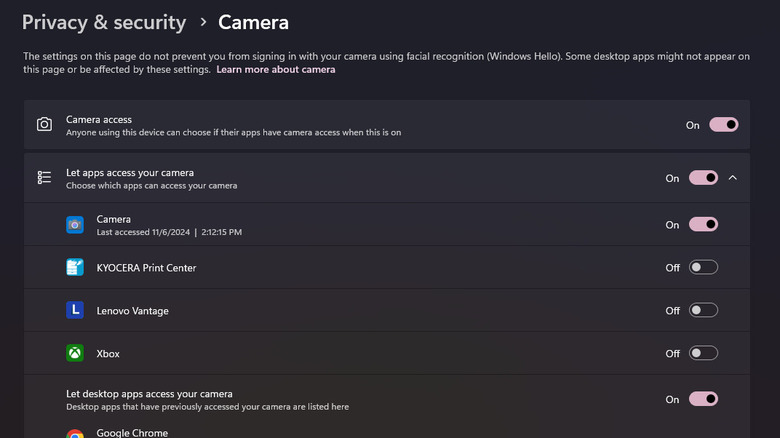
Keep in mind, though, that turning them off won't remove the ads and suggestions you get on Windows. They'll just become more generic instead of specific to you. Another privacy setting you can consider changing is app permissions. Some of your desktop apps can use features like your camera, location, and even contacts to perform certain actions. But you can choose not to give them access to these features if you don't find it necessary. For instance, you can remove a game's access to your location, or a messaging app's access to your camera if you don't really need those features to use the app. Here's a quick guide to set this up:
- In Settings, select Privacy & security.
- Under App permissions, choose a permission you want to configure.
- To turn off access for individual apps, just click on the toggle next to those apps.
- To prevent all your apps from using that permission, toggle off "Let apps access your [permission]" instead.
You can then exit Settings, and your changes will automatically be saved.