5 Cool New Features Samsung Recently Added To Your Galaxy Phone
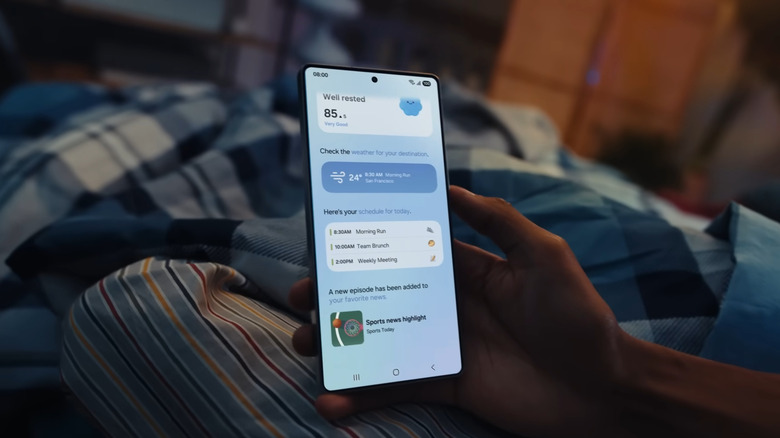
The year 2025 was quite eventful for Galaxy owners. Just within six months of each other, Samsung released two major operating system updates to its One UI platform. One UI 7 arrived in early April, while One UI 8 rolled out in mid-September. These back-to-back updates meant a host of fresh new features to try. Some of the more exciting ones included call captions, reminder templates, and a lock screen clock that changes shape based on the background. The Now Bar, Galaxy S25's version of the Dynamic Island on iPhones, is another definite highlight, giving you quick and easy access to your active apps.
If you think these are cool, wait until you hear that Samsung is actually just getting started. For users who joined the One UI Beta Program, Samsung has recently added a new set of features to your Galaxy phone via its most recent One UI 8.5 update. This update is currently in beta testing, though, so nothing is official or available to the general public yet. But you're free to sign up for the program anytime. After doing so, here are five of the new Galaxy features you should check out.
Record only a portion of your screen
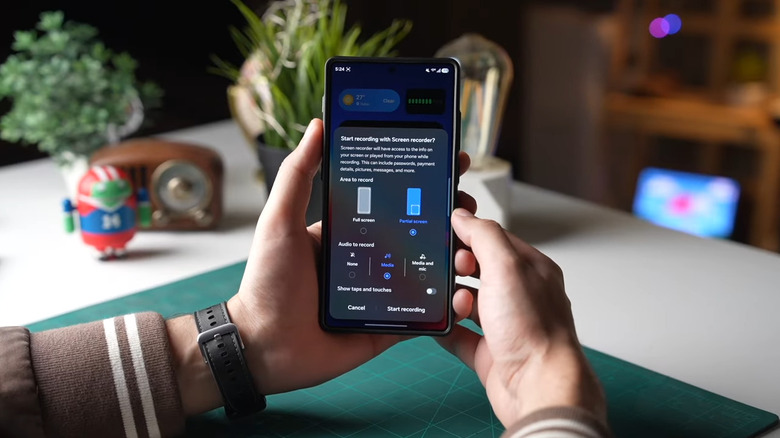
Every time you're screen recording an app tutorial on your Galaxy phone, you'd usually need to crop out the status and navigation bars afterward. This protects your privacy and makes the recording look less cluttered. You might also end up cropping a screen recording whenever you only want a specific portion of it — maybe a GIF your friend sent or an error popup from a website.
On One UI 8.5, you don't have to go through the extra step of editing the file yourself. Your Galaxy phone now supports partial screen recording, where you can manually select which areas to capture. Using partial screen recording on One UI 8.5 is as easy as the old screen recorder. Here's how:
- Go to your Quick Settings.
- Add the Screen Recorder control if it isn't already there.
- Tap Screen Recorder.
- On the panel that pops up, select Partial screen.
- You can also choose your preferred audio recording setting — media, media and microphone, or none — and whether to include taps and touches.
- Hit Start recording.
- Resize the rectangle as you see fit. A magnifier will appear on the upper-left to help you adjust the corners accurately.
- Grab the white circular handle in the top-middle of the rectangle to move it around.
- Press Record.
You can now proceed with screen recording as usual. If you need to pause it, simply tap on the pause icon at the bottom of the rectangle. Once you're done, hit the stop icon. Your screen recording will be saved directly in your Gallery.
Customize your Quick Settings panel
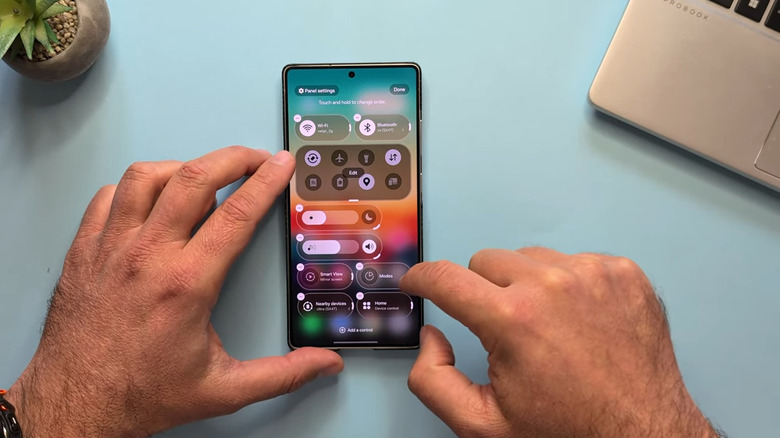
The Quick Settings panel on your Galaxy phone is probably the one thing you always open multiple times a day. And while it's already customizable to an extent, One UI 8.5 gives you even more control over how it should look to better optimize your Samsung Galaxy phone. This update now lets you resize the tiles, drag them anywhere on the screen, and add or remove tiles outside of the preset Quick Toggles group.
When it comes to resizing the tiles, most of the controls are locked into two options: icon-only and pill-shaped (icon with a label). There are a few exceptions, though. For instance, the brightness and volume sliders can actually be stretched longer and oriented either horizontally or vertically. The music player and Quick Toggles group can also be expanded to an even bigger size, covering nearly half the panel. To edit how your Quick Settings panel looks, here's what you need to do:
- Swipe down from the top of the screen to open the Quick Settings panel.
- Select the pencil icon at the top.
- To make the tile smaller or bigger, drag its resize handle located on the right or bottom.
- To move a tile, drag and drop it to your desired position.
- To remove a tile, press the minus icon in the top-left corner.
- To add a new tile, hit "Add a control" in the bottom, long-press on the setting you want, and drop it on the panel.
- Once you're happy with how the items are organized, just hit Done in the upper-right corner and you're good to go.
Edit images with the enhanced Photo Assist menu
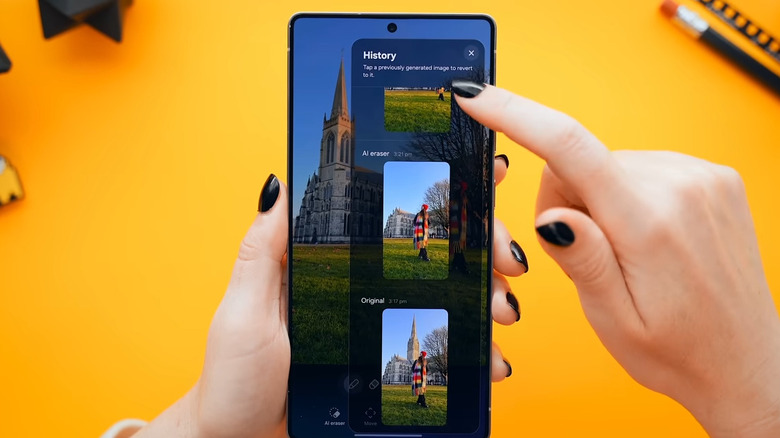
Samsung Galaxy's Gallery app has been integrated with AI photo editing features for a while now. But they weren't as intuitive to use until One UI 8.5. The update introduced a cleaner design and an easily accessible history to help you get the most out of this feature.
To use the new and improved Photo Assist on your Galaxy phone, just open a picture you want to edit in the Gallery app and press the sparkle icon at the bottom. This will redirect you to the Photo Assist screen with the options at the bottom. You can then proceed with editing the image as you wish. To remove an object from the photo:
- Select AI eraser.
- Tap or draw a circle around the object you want to remove.
- Hit Erase to proceed.
To relocate an object to a different part of the image:
- Go to Move.
- Tap, draw around, or long-press on the specific object.
- Drag and drop it to your position of choice.
- Resize the object as needed and once you're happy with where it is, press Generate.
To add new objects to the picture:
- Click on Create.
- Tap the pen tool.
- Pick a color and line thickness.
- Sketch what you want to appear in the photo and select Generate.
To edit photos with people in them:
- Choose Style.
- Press any of the preset styles (Comic, 3D Cartoon, Watercolor, or Sketch).
- Click on Generate.
At any point during your editing session, you can press the "Keep editing" option to add, remove, or move objects. You can quickly go back to a previous edit by tapping the history icon in the upper-right corner.
Hide your private photos and videos in a private album
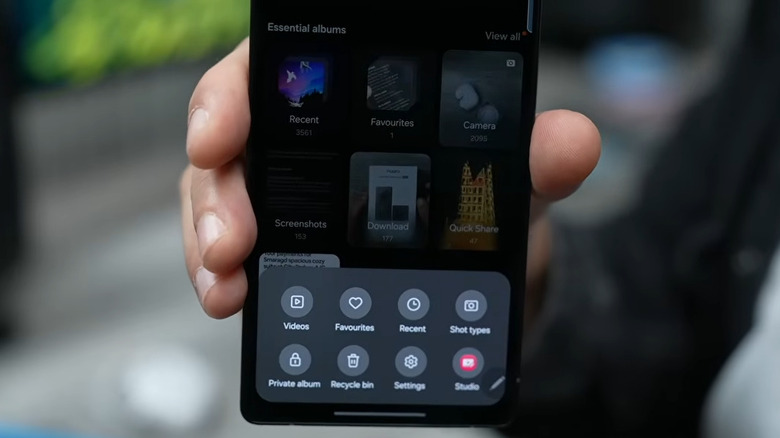
We all have personal photos and videos that we don't want others to see. Unfortunately, even if they can't go through your lock screen security, there will be instances when someone else might have access to your unlocked phone. Maybe you let them borrow it to play games or make a quick call. This puts you at risk of a privacy breach as they now have the chance to open up your gallery, whether intentionally or by accident. To prevent this, you'd usually hop on the Play Store to look for a third-party gallery app that offers a hidden album feature.
But with One UI 8.5, though, you no longer have to rely on free Android apps just to keep your private media out of sight. Your native Gallery app now comes with a private album, where you can store photos and videos away from prying eyes. Follow these steps to populate and use your Galaxy's new private album:
- Open your Gallery app.
- Find and select all the photos and videos you want to add to the private album.
- Tap More at the bottom.
- From the menu, choose Move to private album.
- Confirm by pressing Move.
Anything you transfer will automatically be hidden from your main library and can only be viewed from the private album. To do so, go to your Gallery, press Menu, and choose Private album. After you unlock it with your fingerprint, face ID, or PIN, it will show you all your private photos and videos. You can also move any of the hidden photos and videos back to the main library, if you no longer want them hidden.
Handle voicemails directly on your phone
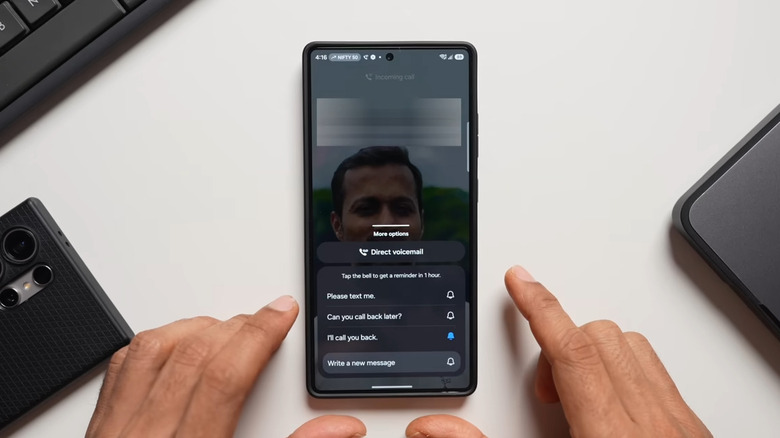
Voicemails are normally handled by carriers. Just set it up, and whenever someone leaves you a voicemail, you can listen to it by pressing and holding 1 on your dialer until it plays the message. This seems easy enough, but the downside is you don't have much control over how the voicemail operates and how to efficiently manage your messages.
Thankfully, One UI 8.5 added a Direct Voicemail feature on your Samsung Galaxy phone. It allows you to automatically send a call to voicemail after a set time or manually send it to voicemail from the incoming call screen. The Direct Voicemail feature also records the voicemails straight to your phone, making it easier to access your messages without needing to dial anything. To activate Direct Voicemail on your Galaxy phone, use this guide:
- Launch the Phone app.
- Tap the More icon in the upper-right corner.
- In the pop-up, hit Settings.
- Select Direct voicemail and toggle it on.
- When prompted, tap Agree to proceed.
- To automatically redirect your calls to voicemail after a few seconds:
- Go to Auto send to voicemail.
- Enable it.
- Choose a preset time, or Custom time to create your own.
- To see a transcription of the voicemail as the caller is speaking:
- Hit Transcript assist.
- Under Call recordings, turn on Auto transcribe recorded calls.
Now, when you receive a call, you can swipe up on the More options at the bottom of the screen and press Direct voicemail to manually redirect the caller to voicemail. If you want to check your voicemails, go to Recents on your Phone app and look for the entry with a blue phone icon. Then, press the mic to play the voicemail.