5 USB Port Tips And Tricks To Take Full Advantage Of Your USB Sticks
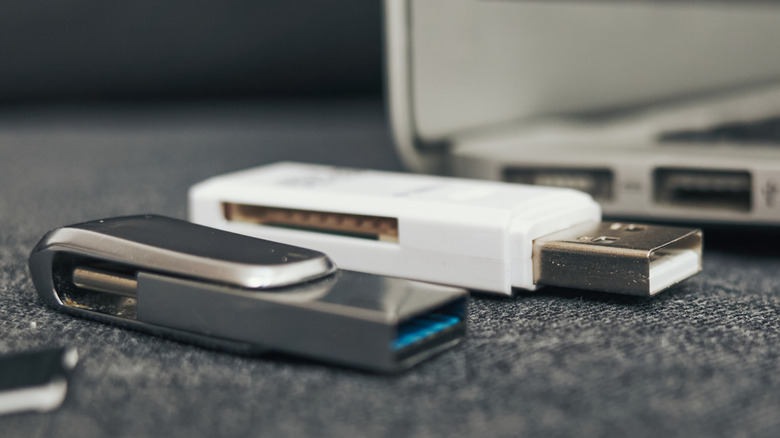
USB sticks and flash drives seem simple. You plug them into a USB port, transfer data, and unplug them once you are done. But most people don't realize that the USB ports you use are just as important. That's why the same drive delivers different results on different computers. On one PC, you may see faster file transfer and far fewer disconnections, while on another, the exact same flash drive may have lower file transfer speeds and face connectivity issues. And in most cases, it's not the drive to blame, but how the system manages the USB ports.
Modern PCs include several USB port-related settings that most users don't know about. Some prioritize performance, others boost transfer speed, while a few conserve power. The best part is that you don't need advanced tools or access to the system BIOS to make these changes, as most of them are available on Windows. And when you combine these with a few hardware-related tricks, you will immediately notice better performance, expanded connectivity, and improved reliability from the same USB stick.
Plug devices into rear USB ports on your PC
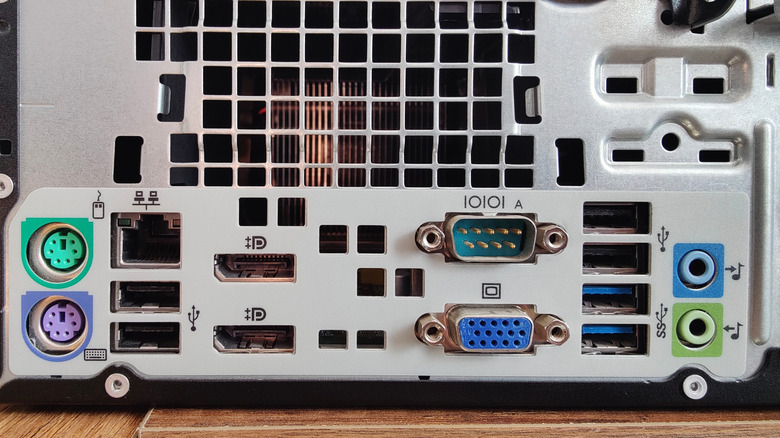
If you have a desktop, you must have noticed that the front and back of the computer case house different USB ports. While connecting to the front ports is easier, the ones on the back are actually better for performance and stability. That's because, in most computers, the back USB ports are directly attached to the motherboard, while those on the front are connected using cables.
This doesn't impact low-bandwidth devices like keyboards or mice, but for high-speed flash drives, the effects on transfer speed may be noticeable. For instance, if your flash drive supports transfer speeds of 80 MB/s to 150 MB/s, connecting it to the front USB port may cut that in half if the front port is USB 2.0. In case both ports have the same standard, the performance will be similar.
If you often experience issues related to connectivity or transfer speed, plugging the flash drive into the rear USB port could do the trick. The front ports can be reserved for headphones, microphones, mice, keyboards, or charging cables. Keep in mind that this applies to desktops, not laptops.
Disable USB power-saving features

Modern Windows iterations come with a wide array of power-saving features, one of which automatically suspends inactive devices. This is controlled by the USB selective suspend setting. The idea behind it is simple: many devices don't need a constant power supply, and suspending them allows the system to conserve power. It's beneficial for laptops, but there's also a downside to the feature.
Often, Windows incorrectly assumes a device is idle when it's not. For instance, during file transfers, the feature may kick in, briefly interrupting the operation. This increases the transfer time, and, in rare cases, can even cause file corruption. So, for smoother and more consistent transfers, disable the USB selective suspend feature.
To do that, open the Device Manager, expand the Universal Serial Bus controllers entry, right-click on the port, and select Properties. Now, navigate to the Power Management tab, and uncheck the option "Allow the computer to turn off this device to save power." This doesn't make your USB stick faster, but it may stabilize file transfers and minimize the likelihood of slowdowns.
Speed up your old PC with a USB stick
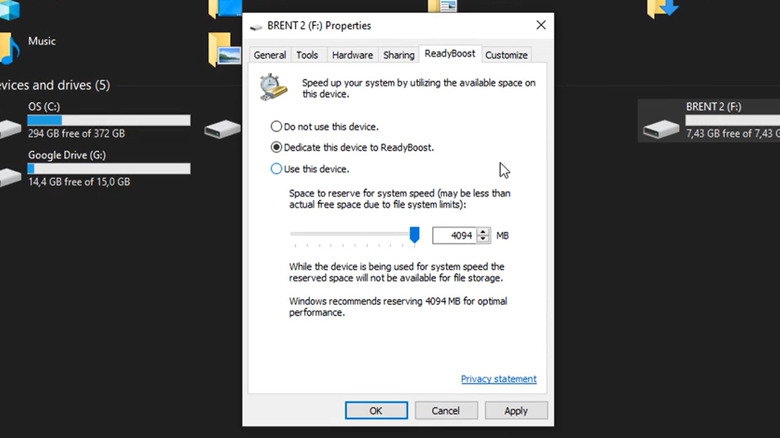
A flash drive can speed up an old computer using ReadyBoost, a native Windows feature. ReadyBoost allows a flash drive to act as cache on systems with low RAM and slow storage drives. Once the feature is set up, your PC uses the flash drive to temporarily store files you access frequently, and since accessing files from it is faster than a traditional storage drive, the system performance improves. Any spare flash drive with a few gigabytes of free space can be used for this.
To set up ReadyBoost, connect the flash drive to the PC, open File Explorer, right-click on the flash drive, and select Properties. Go to the ReadyBoost tab, pick the Use this device option, then drag the slider to set the space you want to reserve for ReadyBoost on the USB stick.
Keep in mind that ReadyBoost can only be used to speed up old computers. Most modern PCs already ship with SSDs as the storage drive, which are fast enough and render ReadyBoost ineffective. As a result, the feature has been removed from some Windows 11 versions. And even for Windows 10, ReadyBoost can only be enabled on slow systems, particularly those with low RAM and an HDD.
Use a powered USB hub for enhanced reliability
When it comes to USB hubs, many models draw power from the system's USB port and then relay it to the connected devices. While it's cost-effective, the drawback of using a non-powered USB hub is that it's not as reliable and can even result in unstable transfers. A powered USB hub, on the other hand, has its own dedicated adapter that delivers constant power to all connected devices. It's ideal for gadgets with higher power requirements, like storage drives and multimedia devices. Since it has its own power adapter, connected equipment rarely loses power, improving the setup's reliability and providing stable transfers even with multiple flash drives connected simultaneously.
Apart from that, powered USB hubs have more ports, as many as 12 in some models. That's because they don't draw power from the computer's USB port. With their own adapter, they can power more devices. So, those additional ports will let you add more devices to your PC.
Enable Better performance mode for USB sticks
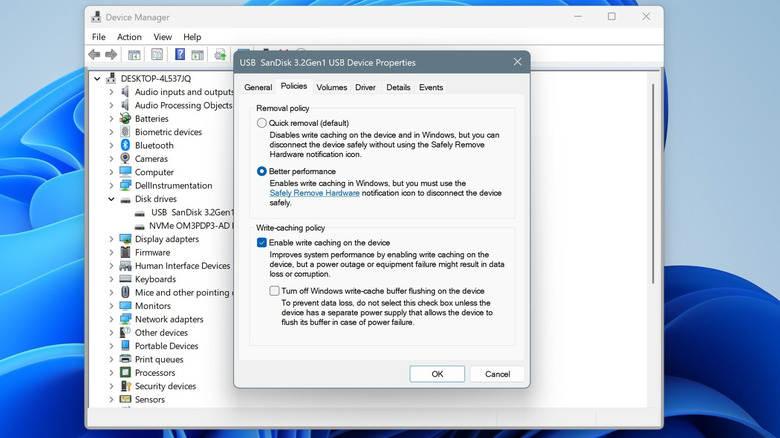
When it comes to storage devices like USB sticks, your PC prioritizes safety and stability over performance to prevent corruption and loss of data. But there's a built-in setting, write caching, that shifts focus to performance, significantly improving transfer speeds for many flash drives. With write caching, Windows first temporarily stores data in RAM memory, and then writes it to the drive. This way, the data is written in large chunks instead of smaller pieces.
To turn on write caching for the USB stick, open Device Manager, expand Disk drives, right-click on the flash drive, and select Properties. Go to the Policies tab, select Better performance, then tick the checkbox for Enable write caching on device and save the changes.
After turning it on, make sure to never abruptly unplug the flash drive. Always eject it first via the system tray, and only then physically remove the device. Otherwise, you run the risk of file corruption and data loss. But for the performance boost you are getting, the trade-off of an added step isn't that bad.