5 Google Maps Features You've Been Missing Out On
While there are plenty of free Google Maps alternatives you can find these days, many still prefer the genuine article, and for good reason. It offers reliable turn-by-turn guides both online and offline, shows real-time traffic conditions, and comes with quick search menus for places like hotels, restaurants, and gas stations. Most users simply see it as a navigation tool, though. All they do on Maps is look up their destination, follow the directions, and exit the app.
But beyond this basic and familiar functionality, Google Maps actually includes a handful of nifty features you might not realize exist. These include tools for customizing your map, editing how you navigate, and even making sure you get to your destination on time.
They're tucked away from the main menu, and in some cases, are exclusive to certain devices, so you could easily miss them. But that doesn't mean they're not worth exploring. Here are five of Google Maps' little known features you should check out today.
Make your must-visit places glanceable with emojis
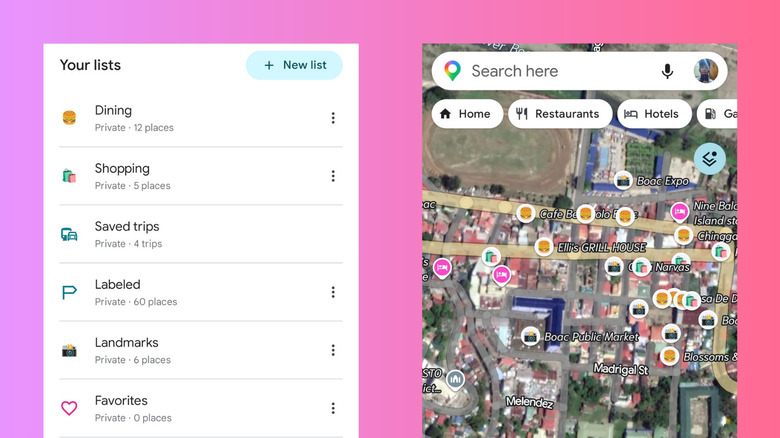
If you've been traveling out of town a lot, you're probably already familiar with Google Maps lists. It's where you add all the places you want to visit for the first time or as a repeat customer. By default, all the locations on the list will appear with a bookmark icon on the map, regardless of what type of establishment or landmark they are. This quickly becomes confusing when you just want to have a quick cup of coffee nearby, but can't tell which of your saved places are coffee shops without going over them one by one. To solve this, you can have Google Maps display emojis for custom categories instead. Follow these steps to do so:
- Launch Google Maps.
- Head over to You at the bottom.
- Open an existing list. Or create one by pressing New list.
- If it's an existing list, hit Edit.
- Tap Choose icon.
- Pick the emoji you want to appear on Google Maps for that list. To make it easier to spot, go with one that's intuitive and easy to remember, like a croissant for a breakfast place or a shopping bag for a shopping mall.
- Press Save in the top-right corner.
- Rinse and repeat for all your other lists.
Now, when you open your map, you'll see the different emojis you assigned to each list. Tap on one to view the location details and get directions.
Avoid the stairs
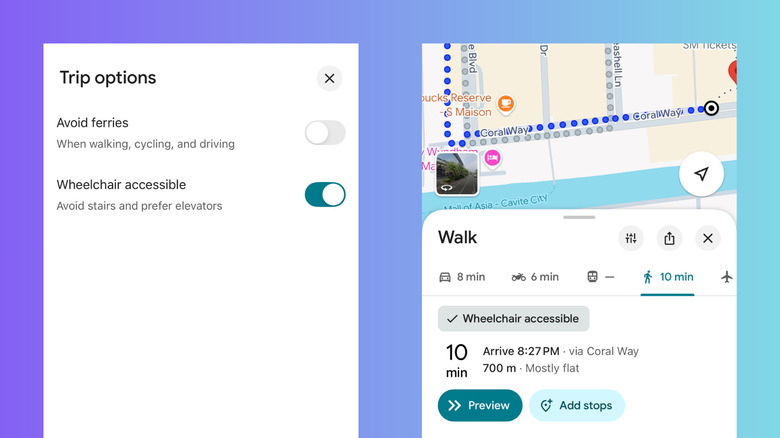
Unless you're trying to get your steps in, you probably despise stairs with a passion. They're one of the things that make traveling harder than necessary, especially when you need to carry heavy bags or are in a rush. With Google Maps, though, stairs become a non-issue. If you're out walking and would rather avoid them, you can simply turn on a cool Google Maps setting. This removes stairs from the equation and redirects you to where the elevators are instead. Other than saving you time and effort, this hidden Google Maps feature is especially helpful for elderly tourists, people using wheelchairs, and parents traveling with a stroller. But you can only enable it when you're in the Public transport and Walking options. Here's how:
- In Google Maps, search for your destination.
- Hit Directions.
- Go to the Walking/Train tab.
- Tap the filter icon next to the share icon.
- Toggle on Wheelchair accessible.
Google Maps will then show you a new route that avoids any stairs. Just follow the suggested route as you normally would. Keep in mind that this might be longer than the original recommendation, so be prepared to walk more.
Create a list out of your screenshots
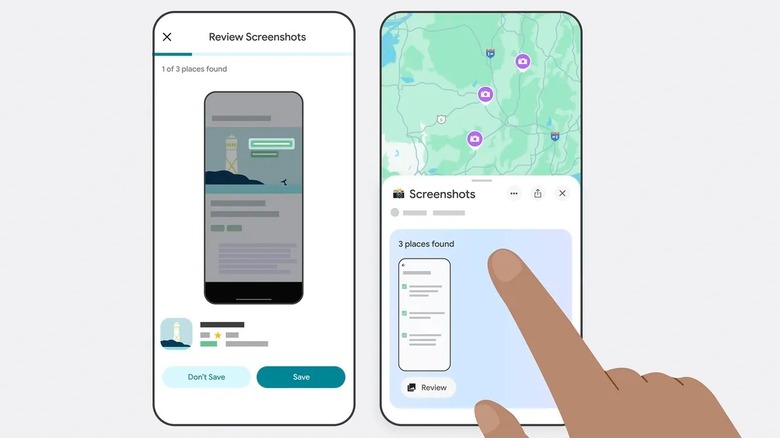
These days, the quickest way to discover new places is through social media. Once you come across a location recommendation from a content creator or a post from the establishments' page, you just snap a screenshot and move on. But these screenshots can take up space on your device. And by the time you're on the hunt for somewhere to eat or party, they're probably buried in your gallery. Well, you can actually put those screenshots to good use. On iPhones and iPads, there's a hidden Google Maps feature that allows you to use your screenshots to save places to a special list and show them on the map. It's one of the new Gemini updates on Google Maps. What Gemini does is read the location's name on the screenshot and look it up for you on Maps. From there, you can save it to the list for easy reference later. Here's how to save places on Google Maps based on your screenshots:
- Go to Google Maps on your Apple device.
- Select the You tab.
- Open the Screenshots list.
- When prompted, hit Allow to let Maps access your gallery.
- Set your photos permissions setting to Limit Access/Don't Allow.
- On the Screenshots list, press Choose screenshots.
- Pick up to 50 screenshots.
- Hit Add.
- Wait for Gemini to finish scanning the photos.
Once done, you can then check whether the scanned locations are accurate. Select Save to save the place to your Screenshots list or Don't Save to dismiss it.
Get reminders for when to leave on time
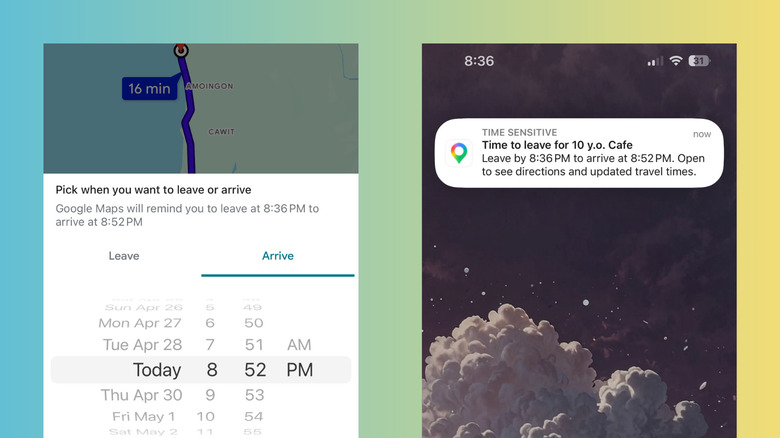
Whether it's a casual meeting with friends or an important dentist's appointment, it's a good habit to arrive at your destination on time. To do so, you'd normally search for your destination on Maps, check the travel time, and estimate when you should leave your location. Then, you'd hop on your reminders app to create a reminder. But you don't really need a separate reminders app. Google Maps has a built-in reminders feature, so you get a notification when it's time to leave. Unfortunately, it's only available on iPhones and iPads. If you're on an Apple device, follow this guide to set a leave reminder on Google Maps:
- Look up your destination in Google Maps on your Apple device.
- Hit Directions.
- Press the More icon (three dots) next to Your location at the top.
- Go to Set a reminder to leave.
- If you know exactly when you want to leave, select the Leave tab.
- If you need to arrive at a certain time instead, head over to the Arrive tab.
- Enter your preferred time.
- Tap Set Reminder to save your settings.
If you don't have Google Maps notifications turned on, you'll be prompted to enable them from your Settings app. You can choose whether or not to display the alert on your Lock Screen, Notification Center, or Banners. At your scheduled departure time, Maps will notify you that it's time to leave for your destination. It'll also mention your estimated arrival time.
Calibrate your location with your camera

There are instances when you're using Google Maps to walk to your destination, but the landmarks on the map don't match what you see in your actual position. In that case, you can try calibrating your location with Lens in Maps. It uses your phone camera to check the surrounding buildings and accurately pinpoint your spot on the map. This, however, only works if the area is available in Street View. Calibrate also doesn't run at night and indoors, so you can only use it outdoors in the daylight. To calibrate your location on Google Maps, here's what you need to do:
- In Google Maps, tap on the blue dot, indicating your current location.
- Choose Calibrate.
- Hit Start.
- Point your rear camera in front of you.
- Start scanning the street signs and buildings right from where you're standing. Don't scan the trees or passersby.
- If you get an error that it can't find your precise location, just hit Try again and move to a more well-lit spot.
As soon as Maps detects and identifies nearby landmarks, you'll automatically be redirected to the map with a message saying your location now has high accuracy. From here, try searching for and navigating to your destination again.