

I Finally Ditched Netflix For Jellyfin, Even On Mobile — Here's How

I've managed to ditch Netflix entirely, if you can believe it. After subscribing during my first week at university to bury my head in some movies and shows while adjusting to being three hours away from anyone I once knew way back in 2013, I have now canceled my subscription. Considering the rising costs of the service and my complete lack of interest in a majority of the output (aside from some comedy specials like "Uncle Stav"), it was time to cut ties.
In fact, the last thing I watched through Netflix was that "GTA 6" 30-minute trailer. My subscription lapsed the day after. Now, I've fully committed to Jellyfin, the open-source media streamer that runs on something as small as the Geekom A8 mini PC. It asks for a little more work than something like Plex, mostly in terms of organization, but it's entirely free.
Birthed out of Emby, another media server that was forked since it ditched open source, Jellyfin has been around since 2018. Now on version 12, there's never been a better time to start using it. I've even managed to get it working on the go, using a really nice alternative app on my phone that gets served over the web with a custom domain. Surprisingly, it's not as hard as it sounds to get going.
Jellyfin hardware considerations
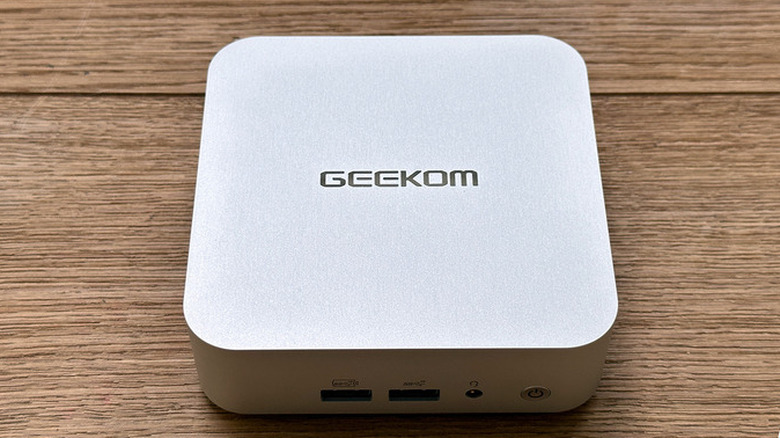
First, let's talk hardware. You can scale hardware for Jellyfin to meet your needs. As it's mostly my partner and me watching ~200 MB files of various cartoons or "The X-Files" on a regular basis, the integrated GPU on the AMD chip in the Geekom A8 mini PC is more than enough to power everything. Even when transcoding to our TV, if I've happened to encode something in a codec that isn't natively supported, it's fairly nimble at converting it into a format the TV app can accept. As I and others have discussed elsewhere, you don't need the biggest PC you can find to power your server.
One aspect that has caused a massive headache in our household is storage. Choices about what has to stay and what we could do without are regular conversations. That said, I do store some of the shows in the cloud through one of the low-key subscriptions I still don't mind paying.
With hardware prices through the roof thanks to AI data centers, buying the right storage has become the most expensive part of running the Jellyfin operation. It's totally an "in the long run" sort of conversation, but it is incredibly annoying that the 5 TB drive I bought in 2021 for around $100 is now $600.
Setting up Jellyfin and Docker
With hardware out of the way, getting Jellyfin up and running is incredibly easy, and mapping out drives for the library is super simple. I'm using Ubuntu Server, but you can totally install Jellyfin on a regular OS like Windows or macOS, as well as the million versions of Linux. In my case, I'm using the incredible Docker, which isolates Jellyfin into its own area on the PC and can be moved elsewhere if needed.
One element that tripped me up when starting is Docker itself. There are some apps that can launch just through a command in the terminal, but I now prefer to use Docker Compose. This uses a YAML file to instruct Docker on exactly how to set up Jellyfin (or any other app), including mapping drives and other options that can get quite messy when dealing with it in the terminal.
The default Compose file provided by Jellyfin is more than enough, but sometimes going in blind can be a pain. What Jellyfin doesn't tell you is how the volumes are mapped out and then into Docker, sort of expecting that you'd already know. Essentially, when you see:
volumes:
-type: bind
   source: /path/to/media
   target: /media
Docker is taking in the host file path, and then creating its own in the container that it'll then use. It's a mirror, so when adding media, you just want to go to where you've set the path in the compose file (/home/user/Videos/jellyfin/movies, for instance). I've provided my commented version of the Compose file here if you want to use it as a template:
services:
  jellyfin:
    image: jellyfin/jellyfin #grabs Jellyfin
    container_name: jellyfin #names Jellyfin
    ports:
      - 8096:8096/tcp #Default Ports
      - 7359:7359/udp
    volumes:
      - /jellyfin/config:/config #Point the directory before the ":" to where you want config & cache stored
      - /jellyfin/cache:/cache
      - type: bind #As it says, binds the path to Docker
        source: /path/to/movies #replace /path/to/movies to the directory where media is stored
        target: /movies
      - type: bind
        source: /path/to/tv
        target: /tv
        read_only: true
      - type: bind
        source: /path/to/other/media
        target: /othermedia
        read_only: true

    restart: 'unless-stopped'
    # Optional - alternative address used for autodiscovery
    environment:
      - JELLYFIN_PublishedServerUrl=http://example.com
    # Optional - may be necessary for docker healthcheck to pass if running in host network mode
    extra_hosts:
      - 'host.docker.internal:host-gateway'
Adding essentials and exploring other Jellyfin benefits
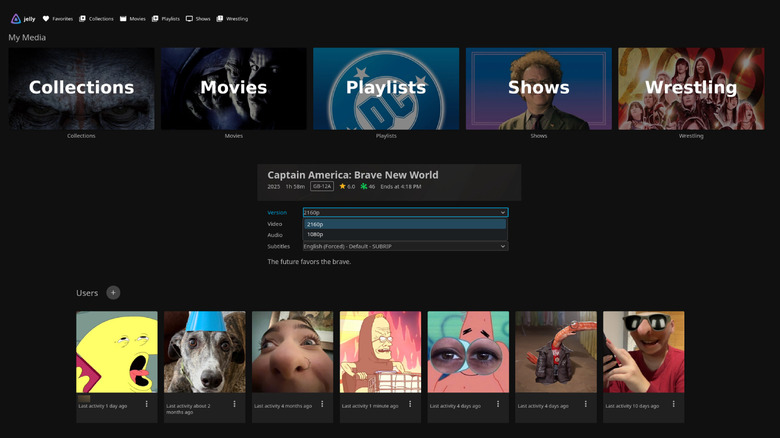
With the Compose file customized and launched with the "docker compose up -d" command, follow the instructions and head to either the server's IP address you set it up on, or if on your current machine, "localhost:[port you assigned]." Follow the on-screen instructions, and you can now add media to your library. Ripping media you already own is a great way to get a head start, and there's plenty of digital sales or options to acquire newer media. Just place them in and then head to the admin panel to scan for new media.
Despite it mostly being in the home, I do have Jellyfin set up to allow for different users. My dad likes what I like, and having movies available that he wouldn't be able to access otherwise (like the Russian film "Stalker") is handy. Much like Netflix, Jellyfin allows different profiles, which includes keeping your place when watching. As I'm in full control, when my dad inevitably forgets the password I set up, I can easily reset it for him without ever having to exit Jellyfin itself.
The TV app will also let you alter the stream's fidelity, separate from the versions I make available in the browser. This can be super handy when streaming 4K content on a connection not sturdy enough, but Jellyfin also allows for versioning. Some films I provide in 4K or 1080p, which the viewer can then switch between. Being in total control of my collection is strangely empowering, especially compared to having to just deal with whatever Netflix can serve up.
Nginx Proxy Manager is your key for going mobile

There are a couple of ways to enable mobile Jellyfin access, and I've settled on a wholly controlled method. I'm running a "headless" instance of Debian 13 on another mini PC (Geekom Air 11) — using SSH (Secure Shell), I control it via my main desktop and have installed Nginx Proxy Manager on it. This integrates with a custom domain to pipe Jellyfin from the local network to the wider web.
There are plenty of options, including the simpler Caddy, but NPM works well for what I need and also provides Let's Encrypt certificates to allow HTTPS to securely cover my connection. Nginx Proxy Manager does require opening ports 80 and 443 on your router, which unfortunately is different for every single router. Ensure you check the manual or a guide online for how to do that.
NPM runs via Docker as well, but as I set up the Debian web server on install like a dope, I had to make some alterations to the Docker Compose file to get it to work. Rather than hosting on ports 80 and 443 internally, I swapped these to 50080 and 50443, with 50081 acting as the admin panel. After this, I had to head to my domain registrar and set up A records that pointed the domain to my public IP address.
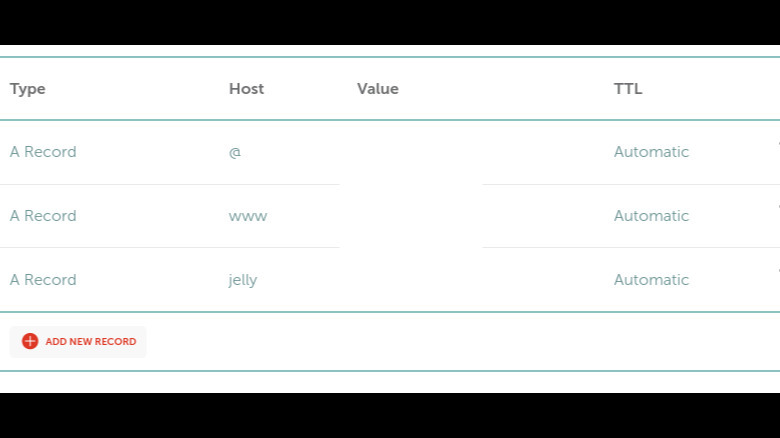
I use Namecheap, but the concept is the same across the board. Find your public IP address, then add A Records to your domain, with two being required: @ and www. It should end up looking like this:
 Joel Loynds
With that set up, you can also add a subdomain, so for Jellyfin, either "jf.example.com" or "jelly.example.com." Add another A Record with your IP, and then head to Nginx Proxy Manager.
Setting up Proxy Manager to access Jellyfin remotely
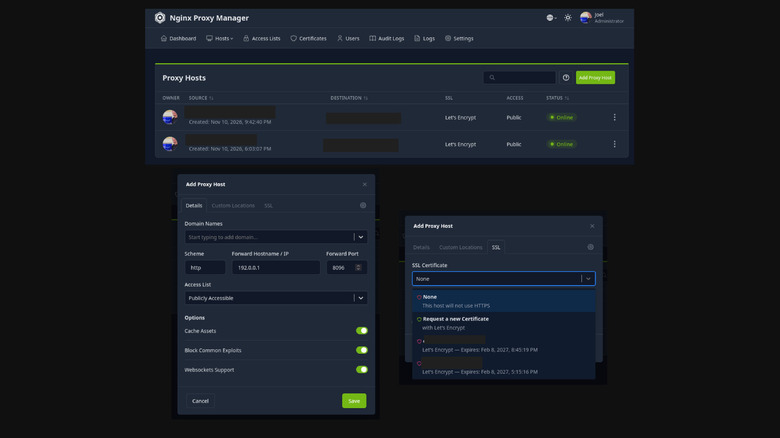
In NPM, choose Add Host under the "Proxy Host" setting in the "Hosts" menu. Input the domain and subdomain you want it to point to. Be sure to turn on Block Common Exploits, Cache Assets, and, particularly, Websockets Support, which Jellyfin requires to work. Add a certificate under the "SSL Certificate" field and hit Accept. If everything went right, it should now be online and pointed at your domain. Check it to ensure that it's all working.
If it is, congratulations! Now, you can log into the official Jellyfin app, or choose the much cleaner Streamyfin. The downside to Streamyfin, despite it bringing baked-in casting and a much prettier UI, is that there's no admin panel available. Instead, you'll have to find that in the official app or the browser UI.
If, for whatever reason, Proxy Manager is giving you a headache, you can always use Cloudflare Tunnels. It's a similar concept, except it sits as a Docker container on your network, piping the local IP of Jellyfin to the wider web under Cloudflare's watch. The instructions to get it working are all included by Cloudflare, but be warned: If you're caught shoving video through a public tunnel without the required paid service, Cloudflare might cut you off. Hence why I've opted to swap over to my own solution for now.