5 Hidden iPad Notes App Tricks You Should Stop Sleeping On
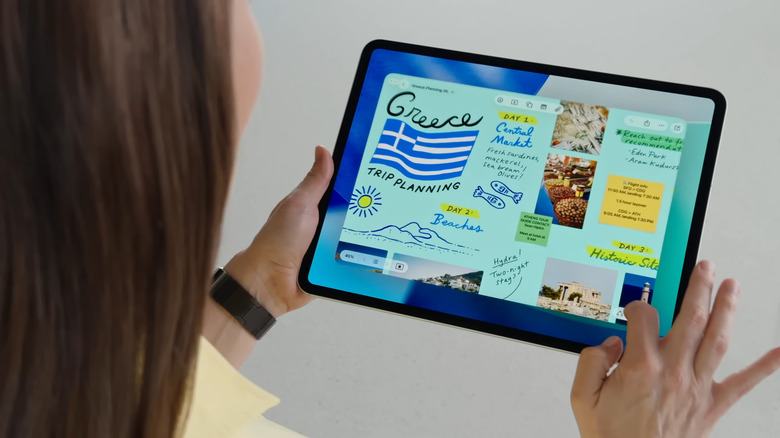
Compared to Evernote and Notion, iPad Notes feels more straightforward to use. It doesn't require setup, decisions to make, or an interface to learn. You just launch the Notes app, write your thoughts and ideas, and move on with your day. This simplicity is exactly what makes the iPad Notes one of the best apps for minimalists who prefer a quick and friction-free note-taking experience.
But while the app does look plain and simple on the surface, it actually offers several nifty functionalities. One of the most popular iPad Notes features is auto-refine handwriting, which polishes your handwritten text to make it more readable. With your Apple Pencil, you can also "refine" shapes by simply holding down on the screen after drawing them. Then, there are the lines and grids templates that make your notes look more like a physical lined/grid notebook.
Other than these well-known features, there's more to iPad Notes than meets the eye. Here are a few more functionalities hidden under the surface.
Add screenshots to notes directly from the full-screen screenshot preview
When you want to insert a screenshot on one of your notes, you typically have to go through quite the process. Take the screenshot, open the specific note in the Notes app, press the attachment icon, select Choose Photo or Video, and finally, tap on the screenshot from the library. But there's actually a much quicker way to go about this with the help of an Apple Pencil. Here's what you need to do:
- Use your Apple Pencil to swipe up from the bottom-left corner of the screen. This opens a full-screen preview of the screenshot.
- Mark up the screenshot with the pen tools as needed.
- To paste the screenshot to a Quick Note:
- Hit the checkmark.
- Choose Save to Quick Note.
- To add the screenshot to a new note:
- Press the share icon at the top.
- Go to Notes.
- (Optional) Type any text to want to include in the note.
- Click Save.
- To insert the screenshot to an existing note:
- Select the share icon.
- Tap on Notes.
- Under Save To, tap on New Note.
- Select the folder where the existing note is.
- Choose the note.
- Press Save.
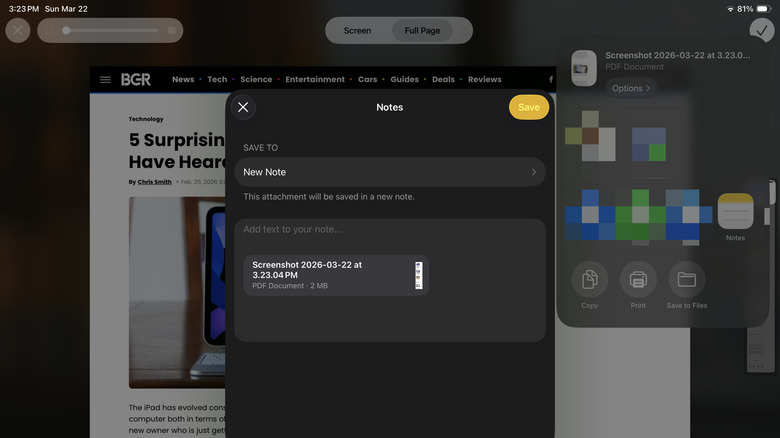
If you're taking a screenshot of a webpage and want to paste an entire article in Notes, you can also do that straight from the full-screen preview. Follow these steps:
- Visit the webpage you want to screenshot.
- Take a screenshot with your Apple Pencil.
- Head over to the Full Page tab.
- Share the screenshot to Notes.
- Tap Save.
The full webpage will be added to your note as a PDF, not a JPEG picture file. Once you have the screenshot in your note, feel free to annotate and edit like you usually would on any attached file.
Create reminders out of your notes
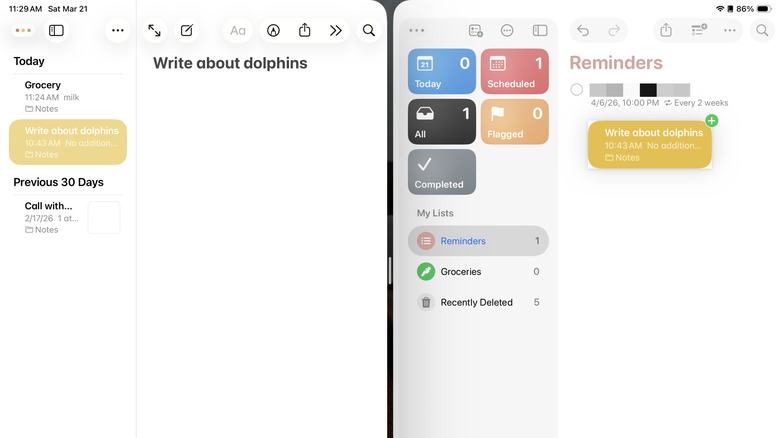
Apple Notes makes it easy to quickly dump ideas for the plans and projects you plan to do. After jotting down your note, you set a reminder to follow through. This setup works to avoid procrastination, but the problem is, once the scheduled date comes, your original note is probably already buried under everything else. The same thing happens when you list down your grocery and shopping items on Notes, then create a reminder in Reminders. Fortunately, Apple Notes integrates seamlessly with other iPad apps, including Reminders. This capability lets you turn your notes into reminders that can take you to the original note. To create reminders out of your notes on iPad, follow this guide:
- Open Notes and Reminders side by side.
- In Reminders, go to Scheduled (if you have a specific date in mind) or All (if you're yet to schedule the task).
- In Notes, find the note you want to create a reminder from.
- Drag and drop the note to the Reminders app.
- To add more details to the reminder:
- Tap on the created reminder.
- Press the info icon.
- Change the date, time, and urgency.
- Fill in the other details as needed.
- Hit the checkmark to save it.
Alternatively, if you have Siri enabled, say "Remind me about this," while the note is opened in the Notes app. Now, when you get the reminder, you will also see a link that redirects you to that specific note. Even after creating a reminder out of the note, though, you can still edit the note as you normally would.
Automatically add notes into folders

Organization in Apple Notes is pretty straightforward — you create folders and move notes into them. The problem is, filing notes away can be a hassle. More often than not, you want to jot your ideas down and be done with it. Thankfully, Smart Folders exist. This Apple Notes feature allows you to move notes into folders without actually dragging and dropping them into the folder or pressing menus. You simply type a tag. Here's how to use Smart Folders in iPad Notes:
- Launch your Notes app.
- Press the Add Folder icon in the left side panel.
- Enter a custom name for your folder.
- Select Make Into Smart Folder.
- Tap on Tags.
- Choose Any Selected Tag.
- Hit the plus sign under Tags.
- Type the tag you want to associate with the smart folder.
- Click on Add.
- Press the checkmark.
- Tap on the checkmark again to save.
Now, whenever you create a new note, just include # and the tag you set (e.g., #idea, #dump, #project1) anywhere in the note. You can also add the tag anywhere in your existing notes. If you already have a folder, though, you can opt to convert it into a Smart Folder:
- Open the existing folder.
- Hit the More icon (three horizontal dots) in the top-right corner of the folder.
- Select Convert to Smart Folder.
- Hit Convert.
The converted folder will then use its name as the tag. For instance, if your folder was "Home", its tag is #Home. If it's "Project Valentine", the tag will be #Project-Valentine. The generated tag is automatically added to the bottom of the notes in that folder. If you'd like to remove a note from any Smart Folder, it's as easy as deleting the tag from that note.
Work faster with iPad Notes gestures
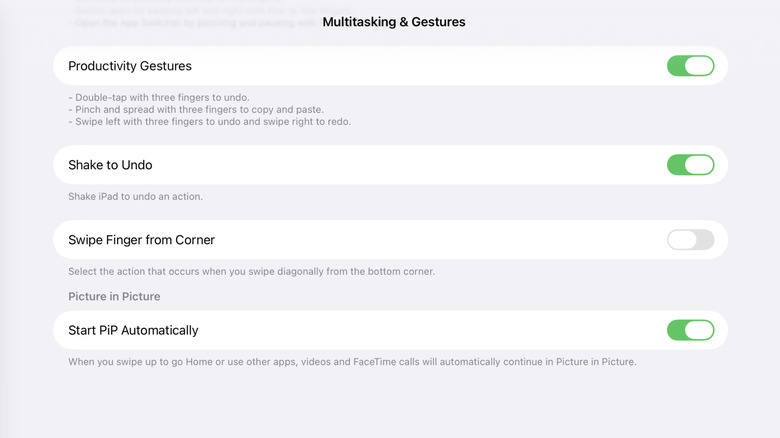
If you've had your iPad for a while, you probably already use gestures for navigation. But did you know that some gestures apply to the iPad Notes too (with Productivity Gestures is enabled in Settings)?
Starting off with the three-finger gestures, you can use three fingers to copy and paste text and undo and redo actions. To copy text, highlight it first, then pinch it as if you're picking it up. To paste it, do a reverse pinch where you spread your three fingers as if dropping the text. This copy-paste trick works across your Apple devices too, meaning you can copy text from your iPhone to your iPad or vice versa. On your iPhone, pinch the selected text to copy it. Then, on your iPad, do the reverse pinch to paste it. Just make sure you're signed into the same Apple account.
To undo and redo actions, swipe left (undo) or swipe right (redo). If you tap three fingers on the screen, you can bring up the copy-paste menu at the top, which also comes with options to cut, copy, paste, undo, and redo actions.
Another iPad Notes gesture — the drag and drop — has to do with iPadOS 26's multitasking features. When you drag a note out of the Notes app and drop it on the screen, it opens in another window, so you can have two notes side by side. You can also drag into the Notes app, not just out of it. When you do so, you're essentially creating a link to the item you dragged over. For instance, you can drag and drop a map location, website link, or mail to a note, and it will take you back to the source app.
Quickly add links to notes by simply opening a Quick Note
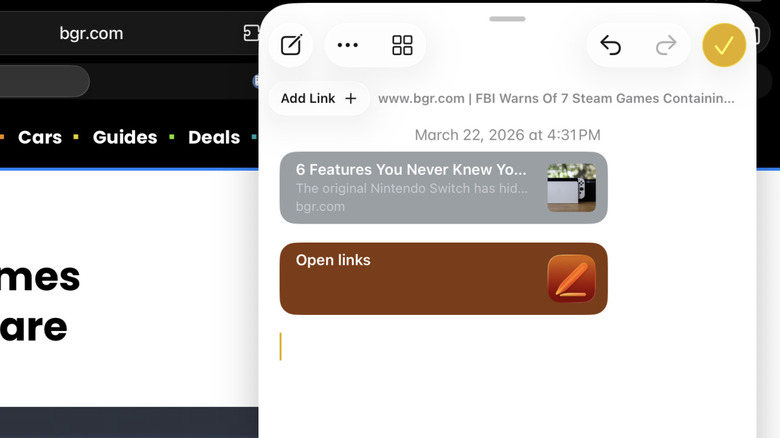
The fastest way to take notes on your iPad is to pull up a Quick Note — hold your Apple Pencil and swipe up from the bottom-right corner. The Quick Note stays on top of your apps, whether they're opened in full-screen or in windowed mode. This makes it easier to write notes while referencing a content from another app. On top of that (pun intended), Quick Notes lets you do one more thing when opened over supported apps: attach links. Yes, you won't have to manually select and copy a link from a different app before pasting it on a note. Quick Notes' Add Link feature is much more effortless.
In the supported app, open the item you want to link to, then pull up a Quick Note. An Add Link button will automatically appear at the very top of the note. All you have to do is tap on the button to paste a preview of the link on the note. If you have multiple supported apps opened, you can press on Add Link to see all the links available for pasting from those apps. Once the link preview is attached to the note, simply click on it, and it will open the specific item in the original app.
You'll likely use Quick Notes' Add Link feature more often on Safari, so you won't have to drag and drop webpage links to your note. But the tool also works with other Apple apps. You can link to a specific conversation in Messages, email in Mail, location in Maps, document in Pages, and page of the book you're currently reading in Books.