This Raspberry Pi Project Builds A Star Wars Lightsaber - Here's How
Lightsabers are easily the most iconic and popular piece of tech from "Star Wars." Who wouldn't want to own a metallic wand that can produce a three-foot beam of plasma that can cut through almost anything? You obtain plenty of lightsaber toys from various stores, but why buy one when you can make your own like a true Jedi or Sith?
Several years ago, Adafruit Industries – a retailer specializing in various small-factor boards, including the Raspberry Pi products — introduced a project that lets users build their own lightsaber. The build revolves around the Adafruit RP 2040 Prop-Maker Feather, a microcontroller board with built-in speakers. While Adafruit supplies this product, it is powered by the Raspberry Pi RP 2040 chip, hence why this DIY lightsaber counts as a Raspberry Pi project.
Of course, while the microcontroller board is the beating heart of this build, it cannot bring a lightsaber to life alone. You also need an RGB Strip, speaker, battery, and ignition button. You can buy them piecemeal (also from Adafruit) or in the "Make your own Lightsaber!" starter kit bundle. Just keep in mind that the package deal includes the Adafruit Prop-Maker FeatherWing, which lacks the RP 2040 chip. Still beats sourcing your own soundboards and speakers to build a homemade lightsaber, though.
3D printed parts (and blade) sold separately
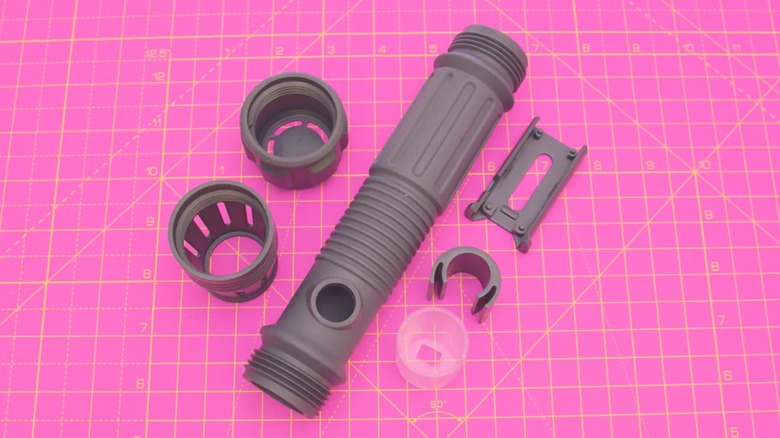
Even after you have bought all the necessary components, you are still missing the most crucial part: the shell. Thankfully, you won't have to spend a ton of money on hilts from companies such as SabersPro, but the final cost will depend on whether you own a 3D printer.
Adafruit supplies the CAD files necessary to build the exterior of the lightsaber, and since it's open source, you can modify them if you have enough 3D modeling knowledge. Just don't expect the sort of parts variety you get from most third-party stores or Savi's Workshop in Galaxy's Edge. Once you're ready, you can print out the shell components in either filament or resin. Alternatively, just send the files out to a 3D-printing service like JLC3DP.
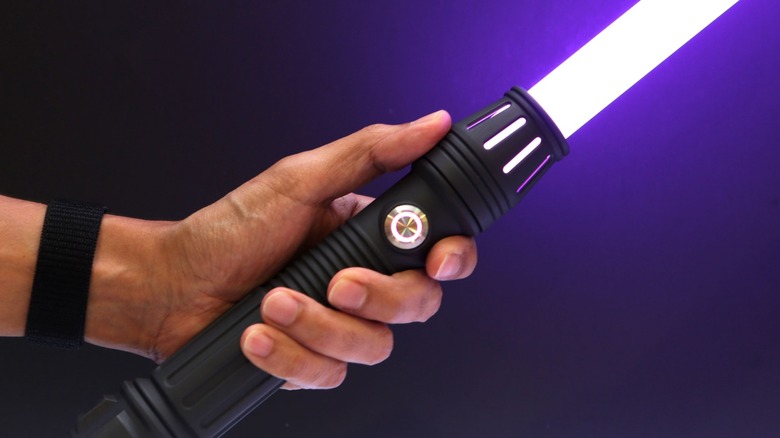
Since the lightsaber won't be able to produce a controlled stream of colored plasma, you will need to supply your own "blade," i.e., a clear polycarbonate tube with a one-inch outer diameter. Adafruit suggests purchasing these rods from third-party lightsaber prop manufacturers, including The Custom Saber Shop and Ultrasabers.
A customizable weapon for a more DIY age

Adafruit claims on its YouTube channel that the lightsaber project is simple and requires little soldering. However, you still have to closely follow the project's instructions, which you can find on the Adafruit website. But once you're done, you will have a modifiable weapon that will be the envy of many "Star Wars" fans. Once you code it, that is.
In order to make the leap from simple 3D-printed prop to exciting replica with lights and sound, you need to install CircuitPython onto the Prop-Maker Feather, followed by the proper code libraries. Again, you can find everything you need, including instructions, on the Adafruit website. Once you are finished, your device will play all the requisite sounds, detect when it has hit something, and even swap between different colors — no extra kyber crystals necessary. Plus, recharging the battery is as simple as unscrewing the hilt and plugging the control board into a USB cable.
If this particular project isn't to your liking, there are plenty of other lightsaber-related builds, including ones that replicate the appearances of Ahsoka Tano's lightsabers and the Mandalorian Darksaber. Or you can try countless other creative Raspberry Pi projects, such as building a portable router or constructing a retro game console. As Yoda one said, "Do, or do not."