

5 AirPods Features You Need To Manually Enable
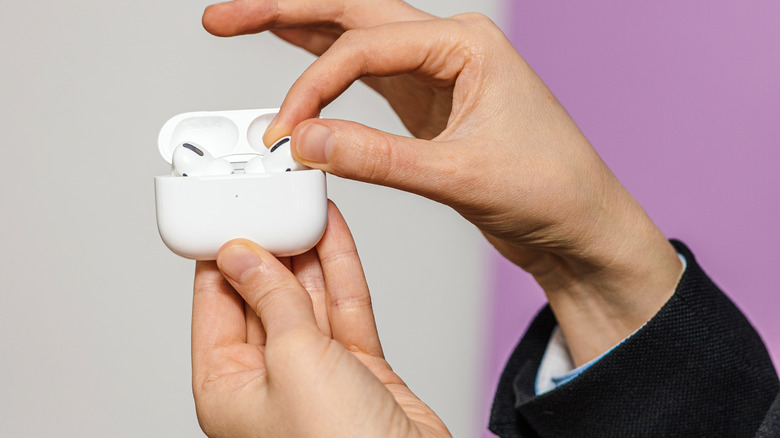
AirPods are designed to work seamlessly from the get-go. In fact, setting up the device for the first time is as simple as taking the AirPods out of the box and opening the charging case with your iPhone nearby. You should immediately see the setup animation pop up on your mobile. From there, you just have to go through the on-screen prompts, and the AirPods should be ready for use.
But to really unlock the full potential of your AirPods, there are some settings you have to turn on yourself. These AirPods features don't come enabled by default for several reasons. For one, they can temporarily interfere with the out-of-the-box functionalities, which you might not be pleased about. Some settings are also a matter of preference.
Don't worry, though. Accessing the AirPods settings to toggle on these features is pretty quick and easy. To do so, wear at least one AirPod and make sure it connects to your iPhone. Then, go into Settings on your phone and open the AirPods option that appears under your Name. You're free to browse the settings page to check which ones you want to turn on, but to give you an idea, here are five AirPods settings you can manually enable.
Pause Media When Falling Asleep
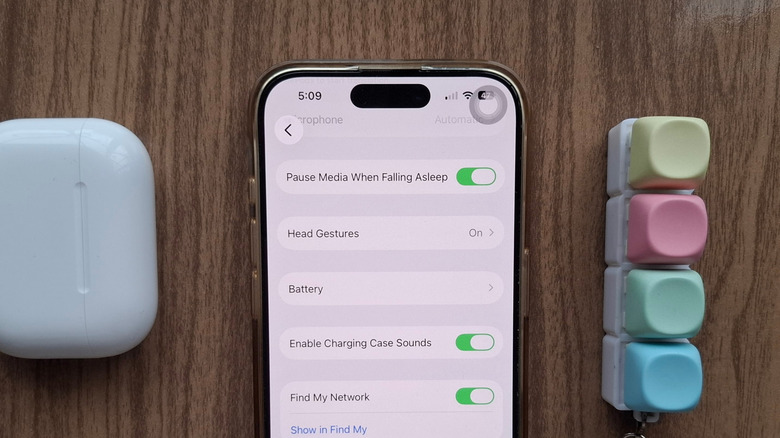
It's a universal problem — you go to bed either watching a video on YouTube, playing relaxing sounds on Spotify, or listening to Audible, and end up falling asleep with the video or music still playing. Hours later, you wake up to a drained phone and AirPods. The worst part is that, if you're unlucky enough that the earbud doesn't fall out of your ear, you might be awoken by the sounds sometime in the middle of the night. To prevent this from happening, you'd normally have to rely on the built-in sleep timer on the app you're using. But if you forget to set it up or the app simply doesn't come with a sleep timer, then your phone will likely keep playing the music or video until you wake up and pause it yourself.
Fortunately, users of AirPods 4 and AirPods Pro 2 and 3 no longer have to worry about this. They can just enable the AirPods setting aptly named Pause Media When Falling Asleep. This works exactly as described. Once you doze off, your AirPods automatically pause the media for you. You only need to toggle it on once, and you're pretty much set.
Other than your iPhone and iPad, you can also use this pause feature when you're watching on your Mac or Apple TV. To find the AirPods settings on your Mac, click the Apple icon and select System Settings. On your Apple TV, go to the Control Center and press on your AirPods.
Siri activation with the left/right AirPod
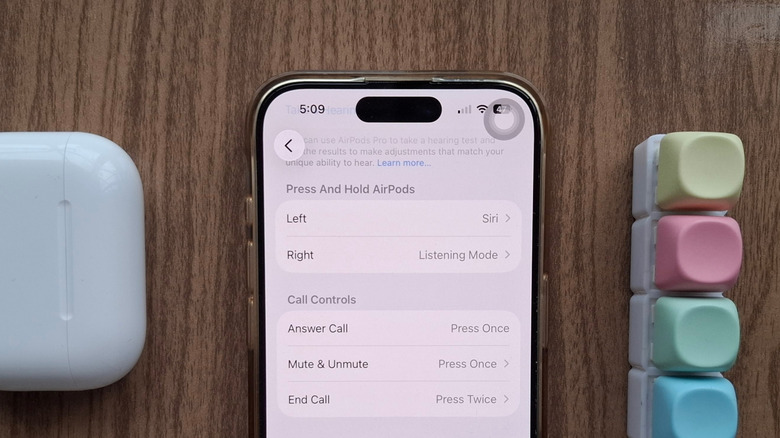
By default, both your left and right AirPod are configured to switch listening modes when they're held down. This is a convenient AirPods trick that eliminates the need to dive into your AirPods settings whenever you want to go from Noise Cancellation to Transparency mode and vice versa. But you don't really need to have both of your AirPods do the same thing. You can actually set one or the other AirPod to take another action: turn on Siri.
This is a great alternative if you don't like pulling out your phone just to activate Siri, maybe during a run, on the commute home, or anytime your mobile is buried in your bag. Instead of reaching for your phone and saying "Hey Siri," all you need to do is press and hold the AirPod stem.
To have a specific AirPod turn on Siri, follow these steps:
- In the AirPods settings, go to the Press And Hold AirPods section.
- Choose either Left or Right.
- Tap on Siri.
Now, when you hold down the stem of your chosen AirPod, you'll hear a chime. That's your cue to say a voice command. You can use all supported Siri commands, and you should hear Siri in your AirPods as it responds to your request.
Camera Remote
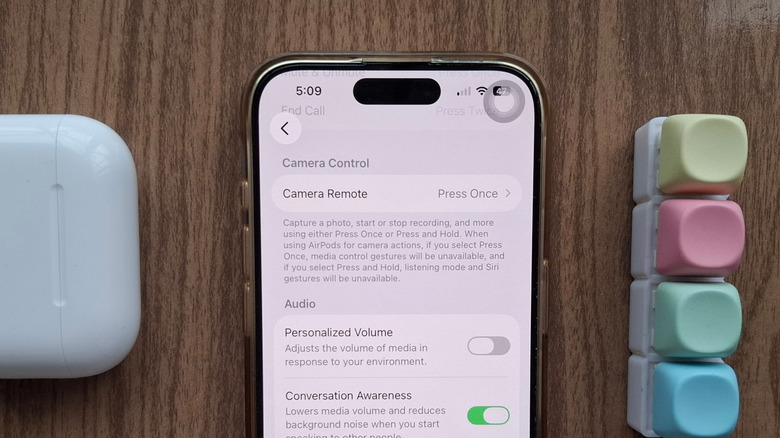
If you have AirPods 4, AirPods Pro 2 or 3, or AirPods Max 2 and an iPhone or iPad updated to iOS 26 or iPadOS 26, one of the handiest AirPods settings you can manually enable is Camera Remote. What it does is turn your AirPods into a remote control for supported camera apps, including the stock camera app, Adobe Lightroom, and Halide Mark III.
Conveniently, it works for both photos and videos. On the iPhone Camera app, there's a three-second countdown before the picture is taken. This means you won't have to set the timer yourself. It can come in handy every time you need to use your iPhone or iPad from a distance — say, you're taking a group picture, snapping full-body shots, or recording yourself and the view during your solo travels. It can also save you the hassle of having to stretch your arms out to reach the shutter button for selfies. In the AirPods settings, Camera Remote can be set to one of two actions. Specifically, you can trigger the camera shutter with either one press or a press and hold.
There's a downside to enabling Camera Remote on your AirPods, though: temporary unavailability of the original press-once and press-and-hold functionalities. Out of the box, press once is actually used to pause or play the audio. It also lets you answer calls and mute or unmute yourself during calls. Press and hold, on the other hand, makes the AirPods change the listening mode from noise cancellation to transparency. Now, if you turn on Camera Remote, these gestures won't work while the camera app is active. You have to exit the app to use the original functionalities again.
Conversation Awareness
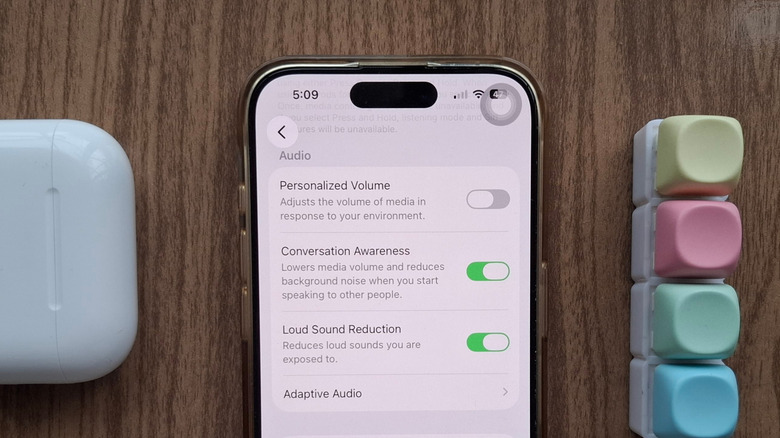
AirPods 4 ANC, AirPods Pro 2 and 3, and AirPods Max 2 come with a nifty feature that makes it easier to talk to people while still wearing both AirPods. Called Conversation Awareness, this AirPods setting is designed to detect when you're talking and automatically adjust the playback to help you focus on the conversation. If you're listening to music, the volume gets turned down, and if you have a podcast, movie, or other spoken media on, it's paused instead. Conversation Awareness is particularly useful if you have frequent, brief conversations throughout the day. This might include co-workers approaching you for tasks, the coffee shop cashier taking your order, or even unexpectedly running into friends while out and about. You won't have to repeatedly remove and put on your AirPods just to engage in the conversation.
Conversation Awareness activates with the sound of your voice. Then, as soon as you're done with the conversation, you can seamlessly go back to what you're listening to without manually changing back the settings. Your AirPods automatically revert to your previous settings for you. If you want to stop Conversation Awareness manually, a simple press and hold on the stem is all it takes. There's also a toggle off in the Control Center when you long-press the volume slider.
When you first connect your AirPods to your iPhone, you're actually given the option to enable Conversation Awareness. If you haven't done so then, you can easily find it in the AirPods settings, under Audio. It's important to note, though, that Conversation Awareness could falsely activate during certain instances. Since it kicks in when you start talking, it could pause your media or reduce the volume when you're just talking to yourself or singing along to the song.
Head Gestures
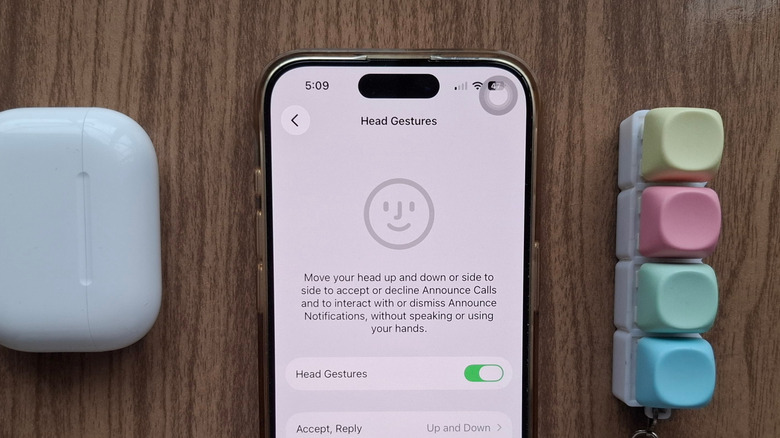
When you receive incoming calls while wearing your AirPods, you'd normally have to touch the earbud to respond. It might seem quick and easy, but it can be inconvenient to do so if your hands are full. Maybe you're walking your dogs, making dinner, or holding bags of groceries. Thankfully, AirPods allow you to interact with your calls (and even notifications) hands-free via Head Gestures.
This feature — which is currently limited to AirPods 4, AirPods Pro 2 and 3, and AirPods Max 2 — only uses head movements to respond to incoming calls and texts. It specifically supports two actions: up-and-down and side-to-side movements. By default, nodding your head lets you reply to messages and pick up incoming calls. Meanwhile, shaking your head clears the notification and rejects calls.
Just like Conversation Awareness, you can turn on Head Gestures during the initial setup. But you can still enable it later from the AirPods settings. You can also switch what the gestures do and try the gestures out to see how they work. Before you can use Head Gestures with your AirPods, though, you need to have Announce Notifications enabled. To do that, open the Settings app, then open Apple Intelligence & Siri and follow these steps:
- Press Announce Notifications.
- Toggle it on.
- Under Announce When Connected To, turn on Headphones.
- Pick which apps you want to get notifications from.
- Go back to the main Apple Intelligence & Siri page.
- Select Announce Calls.
- Choose Headphones Only.
Now, when you get a call or notification, Siri will announce it. Immediately after, you can nod or shake your head to respond. Keep in mind, though, that some apps don't support replies via Siri, including Gmail, Facebook Messenger, and TikTok.