

How To Clear System Storage Space On Your Mac

If you're looking for ways to speed up a Mac computer, clearing internal storage is highly recommended. The biggest reason is that when your Mac runs out of storage space, it has to work harder to manage the little that it has, which affects performance. Many people are often surprised when they go to System Settings > General > Storage to see what is filling up their Mac's drive, and find out that System Data is taking up an unusual amount of space (sometimes upwards of 100GB). There are no official clear instructions or recommendations on how to clear it, but it's much easier than you think.
The problem is that there's no exact definition of what System Data is. It's just a number of files that the system cannot neatly classify as an application, document, photo, or video. These include temporary files that the computer intends to automatically delete later, app caches, files you've downloaded over time, iOS and iPadOS backups, and Time Machine snapshots (these are stored locally to restore recent file versions when your external drive is not available).
To clear any non-essential System Data you can use a cleaner that will automatically take care of everything for you, or you can manually hunt the data down and take care of it bit by bit.
Using a cleaner app is quick and easy
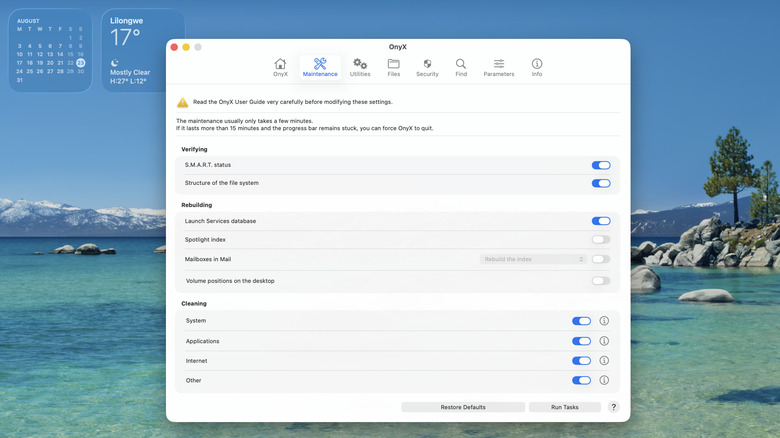
Before we get to the hard way of clearing System Data, there are several apps that you can use to clear it with a few clicks. A good example is OnyX, which is a safe and trusted Mac cleaning and maintenance utility. It's freeware, so you just need to download and install the right version of OnyX for your macOS version (e.g., Tahoe or Sequoia) and run it.
Afterward, do the following steps to clear System Storage on your Mac using OnyX:
-
Open OnyX.
-
Select the Maintenance tab.
-
Make sure System, Applications, Internet, and Other are toggled on in the Cleaning section.
-
Click Run Tasks in the bottom right corner.
-
Click Continue on the prompts warning you that OnyX will close all open apps and restart your Mac.
-
Enter your Mac password.
-
Click OK.
Don't worry about the Applications toggle, as it will not uninstall your apps. It will clear the app cache by default. App caches can get extremely large over time. When you delete them, apps will take longer to load since they have to rebuild their caches, meaning you'll have to delete them again in the future. When you click the "i" next to Applications, you'll see exactly what it deletes. You'll even see some additional options you can toggle to clear more space. Be sure to explore the other toggles (e.g., System and Internet) to maximize OnyX's ability to clear System Storage on your Mac.
Clearing the System Storage manually
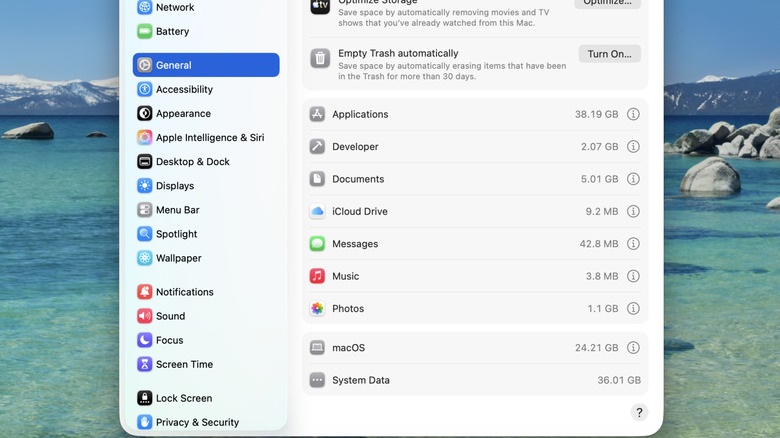
Manually clearing files is one of the best ways to fix a slow Mac. One of the safest ways to do that is through the Storage page in System Settings. Don't delete anything under Applications, as that will remove the app from your computer instead of deleting its cache.
Follow these steps to clear System Storage using the Storage page:
-
Go to System Settings > General > Storage.
-
Click the "i" next to Documents and delete any large files.
-
Target the Downloads tab in particular, where leftover DMG files linger.
-
Click the "i" next to iOS Files or iPadOS Files and delete those backups.
-
Click the "i" next to Trash and click Empty Trash > Empty Trash.
You can also clear app caches manually — with much more control than via Onyx — targeting really large caches while keeping the smaller ones, so that every app isn't forced to rebuild its cache later on.
Follow the steps below:
-
Open Finder.
-
Click Go > Go to Folder.
-
Type ~/Library/Caches and press Enter.
-
Press Command + J and tick Calculate all sizes.
-
Click the Size column to sort the folders from largest to smallest.
-
Select all the biggest caches in there.
-
Press Command + Delete.
Time Machine snapshots are also a problem, and here's how to delete them.
-
Click System Settings > General > Time Machine.
-
Click Options.
-
Select Manually.
-
Click Done — the local backups will be deleted in a few minutes.