You Can Turn Your Extra USB Port Into A Master Key - Here's How

One of the best uses for your PC's empty USB ports is housing a USB security key. What this does is automatically lock your system once the USB stick is removed, and unlock it as soon as the drive is plugged back in. With the USB security key, you can make sure that only you — the thumb drive holder — can access your computer at any time, keeping your files and data private.
To create the USB security key itself, you'll need software like USB Raptor. USB Raptor works by writing a special encrypted file onto your chosen flash drive and continuously checking the connected USB sticks (whether directly on the PC or via USB hub) for this file. Your computer remains accessible as long as the file is detected. When it's not present, the PC gets locked.
For flexibility and convenience, USB Raptor supports any USB stick you have on hand — even ones playing host to other stored files. That means there's no need to dedicate a separate flash drive for locking and unlocking your computer. Storage size isn't an issue either, as USB Raptor's encrypted file takes up only 1KB. Being open source, USB Raptor is free to download and use. For more advanced features like master key creation, though, you need to donate to the developer. In terms of OS compatibility, the program runs on Windows only, but this includes older versions like XP and Windows 7.
If you want to convert any USB drive into a security key for your PC, we'll walk you through the exact process on how to use USB Raptor.
How to do a basic setup of USB Raptor
USB Raptor may be among the more obscure Windows apps (and is also one of the best free Windows apps that many users don't know about), but it's not really intimidating to use. Even to non-technical users, its basic configuration is actually quick and easy to navigate. Here's how to get started with this lock utility:
- Plug your USB stick into your computer.
- Download USB Raptor.
- Extract the ZIP file.
- Double-click on the USB Raptor Setup file.
- When prompted with a "Windows protected your PC" screen, click More info and select Run anyway.
- Install the program as normal.
- Exit the setup window.
- In the Windows Security popup, choose Allow to let public and private networks access USB Raptor.
From here, you can open and set up USB Raptor:
- Go to the USB Raptor window.
- Read the disclaimer/terms of use.
- Mark "I have read the above" to continue.
- Hit I agree.
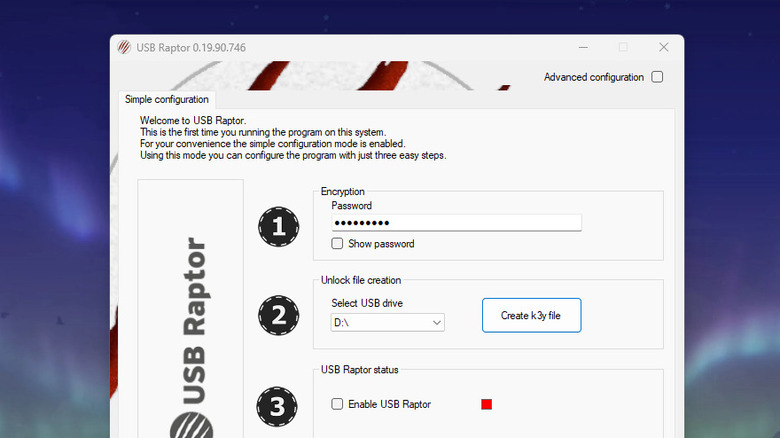
- Under Encryption, press Show password to view the default password.
- Take note of the default password (which is "Default" within the USB Raptor Cherry version). This can come in handy when USB Raptor resets and forgets your personal password.
- Type a new password. This will serve as your alternative way to login if you lose your flash drive.
- Choose your flash drive.
- Hit Create k3y file.
- Check the box for "Enable USB Raptor" to activate the utility.
The system is now armed and ready. If you unplug the USB stick, you'll hear a sound to indicate that the system is locked and unusable. The USB Raptor lock screen will automatically appear, too. When you insert your flash drive again, your computer will make another sound, confirming the system is unlocked. If your USB drive goes missing, simply double-click on the lock screen and enter the password you created. This should be enough to bypass the lock screen and access your computer.
How to customize USB Raptor
USB Raptor is highly customizable, and you can change different aspects — such as the lock screen, notification sound when locking and unlocking the system, and your computer's behavior while it's locked. These options are available in the Advanced configuration section. To access them, just launch USB Raptor and enable Advanced configuration at the top. Then, follow these steps to set a grace period and change the notification sound:
- Select the Lock behavior tab.
- In the Grace period section, choose how long to wait before the system locks (delay for up to 20 seconds or timer for up to six hours).
- In the Notification section, click the up arrow next to Sound to switch to a different option.
To modify the lock screen:
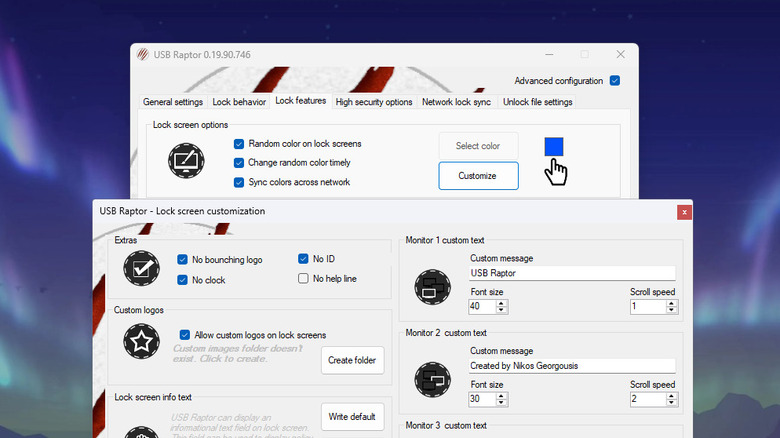
- Go to Lock features.
- Hit Customize.
- In the Lock screen image section, click Select image.
- Pick the lock screen image you want to show.
- Mark Use image.
- In Monitor 1 custom text, set the Custom message to the text you want to appear in the lock screen.
- Edit the Font size and Scroll speed as needed.
- Hit OK to save your lock screen customization settings.
To edit what your computer does while locked:
- Click on the Lock features tab.
- Mark "Mute PC sound on lock" if you want to set the PC on mute while it's locked. USB Raptor will automatically unmute it upon unlocking.
- Enable "Turn off screen on lock" to switch off the display. You can still wake it up by moving the mouse or clicking the keyboard.
- Turn on "Give insomnia effect" to prevent the screen from sleeping.
To set up two-factor authentication (USB drive plus password/PIN) for extra security:
- Navigate to High security options.
- Choose whether to ask for password or PIN after you insert your thumb drive.
- If you selected PIN, click Set PIN and create one.
There are other customization settings for more advanced security options as well, but if you're unsure what the setting does, it's best to leave it as default.