7 DIY Custom Gadgets That Predated 3D Printers
We may receive a commission on purchases made from links.
Humans have been tool builders since the prehistoric Stone Age. As humans developed their technology, they began making implements for hunting, farming, and domestic chores. The more we invented, the faster we were able to create more complex devices. Today, we've mastered the art of building devices that build other devices — or at least the components of other devices.
3D printing is one of the fastest methods of production in existence. With just a few hours and the right digital blueprints, you can turn raw materials into tangible products. While you can use 3D printing to create anything from measuring cups to chess sets, many people use 3D printers to create quick prototypes to show off their visions and create items to sell at conventions or craft fairs. But did you know there were several ways to quickly produce custom products at home, even before 3D printing existed? Plenty of options existed, although they were largely designed for children. Continue reading to learn more about these lesser-known tools.
First, what is 3D printing?
If you've ever watched "Star Trek," you're probably familiar with what the show calls "replicators" (or "food synthesizers" in the original series). These devices take basic materials and turn them into anything from food to weapons. Replicators are, at their core, a science-fiction precursor to the very real technology known as 3D printing.
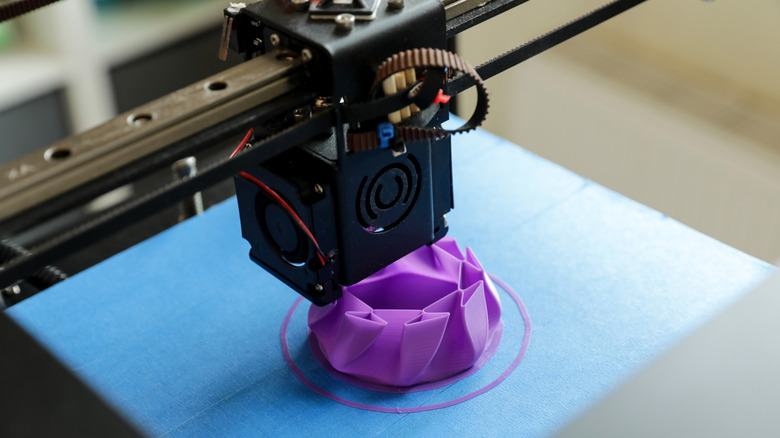
3D printing is a method of quickly producing items by creating them one layer at a time. Imagine a standard ink-based printer outputting text or images across a piece of paper. Now picture the paper dropping by a fraction of a millimeter, whereupon the printer starts printing more ink layers on top of the existing deposits. Repeat that process for several minutes, hours, or even days, and in the end, you end up with a 3D object. That's how 3D printers work, but instead of ink, they use hard materials (such as plastic) that can hold their form. Many modern 3D-printed parts are reliable for several uses, although you should definitely steer clear of replacing your car's brakes with 3D-printed resin ones.
The world's first 3D printer was invented in 1981 and used UV light to cure liquid resin. When the light shone on the resin, the material polymerized to form solid plastic, and that process was repeated layer by layer. This method came to be known as stereolithography, and it paved the way for other 3D printing technologies, such as extrusion. Of course, as technology improved, so did 3D print quality and complexity. If you're so inclined, there are a number of unique, intricate projects you can try printing yourself!
Hot Wheels car kits
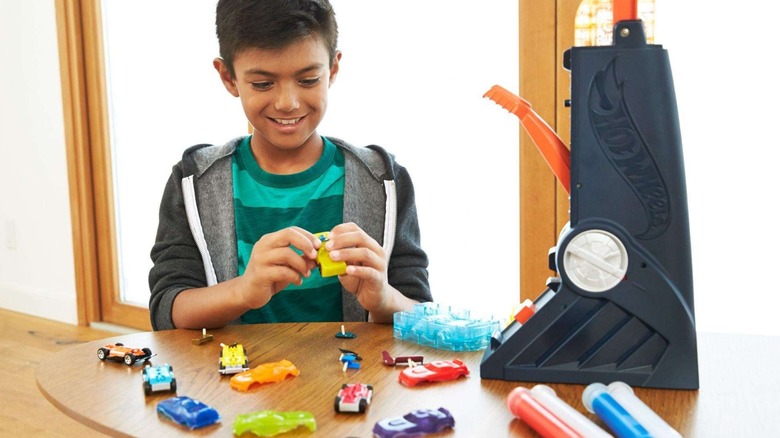
In the world of toy cars and miniature racetracks, few brands are as popular as Hot Wheels. The company has been around since the 1960s, so it offers a wealth of iconic pre-made toy car designs to choose from. However, in 1970, Mattel also made it possible for consumers to make their own custom cars using the first Hot Wheels car kit: the Hot Wheels Factory.
The Hot Wheels Factory heated up plastic pellets, which kids could then shoot into metal molds by pressing a lever. The result was a scaled-down version of injection molding — a method to quickly mass-produce plastic products. Kids could create one of ten different car bodies using the molds, but they also had to use the machine to create plastic chassis for the toy cars.
Mattel reinvented the Hot Wheels Factory several times. In 1979, the company released the Hot Wheels Master Caster, which swapped plastic pellets for wax ones, traded injection molding for manual pouring, and removed the need to fabricate a separate chassis. The next two renditions — the 2001 Hot Wheels Car Factory and the early 2010s Hot Wheels Car Maker — returned to injection molding, but they kept wax as a crafting material. With these tools, kids only had to make car shells, as each set provided swappable chassis. The most recent version from 2016, the Hot Wheels Fusion Factory Car Maker, relies on self-curing silicon to create toy car hoods that attach to the chassis included in the set.
Mold-A-Rama
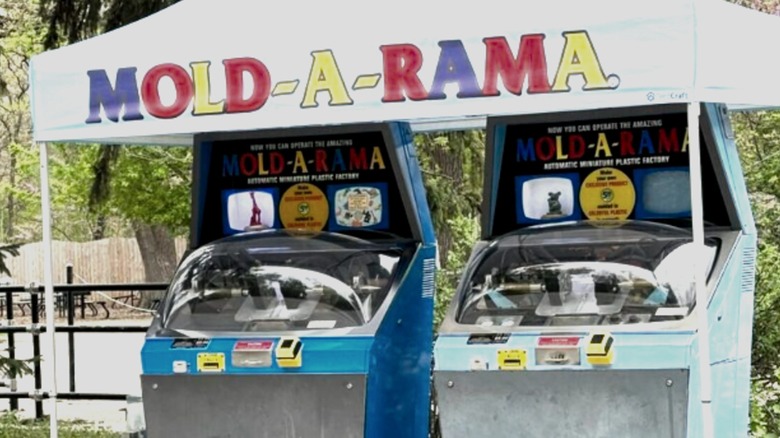
Most of the options herein cover products you can use in the comfort of your home. But if you visit the right spots, you can find decades-old machines that let you turn select raw materials into novel souvenirs. And we're not talking about those gear-powered presses that squash pennies into oblong collectibles that nobody really uses anymore.
At certain museums and zoos dotted across the United States, you can find retro devices known as Mold-A-Ramas. These installations shoot hot plastic into a two-piece metal mold to form a unique trinket. Once complete, the machine clears the mold with a burst of air, and the product gets dispensed following a brief cooling period. The whole process takes less than a minute. After that, users walk away with a fun bit of merchandise that's unique to the location of the Mold-A-Rama they used.
While one of the companies that currently maintains Mold-A-Rama machines started in the early 1970s, Mold-A-Ramas themselves premiered in 1962. Currently, over 60 Mold-A-Ramas operate in six locations across the United States: the Brookfield Zoo, the Field Museum, the Henry Ford Museum, the Milwaukee County Zoo, the Museum of Science & Industry, and the San Antonio Zoo. And while the company still hires an artist to help create new molds, Mold-A-Ramas are a dying breed. The last one was manufactured in the 1960s, and some components are now discontinued. If you ever find a Mold-A-Rama out in the wild, put some money into it while you still can.
Vac-U-Form
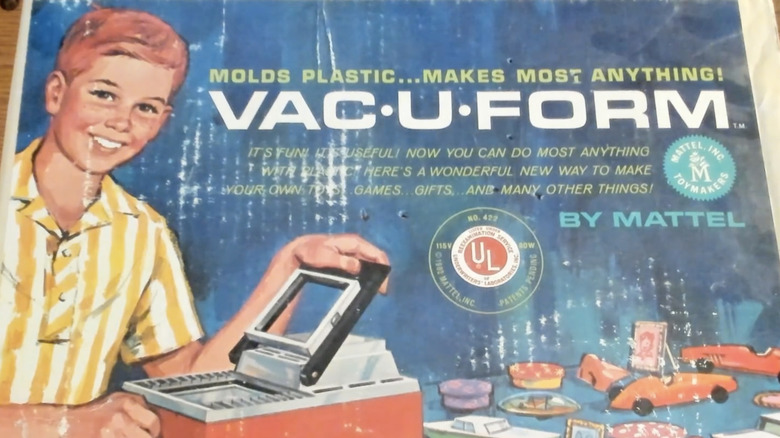
When most people hear the word "vacuum," they probably think of vacuum cleaners (some underrated examples being the LG CordZero Vacuum and the Yeedi M14 Plus Robot Vacuum). Suction power is perfect for clearing loose crumbs and dust off floors, yes. But did you know that with the right preparations, the strength of vacuum suction can also bend certain materials?
In the early 1960s, Mattel started selling the Vac-U-Form, a kit that ran on the same technology as industrial vacuum forming machines. Like its larger counterpart, the Vac-U-Form heated up thin sheets of plastic to make them pliable. Kids could place the softened material over plastic molds, then conform the plastic to the mold shapes using a hand pump. So long as consumers bought accessory packs containing new molds and plastic sheets, they could keep crafting their own new toys.
While the Vac-U-Form eventually died out, the idea of using vacuum forming technology in your own house never did. In the 1990s, ToyMax revived the Vac-U-Form with the Vac-U-Former. Nowadays, companies like Mayku also sell desktop vacuum forming machines designed for more serious practitioners of the craft. Unlike the Vac-U-Form and Vac-U-Former, Mayku products provide all suction power automatically — no hand pump required. You do have to source your own molds, but that allows you to produce impressions of just about anything for just about any purpose, be it clamshell packaging for custom toys or unique chocolate molds.
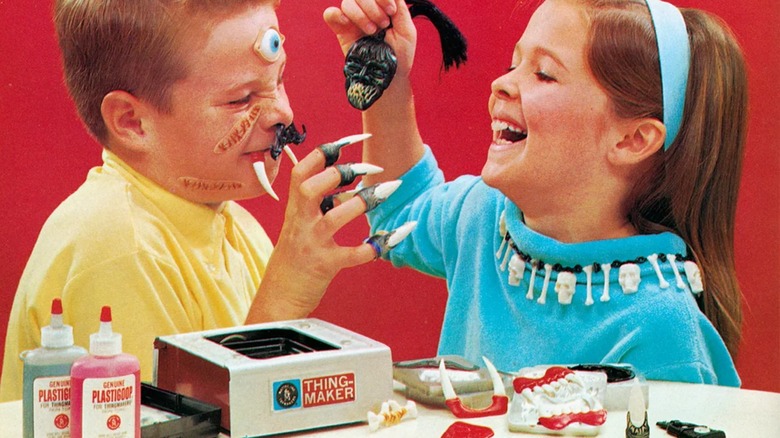
Creepy Crawlers Bugmaker
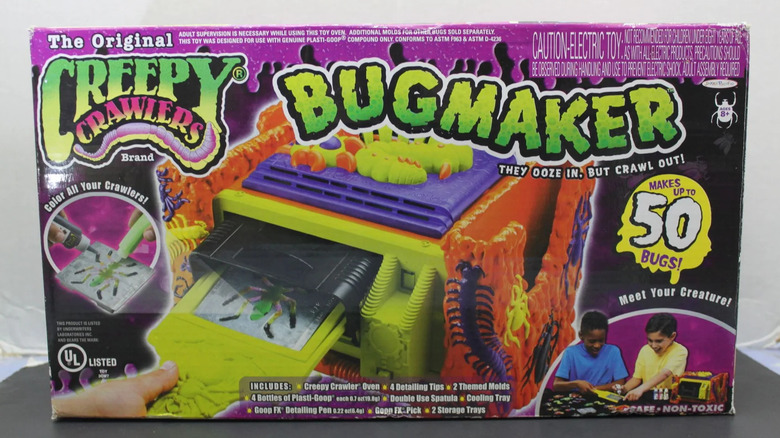
Modern 3D printers function differently depending on the material used. Filament-based printers heat up spools of ABS or PLA using metal nozzles, while resin-based printers use lasers to cure liquid resin into hardened material. Untreated resin is one type of liquid plastic, but in one particular kids' toy from the 1990s, another kind of liquid plastic was available: "Plasti-Goop."
Odds are you saw commercials for — and possibly purchased — Toymax's Creepy Crawlers Bugmaker kit. Unlike other DIY toy sets that required first heating up a material, placing it into a metal mold, and letting it cool into a solid shape, Creepy Crawlers' Plasti-Goop was poured into molds before being heated up. The heating process transmogrified the goop into gummy-like shapes. While the starter kit included several bug-themed molds, ToyMax also produced expansion kits featuring dinosaurs, monsters, and some of the de facto mascots of the era: the Mighty Morphin' Power Rangers.
Despite its popularity in the 1990s, Creepy Crawlers actually started in the 1960s as a spin-off of Mattel's Thingmaker, which itself was a spin-off of the Vac-U-Form. The original Creepy Crawler kit was far from safe. Molds had to be left out in the open during the heating process, which posed a burn hazard for children. Moreover, even though the '60s-era Plasti-Goop wasn't a forever chemical, it was still considered toxic to inhale. While the Creepy Crawlers brand still exists, it's now maintained by Jakks Pacific, which has now designed the product to use an injection molding process.
Rotocasting
Have you ever wondered how independent toymakers create their products? We don't just mean studios like Four Horsemen that started out working for other companies, then went independent; we're talking about individuals who blur the lines between making toys and making art.
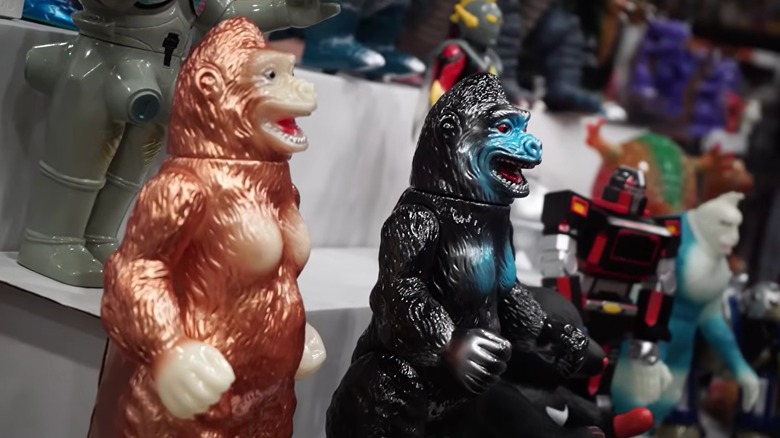
Rotational molding, also known as rotomolding or rotocasting, is a manufacturing method that became popular in the 1950s for its efficiency in creating plastic doll heads. In the process, manufacturers load closed molds with materials that get heated and rotated along a mold's inner surface to produce a hollowed-out shell once enough material cools down. Similarly, many enterprising artists and toymakers use a technique called slush casting, where liquid material (often vinyl) is poured into a mold, then heated and manually rotated. Once enough material cools and hardens, excess liquid material is poured out, and the cast is removed.
Rotocasting became so popular in 1960s Japan that they began referring to domestically produced hollow vinyl toys as "sofubi." The term is a portmanteau of the romanized Japanese term "sofuto biiniru," which literally translates to "soft vinyl." Both independent and big-name toymakers still use this method to create vinyl figures with simple articulation. According to indie toy designer Seismic Toys, many companies still rely on "boutique factories" to create sofubi, but independent creators like Craftnation have demonstrated that people can cast soft vinyl toys in their own homes — for a great price, too.
Gilbert Kaster Kit Jr.
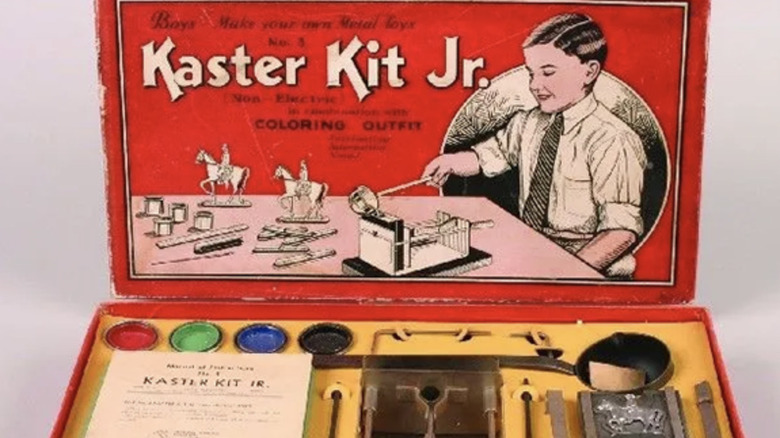
If you are a toy history aficionado, odds are you're somewhat familiar with the name A.C. Gilbert, or at least the A.C. Gilbert Company. Gilbert is best known for inventing beloved toys such as the Erector Set and American Flyer trains, but not all of Gilbert's ideas were hits. Or safe, for that matter. He invented several infamous toy kits, including the U-238 Atomic Energy Lab (which contained actual uranium) and the Gilbert Kaster Kit Jr.
The Gilbert Kaster Kit Jr. was an activity set in which children melted down metal and poured it into molds to create a variety of metal figures, including soldiers, animals, and cowboys. However, the Gilbert Kaster Kit Jr. posed many threats. Not only were children at risk of burning themselves, but the metal in the kit was none other than lead. And you thought toys with lead paint were dangerous enough for children.
The A.C. Gilbert Company wasn't the only firm to market miniature metal molding kits to children. ToyMax's 1996 Metal Molder was a similar product, but it was safer to use, since it included a durable plastic screen to separate the molten metal from children's hands and faces. Plus, the kit didn't use lead. ToyMax sold several accessories for this product, from shark and spaceship molds to detailing kits that included sandpaper and permanent markers.
Gilbert Glass-Blowing Kit
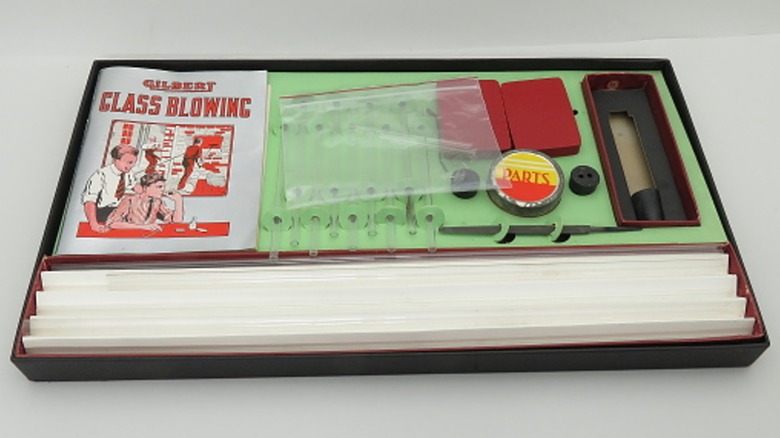
Product safety standards have evolved by leaps and bounds since the early 20th century. Some shoddy items do still slip through the cracks, though, and you might end up buying a Costco candle that could accidentally burn or cut you. But a considerable number of products sold in the early 1900s simply wouldn't fly today. Case in point: a kit that lets kids blow their own glass.
Before the A.C. Gilbert Company sold the Kaster Kit Jr., it produced something just as dangerous: the Gilbert Glass-Blowing Kit. Published in the 1920s, the kit taught users to melt, blow, and shape their own glass. The product even included every glass-blowing apparatus kids needed, from blowtorches to glass tubes. It didn't provide safety equipment, however. The toy's instructions essentially told kids to bend and shape red-hot glass with their bare hands, which is a surefire recipe for third-degree burns.
While toy companies no longer market glass-blowing kits to kids, you can still buy your own glass-blowing equipment. Companies such as Mountain Glass Arts sell starter kits that include torches, tweezers, graphite rods, and safety glasses for shaping glass in a variety of ways. There are even different blowtorches designed for different techniques — but luckily, in all cases, they're designed for adult use.