5 DIY Android Phone Fixes That Are Easier Than You Think
Smartphones are immensely useful devices. Whether you want to contact someone across the globe or find the nearest restaurant, a phone's all you need nowadays. As with any useful piece of tech, though, a phone is very complicated, and a lot goes into showing whatever's on your screen. If your phone starts having issues, it's natural to take it to someone who has spent years studying how smartphones work, rather than trying to fix it yourself without any knowledge.
However, before you take your phone to a professional for a tuneup or hardware repair, it might be worth trying certain fixes yourself. Repairing your phone might seem complicated, but there are many DIY Android phone fixes that are much easier than you'd think.
These include ways to resolve both software and hardware issues. Whether it's a weakened battery or a phone UI that loads slowly, there's a chance that whatever the issue is, you can deal with it at home. Basic technology repair and troubleshooting are some of the most valuable skills to master, and they can save you both time and money.
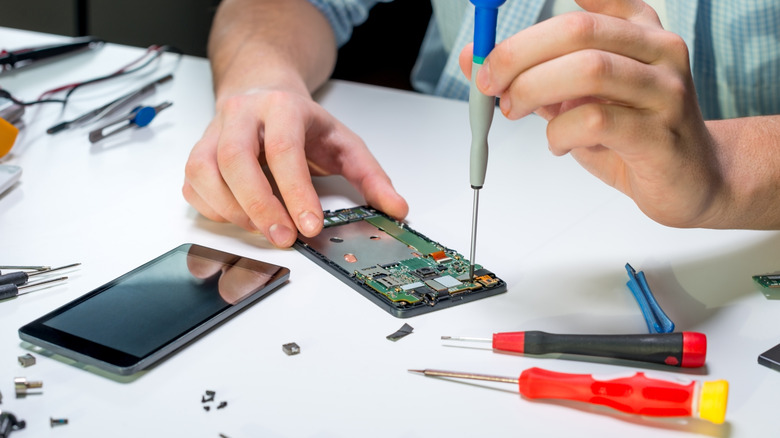
1. Replacing your phone's battery
Your phone's battery is one of its most important components. Whether it's a weakened power cell that charges slowly and dies quickly or one that has physically swollen from repetitive charging cycles, there are clear signs that you need to replace your phone's battery.
Fortunately, replacing a phone battery is usually a straightforward repair that can be done at home. You'll want to make sure the battery is completely discharged before you get started, and you should avoid using metallic or sharp tools when working near the battery. Also note that the process varies slightly for each phone, so you should prepare by watching videos that show how to replace the battery for your specific model if you haven't attempted this before.
For most phones, start by heating up the back cover with a hair dryer or a heat gun. This loosens up the adhesive on your phone's back panel that holds it in place. From there, use a suction cup to pull the back cover away from the frame until there's a small gap at the side. Carefully slide a thin tool such as a razor into the gap to hold it open, then use a plastic tool like a guitar pick to slowly work around the phone's frame and increase the gap. To make this easier, you can apply drops of isopropyl alcohol to the gap to weaken the adhesive, and you can always reapply heat if needed. Once the back panel is off, you can then disconnect any cables between you and the battery and then use a plastic tool or a suction cup to pull the battery out. Put your new battery back the same way you took the old one out, then reverse the prior steps to finish up.
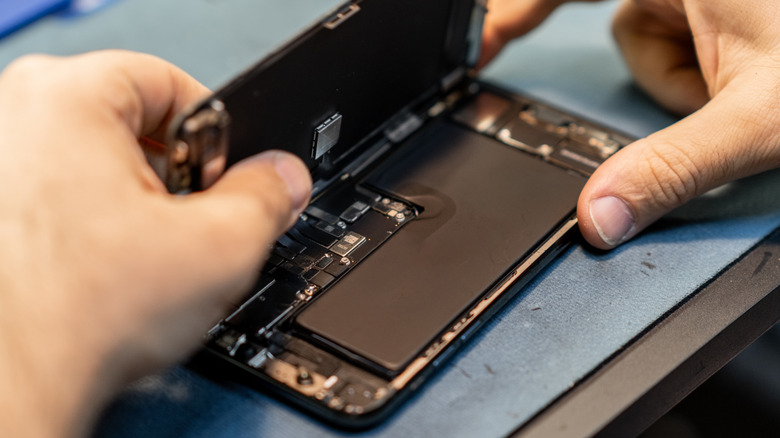
2. Fixing your charging port

A phone is made up of many different components, and any one of them can fail. One of the most common smartphone parts that can have issues is the charging port. Whether your phone has started charging slower than usual, disconnecting from your charger, or refusing to charge altogether, there's a chance you can fix the issue at home.
If the problem is caused by damaged or bent pins and the port itself needs to be replaced, that might be something you'll need to contact an expert for. However, oftentimes, the issue is just a collection of lint and dust inside the port. Since your phone's charging port is always open and you often carry it around in your pocket or purse, dust accumulates inside of it, and whenever you plug in your charging cable, it can push the dust in to create a compacted spot near the back.
Fortunately, fixing your phone's charging port is as easy as cleaning it. The best way to clean your smartphone's USB-C port is by using a can of compressed air. The stream of air is strong enough to deal with dust, and the lack of any physical contact makes it less likely that you'll damage your port further. If this doesn't work, you can use a blunt toothpick to gently push the lint out. If you're doing so, ensure that the toothpick doesn't scratch or push the pins in the center of the port and that you're only moving it around the gaps near the edges.
3. Making your phone less laggy

No one likes a laggy phone, but if you've had yours for a while, it has probably started showing some signs of age. This could be a phone that doesn't respond to touch as quickly as it once used to, one that loads apps slower, or one that requires a restart every once in a while to keep functioning. If you're not ready to upgrade to a newer phone, you might be considering sending it to a repair center to see if a technician can make the experience any better.
That certainly may help, but there's still a lot you can do by yourself that can make your phone feel snappier. First and foremost is checking if you have enough storage space. If you find that only a small percentage of free storage is left, deleting unused apps and old photos can help speed up your phone. Similarly, clearing cache from apps that can build it up quickly — such as Google Chrome or YouTube — can help give your phone more free space to function better.
If clearing up storage space doesn't solve the issue, there are still more DIY phone fixes you can attempt before seeking expert help. Ensure your phone has the latest system update by searching for System Updates in the settings, and try disabling background app processes. To do the latter, you can go to your phone's battery optimization settings and disable the "Allow background usage" (or similar) option for any high-usage apps.
4. Rebooting into safe mode to identify problematic apps and files
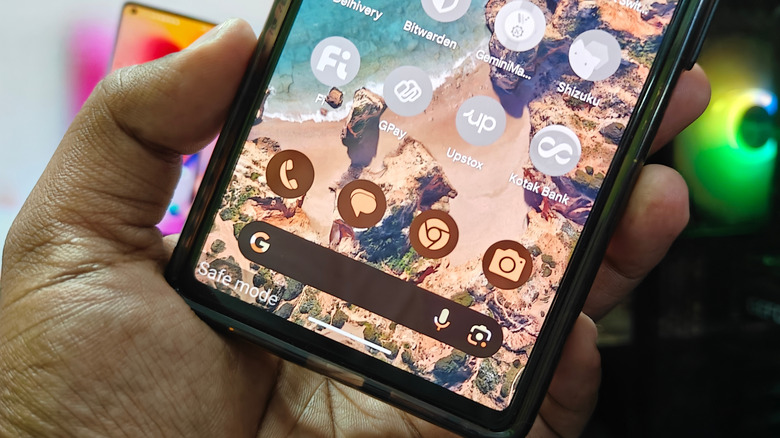
When you're dealing with a slowed phone or one that doesn't function the way it's supposed to, you might assume that it's something that requires professional help. However, it's possible that you've accidentally downloaded an app or file that is causing the issue, in which case there's a simple check that you can perform yourself before you decide to hand your phone over and pay for professional help.
One of the easiest ways to see if an issue is being caused by something you downloaded is to boot your phone into safe mode. This temporarily disables all user-installed apps and makes your phone function the same way it did out of the box. If you find that your phone works fine in safe mode but continues to show issues when you're using it normally, simply deleting any recently downloaded apps or files should fix the issue.
Booting into safe mode on most Android phones is very straightforward. Simply hold down the physical power button on your phone until a power menu pops up. If that brings up your digital assistant, you'll need to use one of the methods that lets you restart your phone without using the power button instead. Once you've brought up the power menu, hold down the "Power off" button on the screen until the safe mode menu appears. Tapping this button will reboot your phone into safe mode, where you can check to see if it works fine without any third-party apps or files interfering. To exit safe mode and use your phone normally again, simply restart the device. Unfortunately, safe mode isn't an option on iPhones.
5. Factory resetting your phone and dealing with a phone that won't turn on

Knowing how to wipe all data from your phone or perform a factory reset is one of the most important DIY phone fixes you can learn. Whether you're just erasing your data before you sell your phone or trying to repair one that won't turn on, a factory reset is one of the easiest ways of dealing with these issues.
The way to factory reset your phone differs depending on if it's working or not. Note that this will erase all of the data you have on the phone, so ensure you have a backup ready if you want to recover it. For an Android phone that turns on, you can find the option to factory reset it in the main settings menu. The way to do this differs depending on the phone model, but you can enter the word "reset" into the search bar in your Settings app to find the option. This might not be named "factory reset," but any option that can be paraphrased as "erase all data" or "reset" should work. Similarly, on an iPhone, go to "General" in the Settings app and you'll find the "Reset All Data" option.
If you can't fully boot your phone up because of a software issue, you can still reset an Android device from its recovery menu. Hold down the power and volume up buttons simultaneously until the phone turns on (if you're on a Samsung phone, you may also need to be plugged in to a charger or external device). This will boot your phone into Recovery Mode. You won't be able to use the touch system here, so use the volume buttons to navigate up and down until you highlight the "Factory data reset" option. To confirm the selection, press your power button.