12 Hidden iPhone Voice Memo Features You Should Start Using
Voice Memo, one of the free iPhone apps for productivity, is an excellent tool for creating audio recordings because it's extremely easy to use. Just launch the app and press the record button. However, it also has hidden features that make it even more powerful. In fact, once they master its capabilities, most people may not need to download or buy any other voice recorder app.
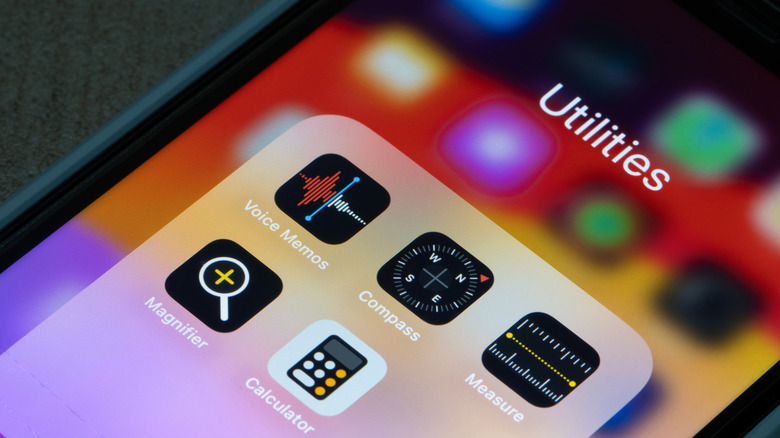
The Voice Memo app looks so simple on the surface, with features that you would expect from similar apps, like renaming, trimming, and organizing recordings. However, do you know it can also create transcripts, edit files, and improve their quality? It's not as feature-packed as paid audio editing software, but for a free app that's built into Apple's iOS, it definitely does more than expected.
To help you maximize the iPhone's Voice Memo, we've gathered a total of 12 hidden features that you may not know are available on the app. Some may prove to be more useful than others depending on the user, but all of these make it much more valuable than most people think.
Pause a recording
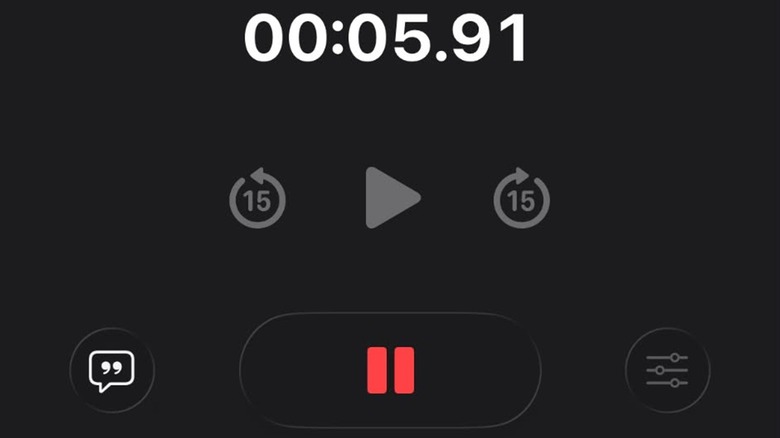
After tapping the bright red record button in the Voice Memo app, tapping it again will end the recording and create the audio file. However, there's a hidden option to pause the recording. To access this feature, once you've started recording, swipe up from the area surrounding the record button, and it will change into a red pause button. Tapping that will pause the session, and it will be replaced by a resume button.
This is helpful if you want a single, uninterrupted file for a long recording session, such as when you're attending a lecture but the speaker takes a few breaks in between sections. For some people, this makes it easier to find and review the recording than creating shorter, separate files, because you stop the session whenever the speaker does.
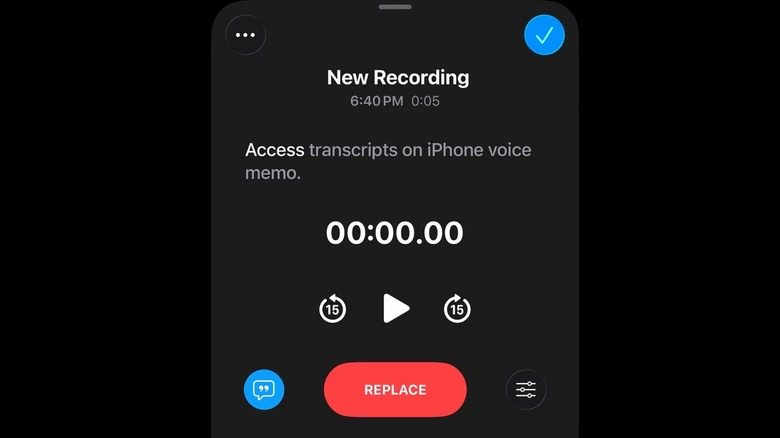
Access transcripts
Some people use the Voice Memo app for recordings of speeches and other forms of communication, and then they play it back so that they can transcribe what was said. There are apps that can do this, but you won't have to download anything else because Voice Memo can already do it for you.
You can actually already see live transcriptions created in real time during your recording session by swiping up from the record button and tapping the icon that looks like a speech bubble. You can also access the transcript icon from your list of recordings by either tapping on the waveform icon on the lower left for each file, or tapping on the three-dots icon on the upper right and selecting the View Transcript option. You'll also be able to tap on the words in the transcript to jump to that part of the recording, and copy the text to paste into another app.
Search for a recording
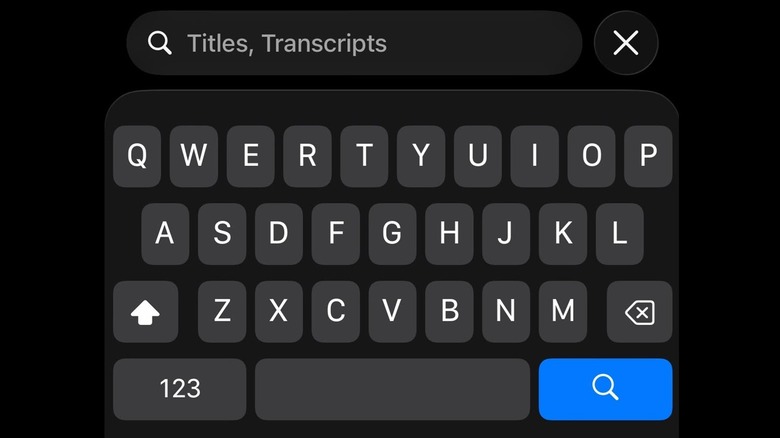
You'll be able to rename your recordings on the Voice Memo app so that it's easier to look for the file that you need just by scrolling through them. However, this becomes much harder once you've accumulated hundreds of recordings across multiple folders. Fortunately, there's a search function on the app that you can access by going to the All Recordings section or into a folder, then tapping the magnifying glass icon at the top.
The search function of the Voice Memo app is pretty impressive because it does not just look at the titles of your recordings. Even if your file names are the default titles, you can still use the feature because it also dives into the transcripts. This is useful if you want to go back to a specific topic in your professor's lectures or need to confirm a statement from one of the many interviews on your phone.
Add another layer
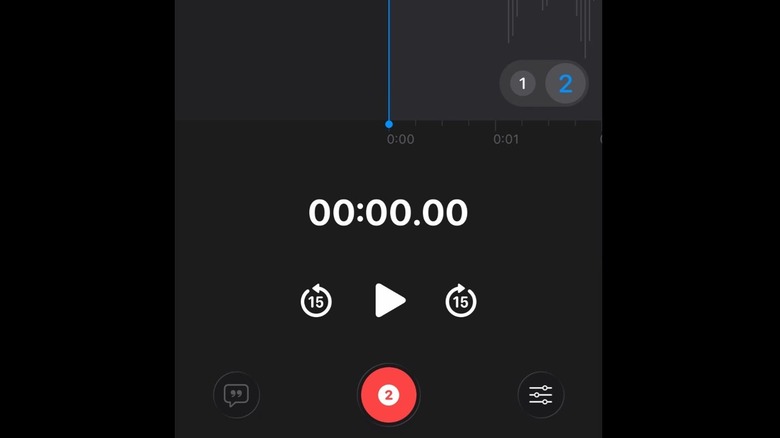
After completing a recording on the Voice Memo app, you can access a feature that will allow you to add another layer of recording to the file. You can have any form of audio on those two layers, so uses of this function include playing music on the first layer and singing the lyrics on the second layer, or adding a layer of sound effects to a voiceover or a podcast.
To access this feature, tap on the file that you want to edit in All Recordings or in the folder where you saved it, then tap the waveform icon. You will see a plus icon in the lower-right corner of the waveform, and if you tap it, you'll see the numbers 1 and 2, indicating the two layers of the audio file. If you're recording for the additional layer, make sure that the number 2 is highlighted, or else you'll be overwriting your original recording.
Replace parts of your recording
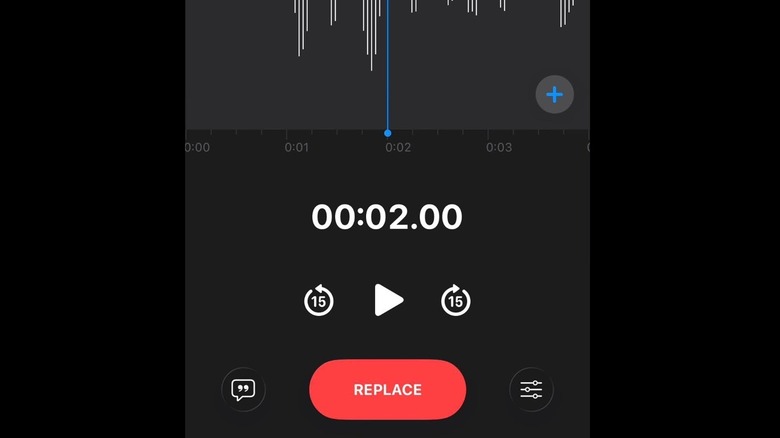
There's a chance you'll overwrite your recordings in the Voice Memos app if you're not careful. It can also be considered a feature, though, as this allows you to edit the contents of your recordings without using other software. Similar to adding another layer, you tap on the waveform icon of the file that you want to edit, but instead of tapping the plus icon, you tap the red replace button at the bottom. You can swipe through the waveform to select the part where you want the replacement recording to start, and then you can either tap on the three-dot icon on the upper left to undo the change, or tap the check button on the upper right to save and overwrite the old file, or save as a new file.
If you've ever made a long recording but you noticed a mistake somewhere in the middle, you won't need to repeat everything with this feature. Just select the part where the error was made and replace it. Don't worry if you make another mistake, as you can keep undoing the change until you get it right.
Change playback speed
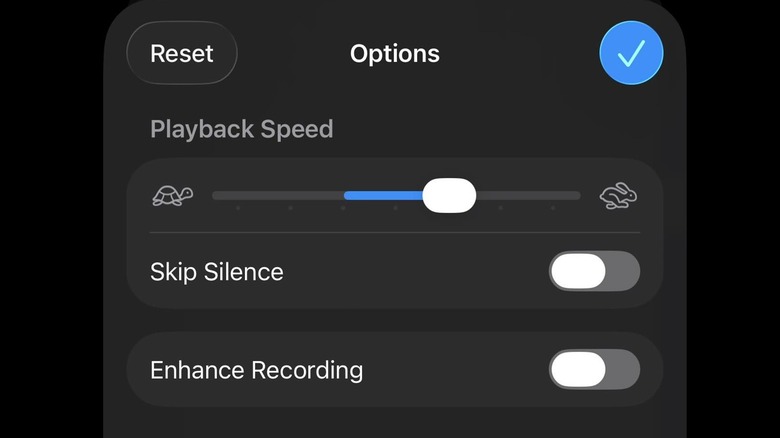
Some people like changing the playback speed of the media that they consume. For audio recordings, playing them faster may reduce the time you need to review meetings and brainstorming sessions, while slowing them down may make it easier to understand explanations of difficult concepts in lectures. If you're among those who like to do this, the Voice Memo app offers this feature for your saved files.
To access the Voice Memo's Playback Speed function, tap on the file in All Recordings or inside the folder, tap on the three-dot icon, then tap on Options. You can also access this menu by tapping the waveform icon and then the sliders icon on the lower right. The Playback Speed slider has symbols of a turtle and a rabbit on either end, which are cute visual representations of whether you want the recording to play slower or faster. A blue line will appear as you move the slider to show how far it is from normal speed.
Use recording as ringtone
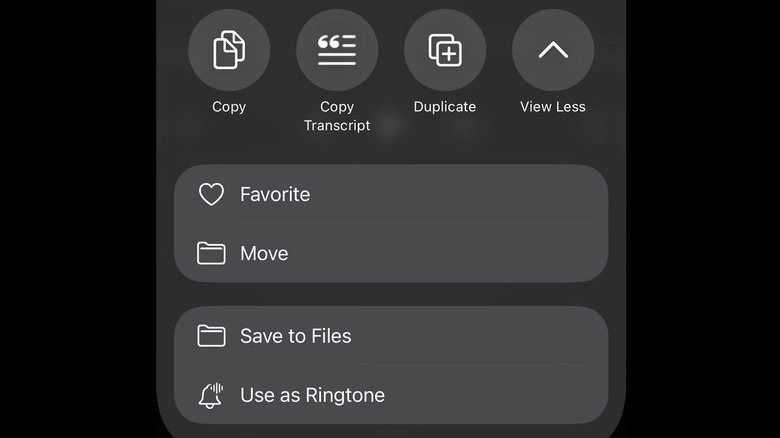
If you've ever made a recording and thought that you'd love to hear it often, how about using it as your iPhone's ringtone? You can do this by selecting the file in your Voice Memo app under All Recordings or in its folder, tapping the three-dot icon on the upper right, and then tapping Share. This menu will let you send the recording to your contacts, mark it as a favorite, and save it to your iPhone's Files app, among other functions, but the one that you'd want is the Use as Ringtone option. Tapping that takes you straight to the Ringtone menu within your iPhone's Settings, with your recording already selected.
The maximum length allowed to be used as a ringtone is 30 seconds, though, so you can't record an entire song and use it for this purpose. You can record snippets of a song, though other options include voices of your loved ones, or an interesting sound from an object or an animal.
Change recording mode
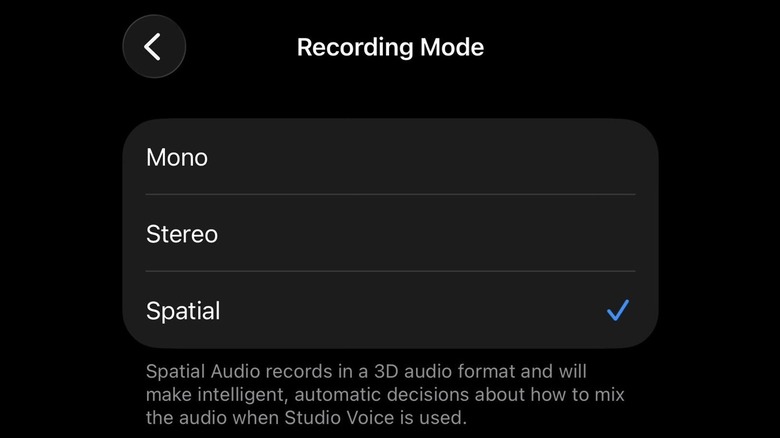
The Voice Memo app has three recording modes, but you can't change them within the app itself. You'll have to go to your iPhone's Settings, enter Apps, and select Voice Memos. If you tap on the Recording Mode option, you'll see three choices: Mono, Stereo, and Spatial. When you listen to a Mono recording using headphones, the audio will be the same in both ears, and for a Stereo recording, it will be different between the left and right ears. A Spatial Audio recording, meanwhile, will sound like it's coming from all directions when you listen to it.
Under the Recording Mode menu, there's an Audio Quality menu for the Voice Memo app. There are two options there: Compressed and Lossless. Compressed, or lossy, audio has lower quality than Lossless audio, but your files will take up less space on your iPhone's storage. If you've chosen to make Spatial Audio recordings, the quality will automatically be lossy, as this is necessary to manage the size of such files.
Skip quiet parts of recordings
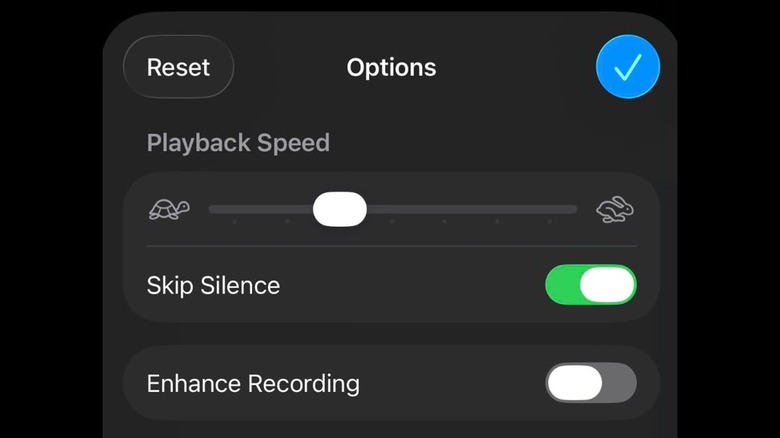
If a recording on the Voice Memo app has a lot of quiet parts because you weren't able to pause it whenever the lecturer stepped out of the room, or when the presenter faced technical difficulties, for example, you can activate the Skip Silence feature. Once it's turned on, playback of that file will skip the gaps, so you won't waste your time listening to nothing or have to make the extra effort of swiping through the waveform to find when the silent part ends.
Skip Silence can be found in the same menu as Playback Speed by selecting Options after tapping the three-dot icon on the file. However, it will only show up for recordings that you make either in Mono mode or Stereo mode. It won't appear for Spatial Audio recordings, so if you think you'll be using the feature for an upcoming session, you need to make sure to select the correct recording mode in preparation.
Remove background noise and echo/reverb
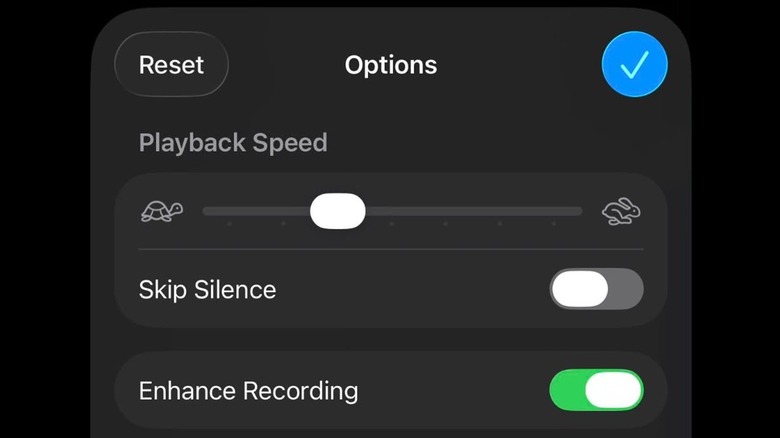
If you think the quality of your recording is a bit lacking, there's a way to make it better. For Mono and Stereo recordings, you can activate the Enhance Recording feature, while for Spatial Audio recordings, you can turn on the Studio Voice feature. Both aim to reduce background noise, echo in your Mono and Stereo recordings, and reverb in your Spatial Audio recordings. They also appear in the Options menu of each file, below Playback Speed and Skip Silence, after tapping the three-dot icon for the recording that you want to improve.
Take note that with the Enhance Recording or Studio Voice functions, activating these features will not edit the files. They only apply to playback of these recordings in the app, and you can revert them to their original state by tapping the Reset button at the upper left of the Options menu.
Make voices clearer

Enhance Recording and Studio Voice are excellent at filtering background noise during playback of recordings on the iPhone's Voice Memo app. However, if you prefer the actual file to have better voice clarity, you should activate Voice Isolation. To do so, once you start recording, swipe down from the top-right corner of your iPhone's screen twice to open the Control Center, then tap Voice Memos at the top. This will bring up a menu that includes Voice Isolation.
Voice Isolation uses the machine-learning capabilities of iOS to reduce ambient noise and focus on voices. It can only be activated while there is an ongoing recording session, but once you turn it on, it will apply to all of your future recordings until you deactivate it. You'll be able to better understand lectures, speeches, and other spoken audio with this feature, but it only works with Mono and Stereo recordings.
Recover recently deleted recordings
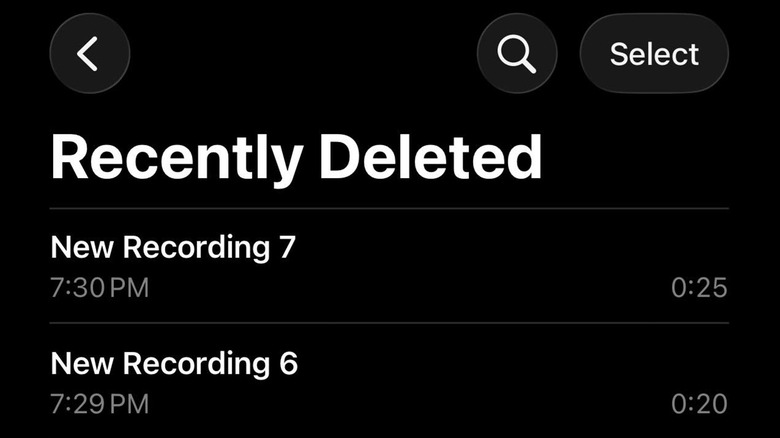
If you're cleaning up your files in the Voice Memo app's folders but mistakenly delete a recording that you want to keep, you don't have to worry. Your file will appear in the Recently Deleted section, which can be found on the front page of the app alongside All Recordings and your folders.
In the Recently Deleted section, you can tap on the files to access the playback function, so you can check their contents. You can then tap Recover on the lower left to send them back to where they were when you deleted them, or tap Delete on the lower right to permanently erase them from your iPhone. You can perform a search in this folder, which will also browse through their titles and transcripts, as well as recover or delete multiple recordings at the same time by tapping on the Select button on the upper right and selecting all the files that you want to include in the batch.