

Should You Enable Or Disable Pre-Caching On Your Steam Deck?

It doesn't matter if you've owned your Steam Deck for years or you've only recently unwrapped a shiny new unit; there are so many features, settings, tweaks, and configurations to consider that you'll almost always discover new things. Many options are meant to compensate for the Deck's limited capabilities, helping games run smoother and better despite its now-dated hardware. One of those settings, and it's a big one, is the system's pre-caching functionality. The Steam Deck shader pre-cache effectively pre-compiles graphics data for installed games before you play. It does this to prevent performance issues, like frequent stutters, and it works because the system doesn't have to compile the shaders in real time.
Your decision to enable or disable pre-caching should depend on several factors, mostly your handheld gaming preferences. It comes down to how much storage space you need, what games you play and whether those games take a performance hit with pre-caching disabled.
But before you decide, there are a few more things to know. Pre-caching doesn't always provide a huge benefit. Open-world and massive games like "Elden Ring" seem to benefit the most, as it significantly reduces background data loading while you play. But also, the Steam Deck will download shader updates from the server for games you have installed, which means your Deck will frequently download new patches, sometimes to an annoying degree. Moreover, caches take up storage space, which leaves less room for games if you have a model with limited storage. Valve has made some changes to how it works, even reducing the storage requirements, but some prefer to disable the feature altogether.
When to disable shader pre-caching on your Steam Deck
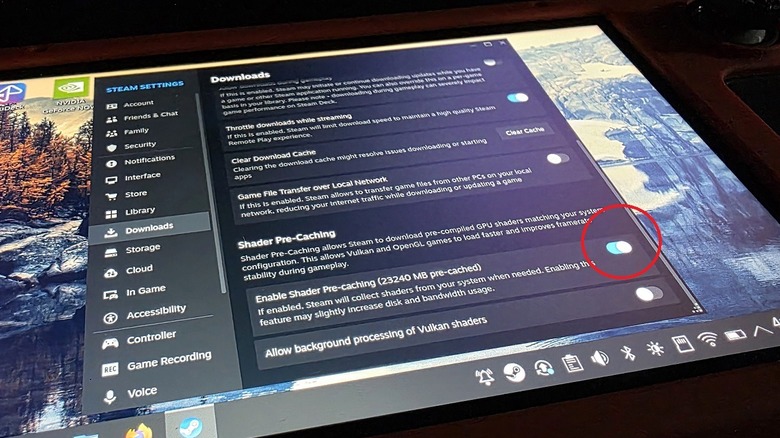
Do note that even with the pre-cache setting disabled, the Steam Deck still compiles shaders; it just handles the process differently and doesn't download packages from Steam's servers. So, that function still happens in the background. But disabling the setting can save you space. The biggest reason for doing so is if you have limited storage, like a model with only 64GB. As you likely know, you need as much space as you can get to install modern games.
Turning off the pre-cache can also reduce how often the Steam Deck downloads and installs updates. Almost every time you restart Game Mode or power-cycle the Deck, you might see several smaller downloads when it loads back up. These are usually shader cache updates for the games you have installed. This happens on desktop, too, but it's more noticeable on the Deck. Turning off pre-cache will reduce this significantly, which matters if you have limited bandwidth or download caps.
To disable the feature, switch to desktop mode by pressing the STEAM button and going to Power > Switch to Desktop. Wait for the desktop to load; it should start Steam automatically, but if it doesn't, launch it. Once it's loaded, go to Settings > Downloads > Shader Pre-Caching and deactivate the toggle next to Enable Shader Pre-Caching. If you haven't yet, you'll want to get used to desktop mode, as it's one of the things you should use first with any new Steam Deck. Desktop mode has a lot of powerful, useful tools you're probably underestimating.
When to use shader pre-caching on your Steam Deck

It is a good idea to keep the shader pre-cache enabled for most games by default, especially large-scale modern games and open-world titles. Examples include "Elden Ring," "Red Dead Redemption 2," "Bethesda" titles, the "Kingdom Come" games, and so on.
If you do leave it on, you can still clear and maintain the cache using various methods. Keep in mind, shader caches are usually removed when you uninstall a game, so that's an option too; uninstall games you don't intend to play. To clean caches, you can use a standalone app called Deck Cleaner to remove them, navigate to the appropriate folders on your Deck in desktop mode (and delete them), or use a Decky Loader plugin called Storage Cleaner. Don't forget to delete the compatdata, as well.
Installing Decky Loader and then installing the Storage Cleaner plugin is more technical. Be ready to do some tinkering if you decide to go that route. Decky Loader is one of a handful of essential Steam Deck apps you should be using, if you aren't already, so it's worth it. And if you need more storage space, the cheapest and easiest way you can instantly upgrade your Steam Deck is to install a new, larger solid-state drive. It's the best upgrade you can do, bar none. I've installed a 2TB drive in mine. As long as you're careful, pretty much anyone can do it, and I highly recommend it so you'll have more storage and keep those caches going.