

5 Essential Tips And Tricks To Make Your Windows 11 Computer Run Faster
Windows 11 is a bloated operating system that's taxing on system memory and CPU usage out of the box, even when idle. Xbox Mode cuts some background processes, but it doesn't fix the underlying issues of Copilot, telemetry, and other processes running while users just want to game. Some users have even resorted to going back to Windows 10 entirely. Windows 11's market share actually slipped through late 2025 while Windows 10 kept growing despite support ending. Rather than downgrading, the better fix is to strip back Windows 11 to improve performance.
In order to make worthwhile optimizations to Windows 11 and get the most out of your hardware, you'll be disabling certain Microsoft features like Copilot. For some of the tasks to do this, we're going to grab the free version of Chris Titus Tech's Windows Utility from GitHub. In my personal experience, it does everything I've needed it to do on a fresh Windows 11 install.
It's an open-source app that bundles the most useful optimizations into one easy-to-understand interface instead of the standard hunting through settings menus and finding the right command lines to get the job done. It opens with an elevated PowerShell command line, which can be found on the CTT Windows Utility GitHub page. Simply copy the stable branch command line, open an instance of PowerShell with administrator privileges, paste the command line, and hit Enter.
Enable Ultimate Performance Mode
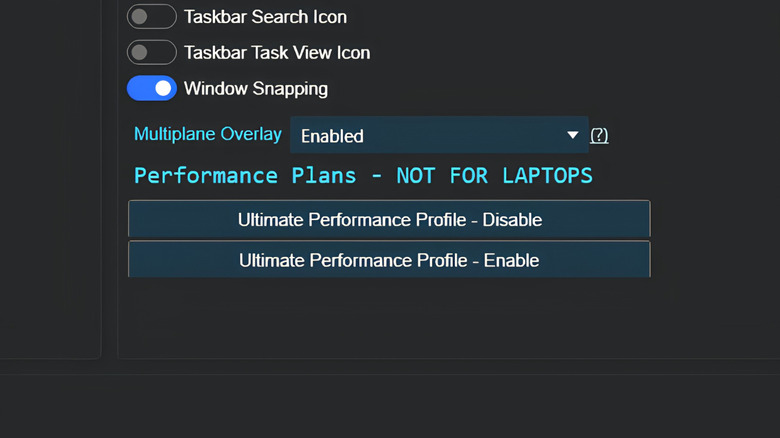
As a blanket solution, head to the Tweaks tab and click the Standard button. These are the recommended optimizations to carry out. It might take some time depending on a user's PC, and there are some additional optimizations I'd personally pick, such as OneDrive under Advanced tweaks. Just make sure in-use software doesn't need said features before ticking extra boxes; it's very easy to break programs and functions by getting rid of their dependencies. Removing Microsoft Edge is a good example, as Windows uses it for WebView instances and more.
Looking at the bottom right-hand side of the Tweaks tab is the "Performance Plans – NOT FOR LAPTOPS". This is where you activate the Ultimate Performance Profile, which unlocks peak component performance in Windows 11. It's a hidden power plan Microsoft originally built for high-end servers that removes power-saving limits so the CPU and GPU can run flat out, which is why it's switched off by default.
As I'm a complete anarchist, I enabled the Ultimate Performance Profile on my Maingear Ultima 18 laptop, and I've experienced no issues so far after a couple of months, but it does have solid cooling unlike many laptops out there. So don't enable it on your laptop unless you know its cooling system can handle it.
Remove Copilot
Copilot is the origin of the reasonably accurate "Microslop" moniker that aggravated Windows users have given Microsoft. The AI is included in everything, including Notepad, Snipping Tool, Photos, and Widgets, and more. It uses up to 500MB of RAM in background processes thanks to it running on an instance of Microsoft Edge via WebView 2. It can end up using over 1GB of RAM when you're actively using the AI, forcing an exodus of users to more capable Linux builds and the aforementioned older Windows systems.
To get rid of Copilot completely, not just stopping it from digging for usage data:
- Open the CTT Win Utility.
- Go to the Tweaks tab.
- Tick off the Windows AI box under advanced tweaks.
- Hit Run Tweaks.
Some Windows updates can reinstall Copilot, so it's just a case of doing this process again if it comes back. Doing this will get rid of Copilot in software, on the taskbar, and free up a sizable amount of RAM in the process, regardless of Windows sticking to its word. The only thing this tweak won't do is remove the Copilot key on a new laptop keyboard.
Optimize Windows 11 Presentation
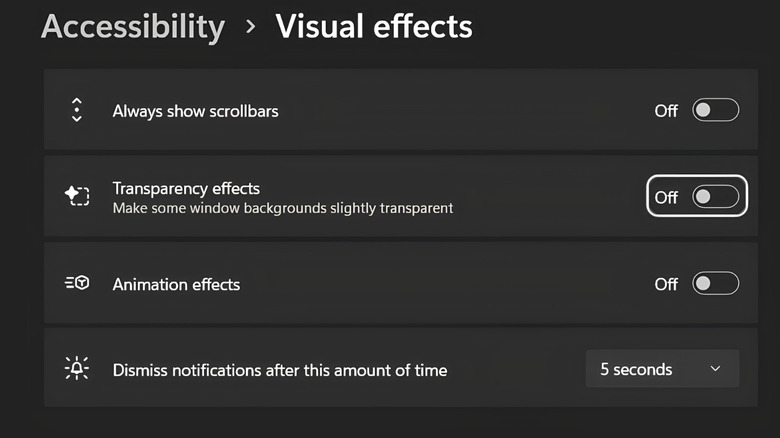
It's nice having a fancy-looking operating system, but every transparent window and smooth visual effect uses system resources. High-end gaming rigs will handle it, but what's the point in spending CPU, GPU, and RAM on something that's not going towards performance? Plus, making these changes will make the general Windows 11 experience feel and act much faster. The layering tax is real with transparency effects. With it on, the GPU needs to allocate more resources in real time, which has a knock-on effect on the CPU.
With it turned off, the GPU only needs to draw the window, which frees up VRAM. Animations are a similar situation but also tax CPU performance. Minimizing, maximizing, and fade animations cause the GPU and CPU to calculate frame-by-frame motion, which causes stuttering due to resource spikes. Turning it off switches states instantly and is far less demanding. The widgets panel, like Copilot, is another instance of Microsoft Edge through the Windows Web Experience Pack, meaning its background processes are pulling data even when idle. Long story short, disabling them is an easy way to free up RAM.
Widgets and visual effects can be disabled and set to performance settings within the Chris Titus Tech Win Utility in the Tweaks tab. Alternatively, users can just navigate to the Windows 11 accessibility menu, click Visual effects, and disable them from there. I noticed a slight increase in frame rates just doing this alone.
Block Telemetry
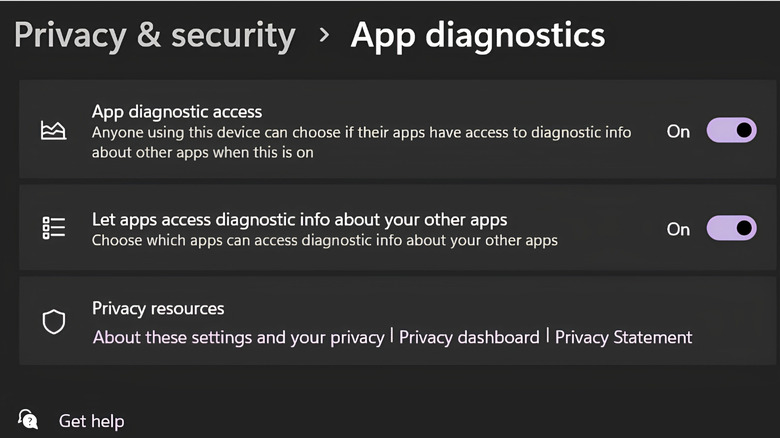
Telemetry within Windows 11 automatically collects and transmits diagnostic and usage data to Microsoft. This information is gathered by background services that monitor system health, reliability, and features. Users can go into the App diagnostics menu to turn some telemetry off and lock down their privacy settings, but the related background processes are still active regardless. This step only reduces the amount of data being sent; it doesn't stop telemetry at a system level.
There's a different way to block Telemetry in Windows 11, but once again the CTT Windows Utility is the easiest way. Head to the tweaks menu again and tick the telemetry off (service-level) box and run the tweak. This block goes deeper than the Settings menu, stopping telemetry at the system level and freeing up CPU bandwidth.
This step comes in handy for lower-end CPUs and laptops where every bit of processing power counts. Telemetry control should be fully in the user's hands; this is their data, not Microsoft's. It can cause random disk access and wakeups, compatibility scans, and unnecessary power draw. Before setting up the telemetry block, be aware that Windows Update may behave differently afterwards, so make sure to double-check update settings in case they've changed.
Set the correct refresh rate
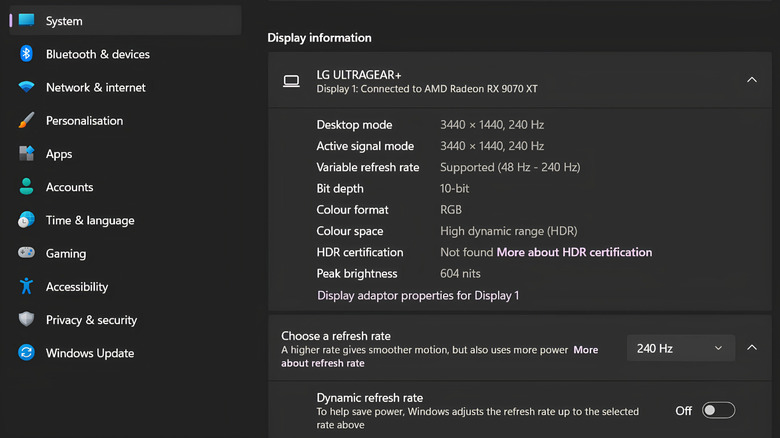
Windows 11 will likely default a gaming monitor's refresh rate to a lower setting. The refresh rate is the number of times per second a screen redraws an image. For example, a 240Hz gaming monitor left at 60Hz will only ever display 60 frames per second, which is a waste. The higher the refresh rate, the smoother the animation, which, alongside low response times, reduces motion blur.
Competitive gamers playing titles such as "Valorant" and "Fortnite" want the highest refresh rates possible, as they can take advantage of faster player response times thanks to more frames being produced on a gaming monitor. Not to mention faster input response being a big competitive edge.
Higher refresh rates above 60Hz/60 fps reduce fatigue during long gaming sessions thanks to being higher than the flicker-fusion threshold for human eyes. More frames per second means more visual updates being bounced off a user's retina, which leads to less eye strain. Low frame rates are often perceived as flickering, which can fatigue users. Just right-click the desktop and go into display settings, then advanced display settings, and make sure the resolution and refresh rate match the monitor being used.