7 Android Gestures You've Probably Never Tried (But Really Should)

Smartphone gestures entered the mainstream after Apple introduced the iPhone in 2007. When the first Android phone, the HTC Dream, was launched the following year, it incorporated similar gestures – like swiping to answer or end phone calls. At the time, these phones also used physical buttons because using gestures to navigate around your phone wasn't familiar to people back then. Now swiping, pinching, and dragging are second nature. But you need to know about gestures to use them, and there are options available that you might not even know exist.
It's difficult to explain some of the subtle differences in phone swiping. We have included videos to help, but it's still going to require some trial and error when you try it on your own phone. A slight change in swipe speed and you might find yourself activating something else entirely. Still, it's worth the initial frustration of trying to get the hang of these things because they become part of your muscle memory in no time. All the videos are taken on a Google Pixel 8 Pro. Things should work more or less the same on other major smartphone brands, but where there are notable differences, I've tried to mention them in the instructions.
If you've stumbled on this article by accident and actually really dislike using gestures to navigate around your phone, it's worth knowing that gestures are still optional on most Android phones. You can opt to use old-school 3-button navigation instead. To do this, go to Settings, then System, and select the Navigation Mode option. Here you can toggle on 3-button navigation.
Switching apps and tabs with a swipe

There are two primary methods for switching between open tabs on your Android phone. You can switch between apps by swiping up from the bottom of the screen and pulling up the Overview. But it turns out that all you need to do is swipe left or right on the small bar at the bottom and scroll back and forth to see your open tabs.
The first way to open the Overview screen is by swiping from the bottom of the screen to the middle and then holding it there for a moment. You can do this from any screen, and you'll see your open tab shown as a smaller preview screen, with the edges of other tabs visible to the left or right of it. To move between preview screens, swipe left or right. To open one of the apps, tap on it or swipe downwards. To close a tab, swipe up.
The second option is quicker, but it relies on you remembering what order your open tabs are in. Simply swipe left or right on the short bar at the bottom of your screen, and it will take you through all your open apps. It's quicker than the Overview method, because you don't need to tap or swipe to open the tab you want. Once you've swiped there, it's already open.
Side swiping to access menus
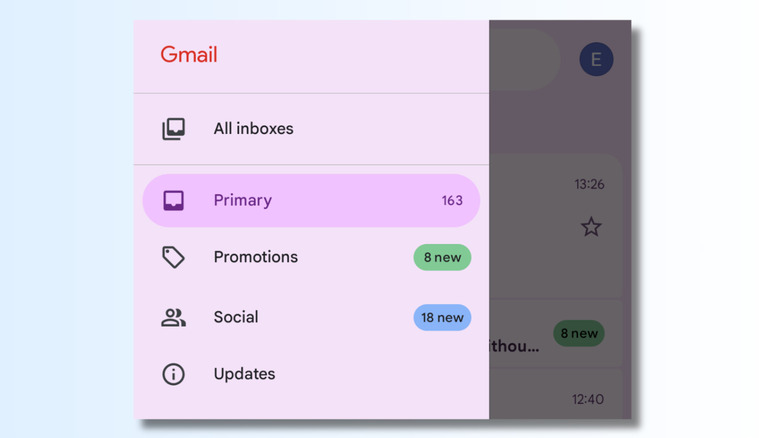
Android phones have a swipe gesture that works as a back button. If you're on a web browser like Chrome, for example, it will take you to your previous page. You simply swipe from the left or right of the screen, a small arrow appears, and your page will change to the previous one. This is all very handy, but sometimes it gets in the way of other actions. For example, it can interfere with accessing the left-hand folder menu on Gmail. It's pretty frustrating if you're trying to perform one action, and the 'back button' gets activated instead. So it's useful to know that there are a couple of gestures that enable you to distinguish between the back button and accessing left or right-hand menus.
You can change the angle of your swipe. Because swiping at a 90-degree angle from the side of the screen will inevitably bring up the little "back" arrow, switch to swiping at a 45-degree angle upwards or downwards. This works best when you do it slowly and will pull out the menu. Another method worth trying is to hold your finger on the outer edge of the screen with one hand and then pull the menu out with the other. And while you're improving your Gmail navigation, you could also remove the annoying Google Meet button at the bottom of your screen.
Tapping on the back of the phone
Some actions, like taking a screenshot or turning on your flashlight, don't even need a screen. They can be performed by double-tapping the back of your phone. This feature is available on many Android phones, including Google Pixels, Xiaomi, and Motorola. If you have a Samsung phone, you'll need to set it up by downloading Good Lock from the Samsung Galaxy Store and installing RegiStar.
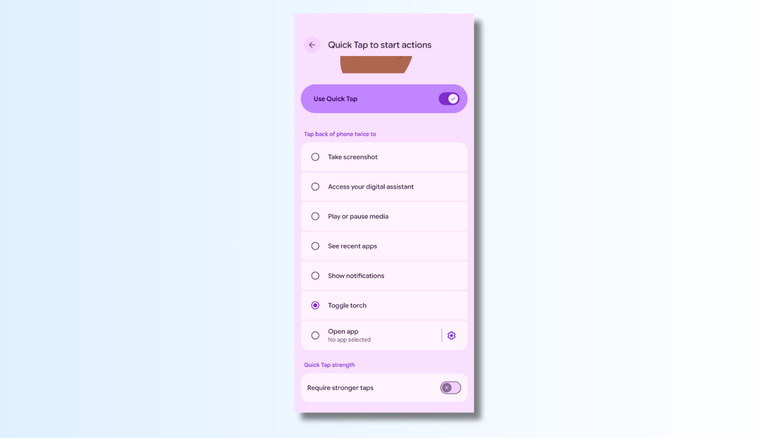
To activate Back Tap on a Google Pixel phone, go to Settings, then System, and select Gestures. Select the "Quick Tap to start actions" option. Options include taking screenshots, accessing the digital assistant, playing or pausing media, seeing recent apps, showing notifications, and turning on your phone's flashlight without opening your phone. You can also set the back-tap gesture to open a specified app. On the Quick Tap screen, ensure that the toggle is switched on, then select the option you want. To set up the Open app option, tap the gear icon and select your app. Some have multiple Quick Tap options. For example, WhatsApp can be set to either open the main app or a conversation with a specific user.
Once this is set up, tap the back of your phone twice in quick succession to activate your preferred option. You can also set it to require stronger taps so it won't get accidentally activated when you don't intend it to. Even with it set to regular tap strength, I had to tap my phone pretty hard in order to get it to respond, so you might not need to activate it. Plus, the feature didn't work at all when I had a plastic protective case on my phone, so if you usually use a phone cover, you might not find this gesture particularly useful.
Long-press to search images onscreen

Google's Lens-based screen search is a function I've often activated by accident. It's triggered by pressing on the bar at the bottom of the screen, so it's easy to turn it on if you're holding your phone with your thumb in the wrong place. If you do open it when you didn't mean to, it's easy enough to close it by pressing the X at the top left of the screen. However, it's actually a really handy feature when you activate it on purpose.
On a Google Pixel phone, you can hold your finger on the bottom bar for a couple of seconds, and you'll see a small text box at the bottom of your screen. You can either type here or activate the microphone to ask Google questions about what's on your screen. You can also circle or tap areas of the screen, and Google will automatically search for the same or similar images online. Once you've mastered the basics, there are a lot of ways you can use Google Lens for everyday tasks. The search can be a bit hit-and-miss depending on how easily identifiable the image is. It can be useful for finding sources, but Google does have a habit of confusing similar-looking items. This gesture also works on non-Google phones when you're using a Google app, like Chrome, but it isn't integrated everywhere like it is on the Pixel.
Swiping diagonally to open Gemini Assistant

On most Android phones, the Gemini AI assistant is only a swipe away. You'll need to enable it first, which you can do on a Pixel phone by going to Settings, selecting System, then Navigation Mode. Tap on the gear icon next to Gesture Navigation and toggle on Swipe to invoke the assistant. Once it's enabled, you can swipe diagonally from either the bottom left or bottom right of the screen, on any screen, and it will open a small "Ask Gemini" text box at the bottom of the screen. You can type queries here or activate the microphone to chat with the Gemini AI assistant. At the moment, answers are displayed on top of the screen you're looking at, but there's word that Google may soon be improving this feature.
You can adjust the sensitivity of the swipe on the settings screen, so if you keep finding that it gets turned on when you don't want it, lower the sensitivity on the slider. You'll probably have to play around with it a bit before you get the setting that works best for you. If you want to limit the gesture to left or right-swipe only, then you can disable the other option by sliding the setting all the way to the left.
Many non-Google phones also use this swipe gesture, although it's not available on all Samsung versions. You can also launch it in other ways, like a long-press of the power or home button, or by using the "Hey Google" voice command.
Swiping down for notifications and quick settings

Swiping down from the top of the screen opens up the notification and quick settings screen. One swipe provides a short menu, and a second swipe gives you a longer list. You may already know that you can use this gesture to access things like screen brightness, internet connectivity, flashlight, airplane mode, and more. What you might not realize is that these things are entirely customizable, and you can remove and add icons to get just the options you use. To edit the tiles, pull down the full menu and then select the edit icon, which looks like a pencil. This shows all the tiles you currently have set up, followed by all available tiles, grouped by category.
To remove applications and settings from your list, select the minus button on the relevant tile. To add new options, scroll down the list and select the ones you want. As well as the things that came pre-installed with your phone, like display and accessibility settings, you can also add quick settings from apps you've installed, like Amazon, ChatGPT, and productivity apps like Todoist. If you add a lot of new tiles, the swipe-down list may extend onto several pages, but you can drag icons up and down the list on the edit page to ensure that your most-used tools are just one gesture away.
Glide typing

Once you've started using swipe gestures, tapping the screen at all might feel like altogether too much work. Who has time to lift their finger off the screen? We're busy people! If you've not used the glide typing functionality on your Android phone keyboard, then prepare to have your mind blown. Glide typing — also known as swipe typing — lets you enter whole words by sliding your finger from letter to letter without lifting it from the keyboard. Simply place your finger on the first letter of a word, trace a path through the remaining letters, and lift your finger at the end, and your keyboard should show the right word. The results are pretty impressive, even if you type something like "My octopus circumnavigated the Ottoman".
Ensure you've got Glide typing switched on. On a Google Pixel phone, you can do this by going to Settings, then System, and selecting On-screen keyboard. Then choose Gboard and Glide typing, where you can toggle on the feature. From here, you can enable Glide trail to see a visible line following your finger as you swipe and "Glide delete," which enables you to swipe left on the delete key to quickly delete words. You can also toggle on "Glide cursor control," which lets you move the text cursor by swiping on the spacebar if you want to go back and change things. I have all the features turned on because I think that's the most fun, but you'll soon figure out the option that works best for you.
Gboard is installed on many Android phones, so this feature isn't just limited to Pixels. If you don't have Gboard already, you can install it. You can also check out alternative on-screen keyboards like Microsoft SwiftKey or Heliboard.