10 Handy Arduino Accessories For Your Next DIY Project
We may receive a commission on purchases made from links.
The world of electronics is fascinating, but it has a high barrier to entry. Trying to program a full-blown computer or understand the complex circuitry of an advanced electronic gadget is impossible for a beginner. The Arduino overcomes this barrier by providing a simple computer assembled on a single board, small and easy to handle. You connect various modules, put together basic circuits, and watch the magic happen.
As you might expect from this open-ended premise, what your Arduino can do depends completely on the kind of accessories you have. The starter kit does come with quite a few odds and ends, but any actual project would require more than the default options. Of course, the exact components you need depend largely on what project you are trying to construct. But there are some accessories that are handy for any project, in addition to the tools you need. And we don't mean general-purpose DIY gadgets and tools.
The Arduino may be simpler to get into than a more advanced computer, but it is by no means a cakewalk. You are still dealing with an electronic circuit with multiple digital components. This means managing things like the voltages, current, and even the signal logic that flows between them. The default Arduino kit doesn't include many tools for these aspects, leaving you to figure things out through trial and error. It is better to use specialized tools to diagnose and understand your Arduino circuits more easily.
Multimeter
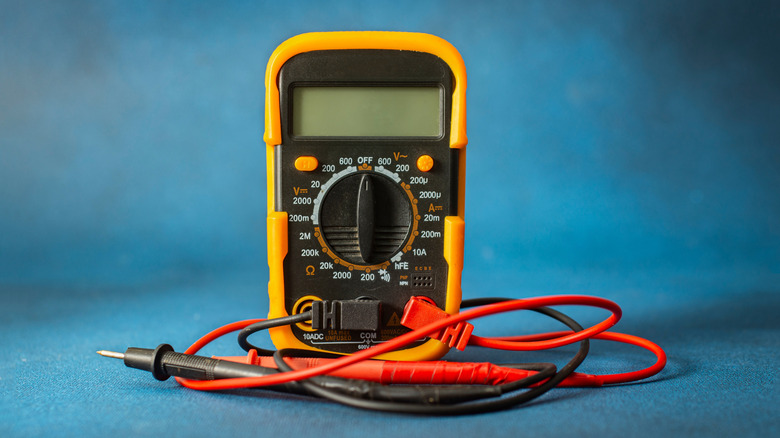
A multimeter is not even an Arduino-specific accessory, but a handy tool in general. You have probably seen the digital multimeter recommended as a must-have for a home toolbox before. The reason for this is simple: The multimeter is a very versatile diagnostic tool. It can be used to understand the key metrics of any electrical circuit, including the appliances plugged into your mains or a small Arduino project you are tinkering with. It is even an easy way to check your car battery.
But what does it actually do? A multimeter can measure aspects such as current, voltage, and resistance in a circuit, among other things. Older models were analog, but modern digital versions display the results on an LCD, making them very easy to use even for a complete beginner. You don't need to understand every feature of a multimeter, either; just pay attention to basic measurements like voltage and current to diagnose electrical issues.
For an Arduino specifically, this helps you identify which part of a circuit is misconfigured. Normally, if your project doesn't work as intended, you are just forced to take it all apart and check every connection. But with a digital multimeter, you can figure out exactly where the current is stalling, or which component is failing to receive the correct voltage. This saves a lot of time troubleshooting your Arduino circuits and accurately pinpointing the problem. Pick up a multimeter online or from your local Walmart; it is worth it.
DC-DC converter
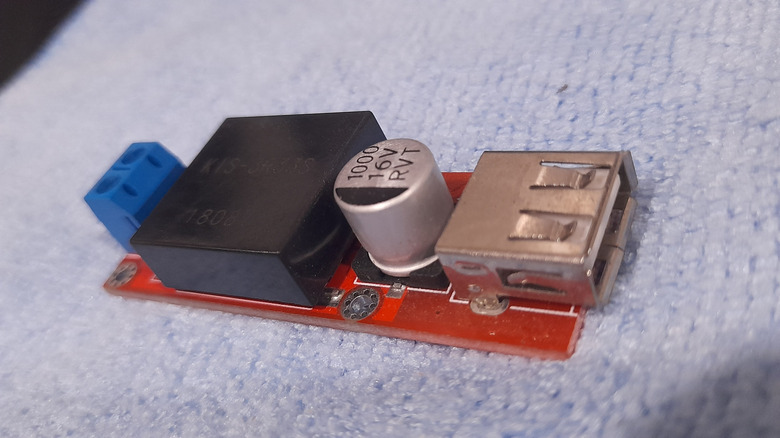
The Arduino is an electronic circuit, which means it runs on DC current with steady voltages. This current is usually supplied by using a battery, as the power needs of the Arduino are quite low. The exact amount depends on the various components wired into the circuit, and can vary from one component to another. This is where you may notice a problem -– how do you ensure every part gets only the amount of volts it needs?
For example, any sensor you use in your Arduino project would run on very low power, while something like a stepper motor would require much more power. You can always hook up a larger battery to meet the maximum power needs, but then you will fry the sensors. This is where DC-DC converters come in handy. They come in various types, from step-up (boost) converters to step-down (buck) converters. There is also the hybrid buck-boost converter that can function in either role depending on configuration.
Converters like this work exactly as their names suggest: They transform the current flowing through them, either increasing or decreasing its voltage. With a few of these, you can put together any kind of circuit you want, irrespective of the potential differences between the various modules. Go for one with multiple outputs for maximum flexibility.
Benchtop power supply
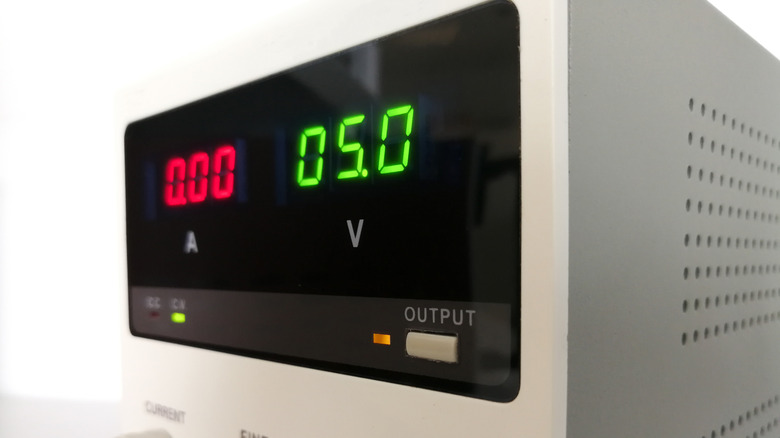
Arduino projects, like most small electronics, run on batteries. This is fine when you know exactly how many volts your project needs, but in the initial stage, when you are still figuring things out, that is not the case. Having to swap out batteries every few minutes to match your project's changing power draw is very cumbersome. And you can't just plug it into the mains supply directly, as electronics like this run on DC power, while your home supply is AC. A lot of portable power stations have DC outputs, but they are fixed voltage.
But what if you could get a device that converts the AC current into a DC supply of any required voltage? That's exactly what a benchtop power supply can do. A bench power supply is an adjustable device that plugs into the mains socket and converts that into a steady DC current for powering any electronic device. The best part is that you can precisely set the exact current and voltage you want.
This makes it really handy for experimenting with an Arduino project, as you can adjust the power level according to the components you are connecting to your board. Some advanced benchtop supplies even have an autoranging power supply that adjusts power parameters based on the connected load. This means you can just tinker away without having to manually adjust anything and get the right amount of power. A great accessory for any starting Arduino dabbler.
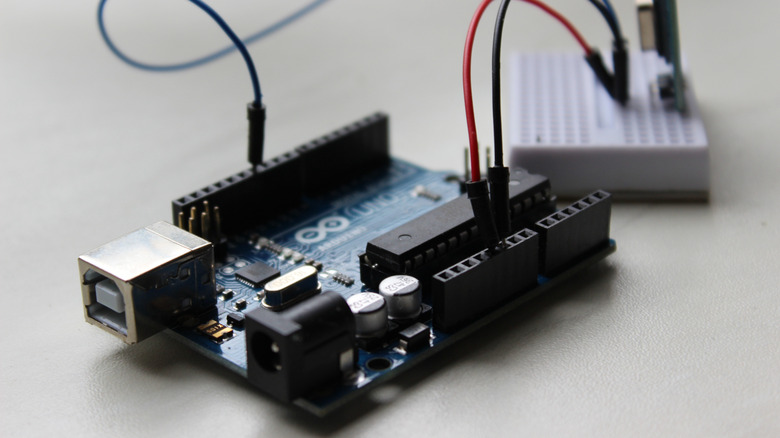
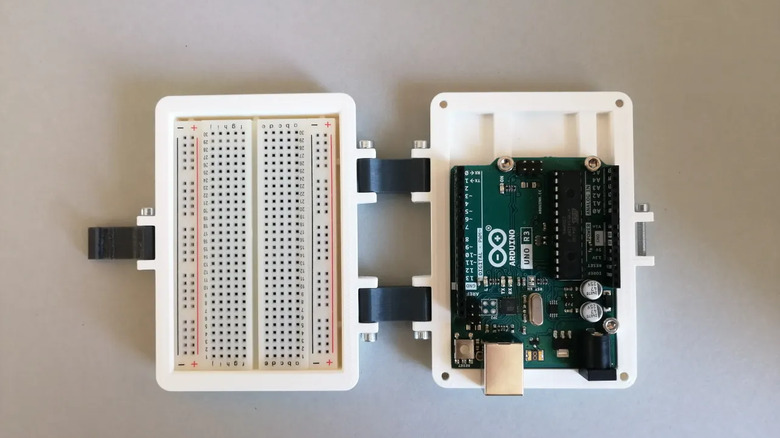
Breadboard
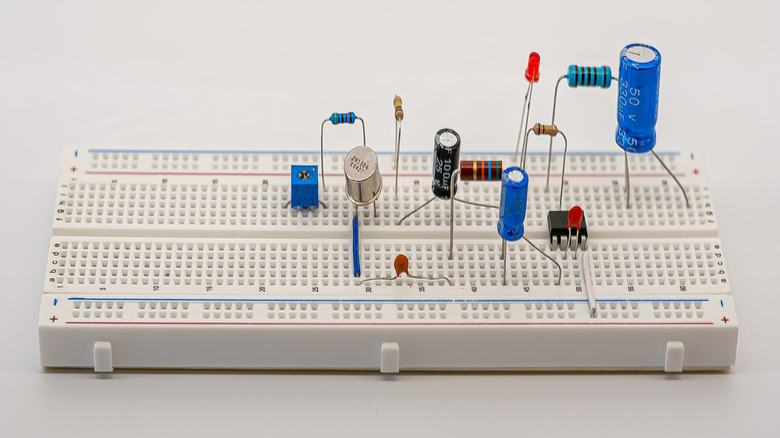
Any electronic gadget is built on a PCB board, with soldered connections bridging the various active components of the circuit. Of course, this is only ideal for permanent circuits, and you want a more flexible option for connecting things when experimenting. The Arduino solves this to some extent by providing various headers for connecting to any modules. You can plug some things in directly with the appropriate header pins, or use cables.
The problem with this approach is that even this can get tedious. If you are trying to prototype a project and deciding on the exact layout of the circuit, the last thing you want is to fiddle with a mess of cables as you plug in and out various modules. The solution is to use a breadboard. The name may sound strange, but it is basically a solderless board with a grid of tiny holes for mounting electronic components. The holes are all connected by design, so you can simply push in any part and it becomes a part of the circuit, without needing any cables or soldering.
A decent-sized breadboard is essential for getting started with Arduino, as it lets you test out any fun project ideas without being daunted by the connections. As a beginner, you will also have a much easier time figuring out circuits on a breadboard. It is also possible to build your circuit permanently on the breadboard itself, even soldering the connections if you want.
Logic analyzer
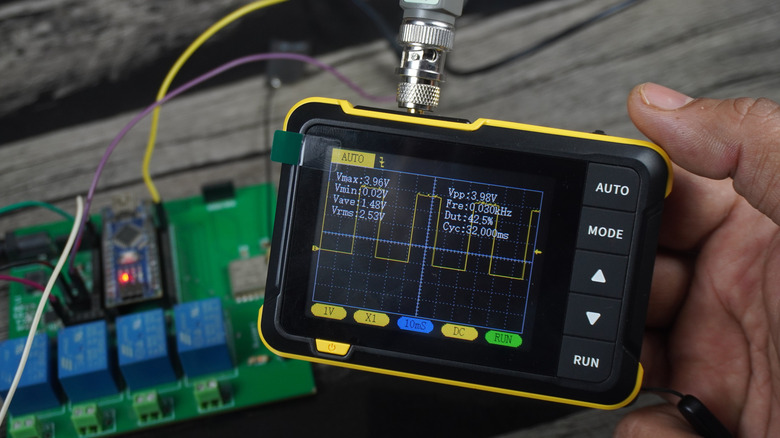
The main thing that separates the Arduino from a simple electronics board is that it is actually a fully functional microcontroller. This means it has a CPU, RAM, and assorted components that can handle complex logic and be programmed with instructions. But this also creates a new dimension of troubleshooting to deal with. When an Arduino circuit you design doesn't work as intended, is the problem purely electrical or logical? Incorrectly configured sensors can end up interfering with each other or sending the wrong signal, leading to the Arduino processing their inputs in an unexpected manner.
Normally, there is no simple way of diagnosing a logical issue. A multimeter can only tell you about the electrical aspects of the circuit, and logic signals are too low-power to be detected this way. You are left with just trial and error to manually figure out the issue. Unless you have a logic analyzer.
A logic analyzer is a gadget that can connect to a digital circuit and accurately capture its signal flow, helping you easily figure out how the logic is moving through the circuit. With a logic analyzer, you can see exactly what is happening to each individual signal and pinpoint where things go wrong, saving hours of manual debugging. It can seem like a daunting gadget to get started with, but it is easy to use for simpler digital boards like the Arduino. Highly recommended for any serious Arduino hobbyist.
Level shifter
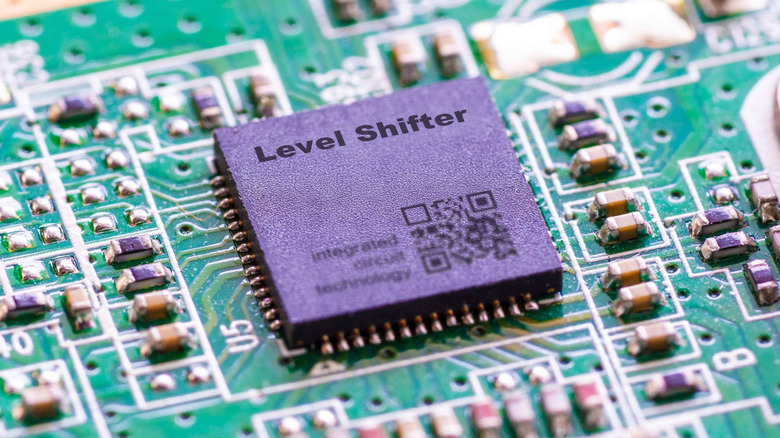
We talked about the logical issues in digital circuits and how to diagnose them with logic analyzers, but how do you resolve them? For things like incorrect wiring, you can just fix your connections, but that isn't useful for handling the interaction among multiple input types. When you have multiple sensors or even multiple shields connected to the same circuit, you need to carefully handle the flow of signal data between them. If connected directly, the varying voltages will overpower each other, giving inconsistent results.
What you need is a level shifter. It is a simple module that can shift the logic level of any signal higher or lower, depending on the need and configuration. Usually, this is between 3.3V and 5V, as most Arduino accessories are rated for these voltages. A single bi-directional logic level shifter can usually handle multiple such conversions, so getting even a single one is enough for any Arduino project you have in mind.
And if you think you can just use DC-DC converters instead, think again. Boost or buck converters are used to adjust the power supply for your components, not for logic flow. You use them when there is a mismatch between the power your battery provides and the power a component needs. A level shifter, on the other hand, shifts the voltage level of a digital signal, preserving its information. You use this to bridge different digital components interacting in a circuit. A must-have Arduino accessory.
LED matrix panel
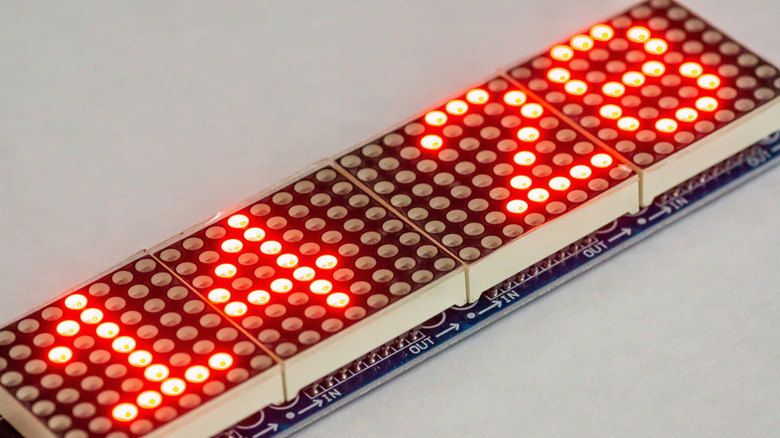
The starter kit comes with a few LEDs of various colors, and it can be really fun connecting them and programming your Arduino to light them up in cool patterns. The problem is that there is only so much you can do with a handful of LEDs, and single-color LEDs at that. What you really need is a grid of RGB lights that you can then program to truly communicate.
You can even use this method to "print" out letters or digits, displaying simple messages. Since the Arduino lacks a screen or anything similar, this visual feedback can be very useful. Of course, it is possible to buy an LCD screen for this purpose as well and to print text directly. But that won't teach you the fundamentals of handling multiple components and having them work in tandem. Besides, an LED matrix panel is more noticeable at a distance and a more fun project.
There is a lot of variety in RGB LED matrices in the market. The main difference is in the resolution, or the number of LEDs in a grid like this. You want a grid that is big enough for basic shapes and patterns, but not so dense that it becomes a pain to program with an Arduino's limited RAM. An 8x8 RGB LED matrix is the best for Arduino projects.
Solid state relay
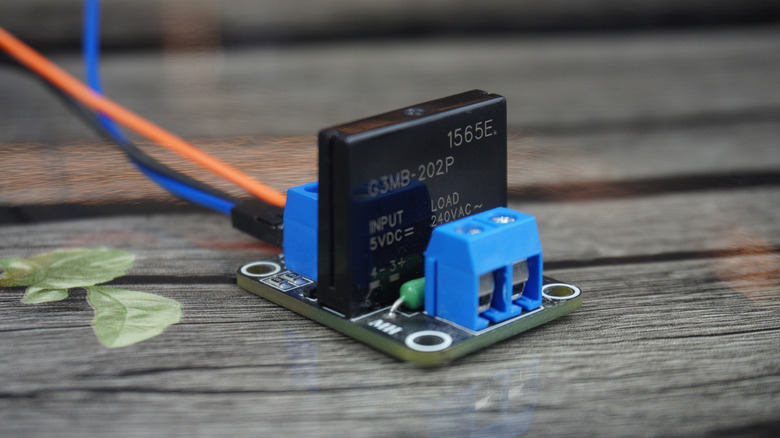
The Arduino's main draw is being a simple, low-power computer that can be programmed to operate on smart logic based on sensors and other factors. But what if you want to control actual home devices using your Arduino instead? With something like a Raspberry Pi, this is easily doable, as you have a proper computer with network access. As such, there are a lot of DIY Raspberry Pi smart home projects.
For an Arduino, you need a solid-state relay (SSR). Normally, you cannot directly connect your Arduino circuit to a home appliance. The Arduino is a single-board computer running on low-voltage DC current, while devices that plug into the mains are built for high-voltage AC current. An SSR bridges this gap by working like an electronic switch that can handle the high-power loads while being triggered by low-power signals.
Basically, you connect any standard machine to the socket via the SSR, then use your Arduino to control its behavior, as you would with an LED. This way, you can program the microcontroller to switch the device on and off based on complex logic, including input from any sensors, effectively turning your Arduino into a home-automation device. A solid-state relay is rather inexpensive, so you can easily buy a few for various projects. Just keep in mind that the output voltage matters, as it needs to be able to handle the device's load without getting fried.
Stacking headers
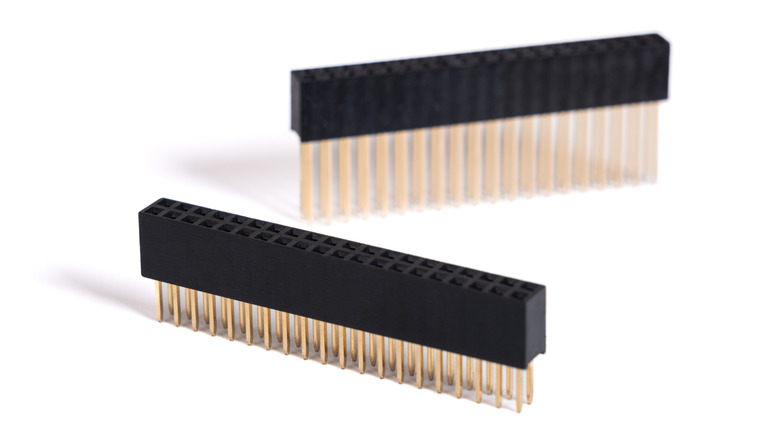
A breadboard is great for experimenting with various circuit configurations, but when the time comes to put the project together on a more permanent basis, you need direct connections. The design of the Arduino makes this easy, with multiple headers available that you can plug any modules into. For simple circuits, this is enough to accommodate everything you need. But once you start adding a few more components, you realize you can't exactly fit everything in the scarce few headers on the board.
The compatibility itself isn't the problem. In terms of hardware, the Arduino is capable of accommodating a lot of add-on modules. The problem is physically fitting all those connections in, since there are only so many headers, and beyond a point, the components struggle to fit on one tiny board. The answer is stacking headers.
These headers are designed with very long pins that go through the board, allowing you to mount components vertically. The height ensures that anything you attach this way is clear of the components directly on the base Arduino board. And since they feature male and female connectors on different sides, you can repeat the process, mounting another board on top with its own set of components. This is called a shield and is how people stack layers of modules on the Arduino, making it infinitely extensible. Definitely get a stackable header kit to make your next project easier to assemble. Maybe even a budget soldering iron to install them.
Case
The Arduino comes as an open electronic board with all its key components mounted visibly on the printed circuit board. This design choice is deliberate, as the Arduino is meant to help students and hobbyists get started with electronics. But once you have put together a project with multiple components, this same design philosophy seems risky. The Arduino is unprotected, and accidentally dropping this mass of fragile electronic components can be devastating.
One key accessory worth investing in is an Arduino case. It doesn't have to be anything fancy; even a simple transparent plastic shell can protect it from scratches and impacts without hiding the inner workings. The problem is that Arduino itself does not sell anything like it, and the varying sizes of the Arduino models mean that a standard case cannot exist. Instead, people 3D print cases.
A 3D printed case is completely customizable, and people have come up with a wide variety of designs to accommodate different sizes and needs. It is easy to modify a design like this to leave cutouts for the ports your project needs, and a flat case is straightforward to 3D print as well. You don't have to bother coming up with a design yourself, either, as there are plenty of sites with free 3D printing projects and open source models you can search from.