Change These 5 Settings To Turn Your iPad Into A Kindle Replacement

With Apple fitting the iPad with the same chip as the MacBooks, it's pretty much safe to say that it can be as versatile as a computer. In fact, your iPad can replace a laptop if you pair it with a mouse and keyboard (or a keyboard with a built-in trackpad). You can also use the iPad as a game console, thanks to remote gaming services like the Xbox Cloud Gaming and a Bluetooth game controller.
But probably one of the easiest things you can convert an iPad to — without the need for accessories — is a Kindle. The iPad's large screen is perfect for reading, and since it supports the Kindle app, you get almost the same library and reading interface. The catch, though, is that your iPad can't fully replace the Kindle, primarily because they have different hardware and software.
Thankfully, there are some workarounds to turn your iPad into a Kindle replacement. For one, you can install a matte or paper-like screen protector to make the screen less glaring. To avoid getting your wrist strained from holding the iPad for long hours, you can use a Kindle remote control for turning the pages from a few feet away. On the software side, you can also tweak several clever iPad settings to make it look and work similar to a Kindle. Here are some of those settings.
Adjust the display settings
The Kindle is well-known for its glare-free, warm, and (usually) colorless display. The iPad is the complete opposite of that, but fortunately, it comes with several display settings that can somehow recreate a similar effect to the Kindle screen. For one, there's Night Shift. Night Shift is what adds a warm Kindle-like glow to your iPad. You also have True Tone, designed to change how the display looks based on ambient lighting. And of course, just like on a Kindle, you can adjust the brightness level on an iPad too. Here's how to change these settings:
- Open the Settings app.
- Choose Display & Brightness.
- Move the Brightness slider to a more comfortable level.
- Enable True Tone.
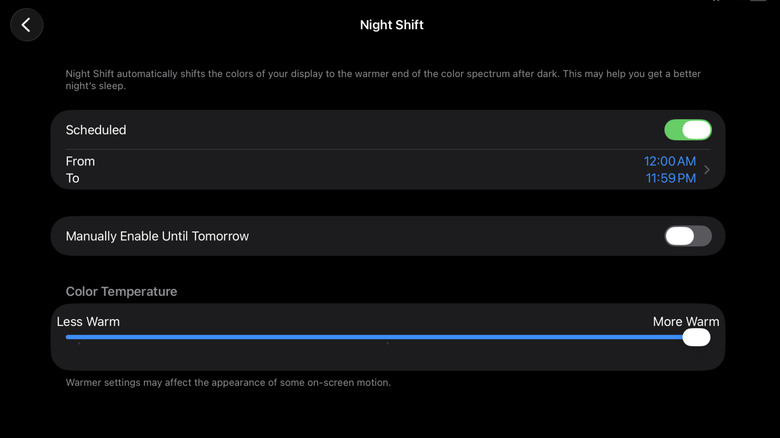
- Go to Night Shift.
- Under Color Temperature, drag the slider to your preferred warmth.
- Turn on Scheduled.
- Tap Custom Schedule.
- Have Night Shift turn on at 12 a.m. and turn off at 11:59 p.m. to keep it on almost all day.
Besides the options under Display & Brightness, you'll also find some clever display settings in Accessibility: Color Filters and Reduce White Point. Color Filters change the color of your entire device. Reduce White Point, on the other hand, further softens the brightness of the screen. Follow these steps to adjust these settings on your iPad:
- In the Settings, head over to Accessibility > Display & Text Size > Color Filters.
- Toggle on Color Filters.
- Set it to Grayscale.
- Press the back button.
- Switch on Reduce White Point.
- Adjust the level to your liking.
Your iPad should now be easier on the eyes. Keep in mind, though, that with these settings enabled, it will be too dim to read on your iPad outdoors. But these are the perfect settings for reading indoors, especially in a dark room or at night.
Enable Guided Access
One of the things users love about the Kindle is that it does one thing and does it well: keep you focused on reading. Unlike on an iPad where distracting apps are all just a quick swipe away, the Kindle locks you in just one "app" — the eBook reader. Sure, you can just uninstall all the apps on your iPad — except for the Kindle app — to achieve the same experience. But you really won't need to. There's one underrated iPad feature that allows you to stick to a single app while reading on your iPad. It's called Guided Access, and it's an Accessibility setting meant to help you focus on the task at hand. To turn on and use Guided Access, here's what you need to do:
- From the Settings, select Accessibility.
- Scroll down to the General section at the bottom.
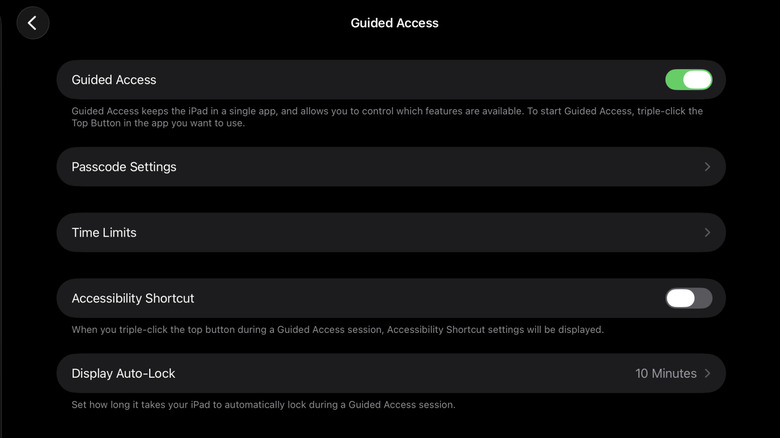
- Go to Guided Access.
- Tap on the toggle next to Guided Access.
- Press Passcode Settings.
- Choose Set Guided Access Passcode.
- Type your passcode of choice.
- Enable Touch ID to end Guided Access with a light press on the top button.
- Set Display Auto-Lock to 10 Minutes, or your preferred inactivity time, after which your iPad automatically locks.
With Guided Access set up, you can now start focusing on reading. Launch the Kindle app and triple-press the top/power button to activate Guided Access. Then, hit Start. From here, you can no longer do any gestures to perform system actions, including swiping up to open the recent apps list and swiping down to go to the Control Center. This makes sure you can't exit the app. You're still free to navigate Kindle as usual, though. To deactivate Guided Access and go back to app switching, just press the top button three times again, enter your passcode or use Touch ID, and select End.
Edit how the Kindle app looks
The iPad's system settings do a good job at making the device look like a Kindle. But if you want customizations on the reading interface itself, you'll need the Kindle app. It offers almost the same options, so you can change the interface to your liking, just like how you would on a Kindle device. To set up the Kindle app to turn your iPad into a Kindle, follow these steps:
- Install and sign in to the Kindle app if you haven't already.
- Open any book in your library.
- Tap the middle of the screen.
- Go to the Aa icon in the upper-right corner.
- Lower the brightness level using the slider.
From here, you can go through each of the tabs to edit the settings:
- In the Font tab, choose one of the available font options.
- Drag the Size slider to enlarge or shrink the text size. If you'll be using a Kindle remote page turner and placing the iPad a few feet away, it's best to go with a larger font.
- Tap Spacing.
- Adjust the line, paragraph, word, and character spacings to meet your needs.
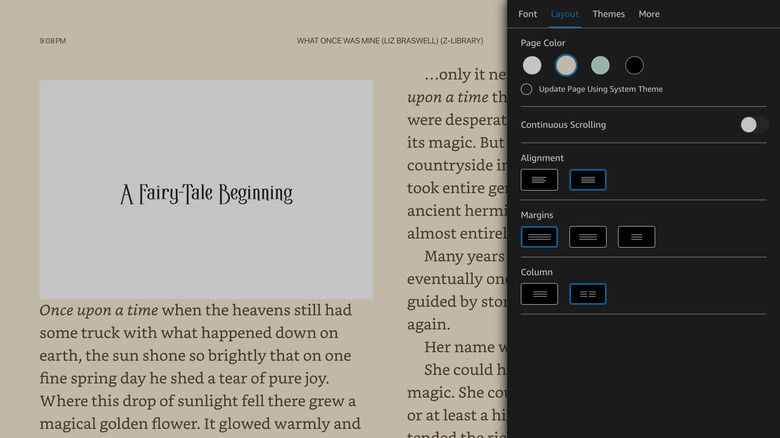
Meanwhile, in the Layout, Themes, and More tabs:
- Go to the Layout tab.
- Set the Page Color to beige or black. These background colors match the grayscale Color Filters and Night Shift best, producing an effect similar to the Kindle screen — beige for light mode and black for dark mode.
- Change the Alignment, Margins, and Column as needed.
- Select the More tab.
- Toggle on Visible Clock to keep the clock fixed at the top of the page.
- To save your adjustments, choose Themes at the top.
- Hit Save next to Custom.
The settings you changed on one book will automatically be applied to all your other books, too.
Create a reading focus
Probably one of the hidden but most useful features on iOS and iPadOS is Focus Mode. True to its name, it helps you focus on a specific task by customizing how your iPad looks and functions during that certain Focus Mode. There are already some preset Focus Modes on your iPad out of the box, including Do Not Disturb and Sleep. You can set up a separate Reading Focus, though, which you can tweak to make your iPad work more like a Kindle. Here's how:
- Launch Settings.
- Go to Focus.
- Press the plus icon in the top-right corner.
- Choose Reading.
- Tap on Customize Focus.
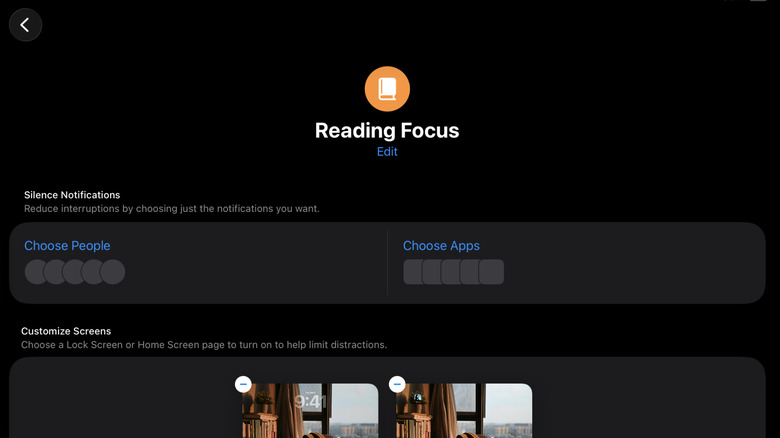
Once on the Reading Focus page, you can go through the sections you want to customize. For the Silence Notifications section, it's best to leave Choose People and Choose Apps blank. This prevents your iPad from sending you audible notifications while Reading Focus is activated — just like how a Kindle doesn't have notification popups. If you still want the iPad to sound when receiving alerts from certain people or apps, tap the option and choose your preferred contacts and apps. To change the Home and Lock Screens:
- Under Customize Screens, hit Choose under the Lock Screen (screen with clock).
- Select your preferred wallpaper.
- Press Choose under the Home Screen (screen with little squares).
- Under Create a New Page, select the last option.
- Click on Edit Apps.
- Remove the suggested apps at the top.
- Add the Kindle app (and your other reading apps).
- Press the checkmark to save your selection.
- Hit Add to use the modified Home Screen.
The last thing to do is add Focus to your Control Center for easy access later. Whenever you want to read, just go to the Control Center, tap on Focus, and select Reading.
Set up Automations when the Kindle app opens and closes
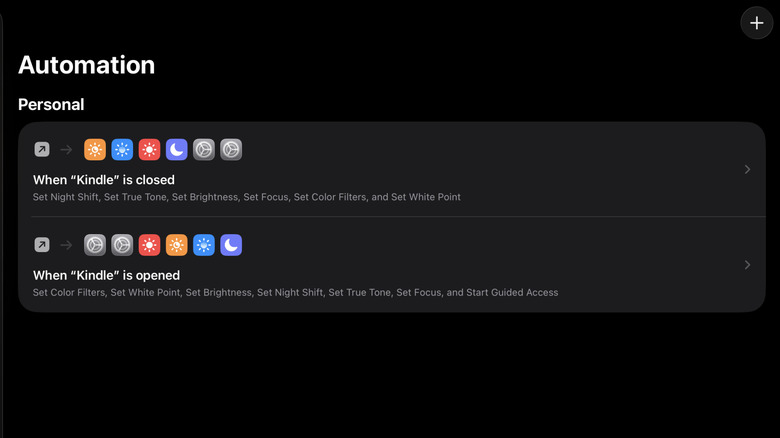
Configuring your iPad to turn into a Kindle replacement is fun and all — until you realize you still want to use it for other things like drawing and doomscrolling on social media. Undoing all the settings you just set can be a real pain, and setting them up again later is even harder. To solve this, you can simply create automations that activate all those settings as soon as you open the Kindle app. To set up an automation on your iPad, go to the Shortcuts app. In the left side panel, click on Automation, and press New Automation. Then, follow this guide:
- Select App.
- Tap on Choose.
- Find the Kindle app.
- Hit the checkmark.
- Choose Run Immediately.
- Press on Next.
- Tap on Create New Shortcut.
- Add these Actions: Set Color Filters, Set White Point, Set Brightness, Set Night Shift, Set True Tone, Set Focus, and Start Guided Access.
- Change Do Not Disturb to Reading.
- Set color filters, white point, night shift, true tone, and Reading to On.
- Adjust the brightness to your preferred percentage (around 20% is just right).
- Hit the checkmark to save the automation.
Then, to deactivate everything when you exit the Kindle app, create another Automation with the same steps. This time, set it to Is Closed, all the Actions to Off and the brightness to the original level. Unfortunately, there isn't an Action for ending Guided Access, so you'd still have to turn that off manually before you can even exit Kindle.
From here, every time you launch the Kindle app, your iPad will be ready for reading. When you're done, press the top button three times to exit Guided Access. You can then exit the app and go about your usual iPad activities.