5 Ways To Check If Your Webcam Is Spying On You
Webcams are a great tool for recording videos or communicating with family, friends, and colleagues via apps like FaceTime, Facebook Messenger, Zoom, or Slack. Yet, hackers can turn them against you by turning them into spies. It's not a common occurrence, but it does happen. It's called camfecting, and it happens when someone gains remote access to your webcam without your knowledge.
There are several ways they can achieve this, including using phishing or exploiting an outdated router or weak Wi-Fi password to gain access to devices on your network. Afterward, they install remote access tools to upload spyware and access the camera directly, on top of other nefarious activities like stealing your sensitive information and launching cyberattacks. Luckily, you can check. The major signs to look for include the webcam's light indicator suddenly turning on, camera movements, weird apps accessing the camera, strange recordings on the drive, performance issues, and network irregularities.
Once you confirm that something is accessing the camera without your permission, the issue can easily be rectified without resorting to drastic measures. After checking, be sure to run a full system scan with a trusted antivirus and enable real-time protection, even if you're on a Mac. Also, be sure to strengthen your passwords, update your router, and change the default password on your network devices.
Check for signs that the camera is in use
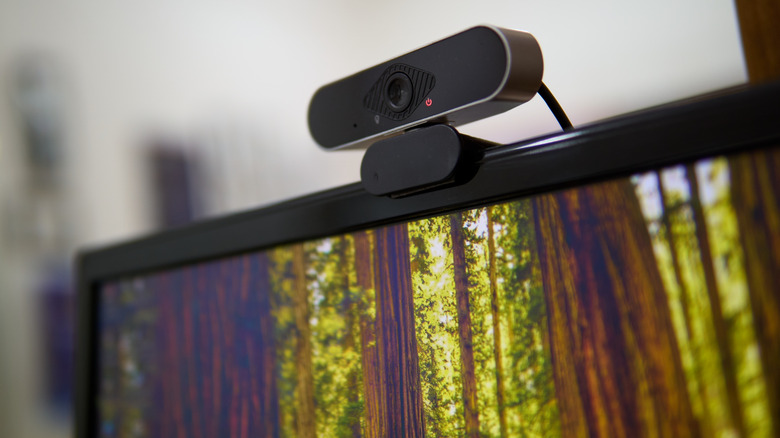
Modern webcams have a white, green, or orange indicator light that shows the webcam is in use. If it's on without you starting a video recording or calling app, that is worth investigating. Also, since hackers can bypass this indicator, another thing that can alert you that your webcam is spying on you is if you have an external motorized unit that zooms, pans, and tilts, and you notice movement that you did not initiate. This could indicate that someone is controlling it. You could also notice glitches while using the camera, such as screen tearing, lag, or a blank screen.
When you notice any of these signs, slide the privacy shutter to block off visual access while you investigate. Not every webcam has this, so an effective alternative would be to cover it with tape. It might seem silly, but it's actually something that former FBI Director James Comey admitted to doing as an everyday privacy precaution.
If it's an external camera, you can disconnect it, but it would make finding what is currently accessing the camera hard to track down. So just find a way to block it for now. Keep in mind that this doesn't block the microphone, so you will have to mute it if it's built-in. If it's an external microphone, disconnect it for now.
Check which apps have access to the camera
Even if you haven't noticed signs that someone is using the webcam, it's always a good idea to check which apps have access to the camera. You might just be surprised. If you deem an app doesn't have a valid reason to use the webcam, you can simply disable its access. If it's a suspicious app you didn't install, you need to uninstall it immediately.
If you're on Windows, you can check this in settings. Here's how:
-
Go to Settings > Privacy & security > Camera.
-
If you came here because the light indicator was on, see if any apps "Currently in use" written beneath them. That will be the one that has visual access.
-
Look at the list of apps that can access the camera and toggle off the ones you think don't need it.
-
While you're at it, scroll down a little to the "Recent activity" section to see a seven-day history of everything that accessed your camera.
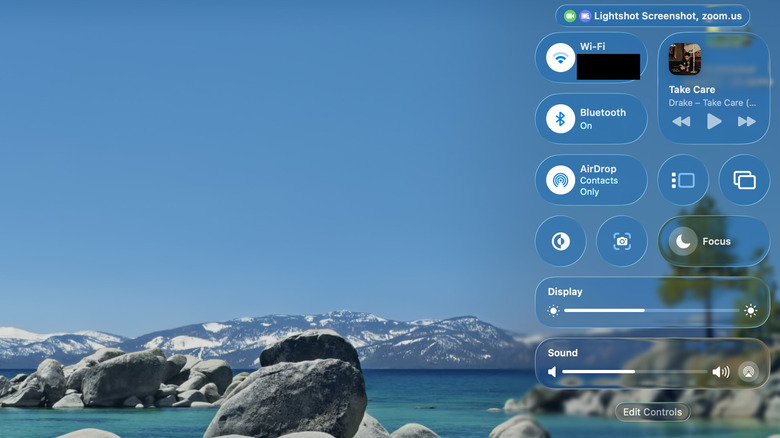
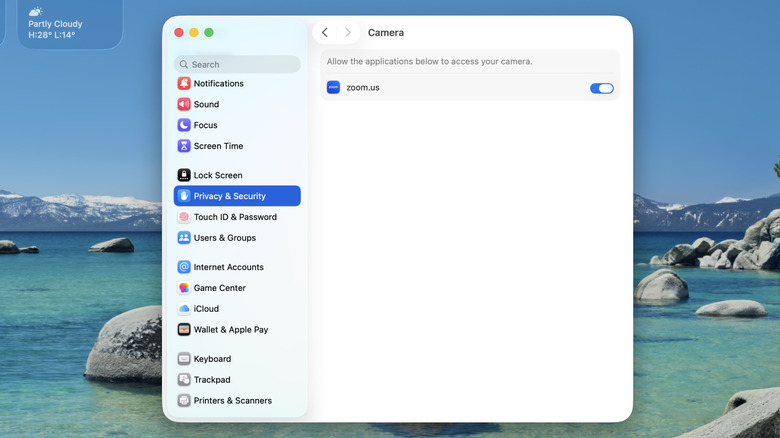
If you're on a Mac, you can see what is currently accessing your camera in the Control Center:
-
Press Fn + C to open the Control Center.
-
Check the green privacy notification at the top; it should either say something like "zoom.us" if an app like Zoom is using it or "zoom.us recently" if it has stopped recently.
-
While you're at it, go to System Settings > Privacy & Security > Camera.
-
Toggle off any suspicious apps.
Check for any recordings you didn't make
If the hackers have been capturing and recording you, there might be evidence on your drive. It's a long shot because they might have done it remotely or deleted all evidence, but it's worth checking. The problem is that the recording can be anywhere on your computer, and it can be time-consuming to look beyond standard folders like "Videos," "Pictures," "Screenshots," and "Recordings." A more effective method would be to look for large folders and investigate from there.
Windows has no built-in app or feature that sorts folders by size. You would have to rely on a third-party app. Here's what to do:
-
Download and install WinDirStat.
-
In WinDirStat, select the drive you want to scan.
-
Click "OK."
-
Once it's done scanning, look for unusually large folders you don't recognize in the tree view. Keep expanding the children until you find the large file in question and see if it's a video recording you didn't make.
-
If you find a suspicious recording, right-click it and select "Delete."
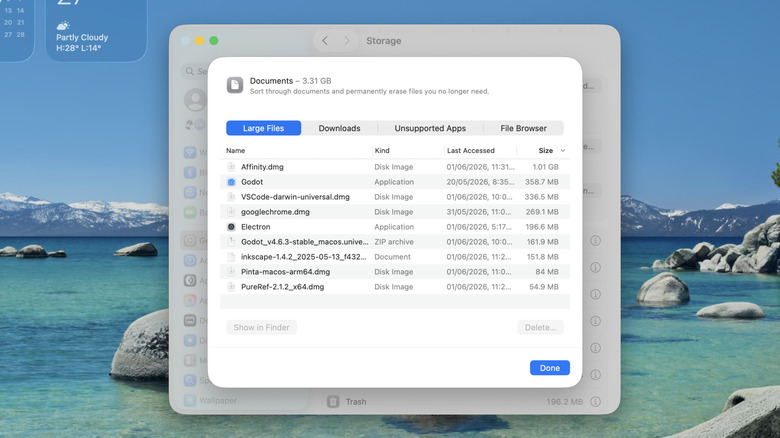
On Mac, it's a little bit easier since you don't have to download anything to see which files are taking up too much space. Do the following:
-
Go to System Settings > General > Storage.
-
Double-click "Documents."
-
Check the "Large Files" tab for any weird recordings.
-
If you find any, select them – press the Command key while clicking to select multiple.
-
Click "Delete" in the bottom-right corner.
Check for performance issues
A sudden dip in performance can have an innocent cause. There are several features that can slow down your computer during use, such as built-in cloud services syncing files, or a system update that is in the process of downloading. Sometimes, it could be an app slowing down your computer, like an antivirus, a web browser, or a video recorder. If one or more of the warning signs above check out, then you need to investigate further to ensure you're not being recorded.
If you are on Windows, you should check the Task Manager for suspicious apps and processes:
-
Right-click the taskbar and select "Task Manager."
-
Select the "Processes" tab.
-
Check what is causing high CPU usage from the list.
-
If it's suspicious, right-click it.
-
Select "End Task" in the menu.
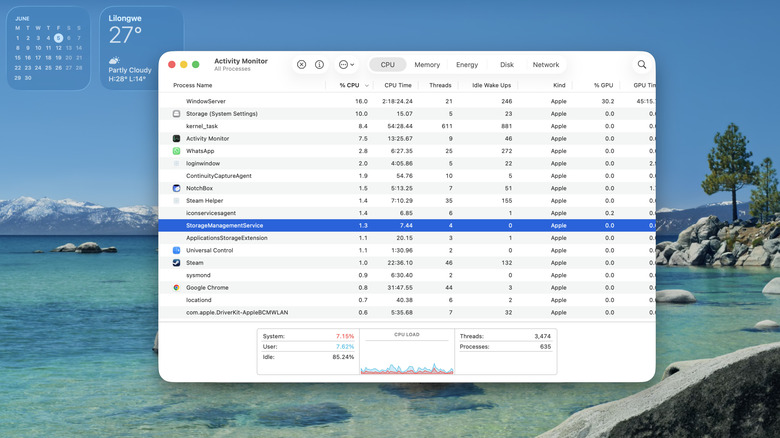
Mac users can do the same in the Activity Monitor:
-
Press Command + Space bar to open "Spotlight Search."
-
Type "Activity Monitor."
-
Press Enter.
-
Check what is causing high CPU usage from the list.
-
If it's suspicious, select it.
-
Click "Stop" — the "X" button in the top-left corner of Activity Monitor.
-
Select "Quit" in the pop-up.
Check for unexplained network using
As with performance drops, if your network becomes slow for no reason, coupled with other warning signs, it could indicate something is transmitting, or a file is being uploaded. You can also check for the culprit in the "Network" tab of the Task Manager or Activity Monitor. Again, if whatever is causing the high network usage is something that seems off to you, kill or stop it.
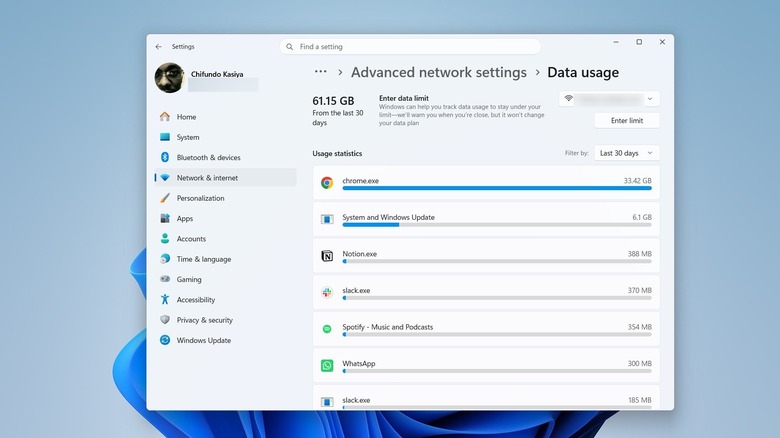
Even if you haven't noticed any network issues, it doesn't mean nothing happened in the past. You should check the network usage of apps and processes to see which ones are consuming a lot of data. If you find one you don't recognize, do a quick Google search to ensure it's not malware. If it's an app, uninstall it immediately, and if it's a process, check if it's still running and kill it. Afterward, you should update your antivirus and run a full system scan.
To check which app is using a lot of data on Windows, go to Settings > Network & internet > Advanced network settings > Data usage. Check the "Usage statistics" section. It should list apps and processes, along with how much data they've used for the last 30 days. Unfortunately, there's nothing like this on Mac, so you have to rely on the "Network" tab to monitor things in real time.