5 Useful iOS Features That Let You Take More Control Of Your Audio

When it comes to controlling audio on your iPhone, the thing that usually comes to mind is the volume buttons — for obvious reasons. But there's actually more than one way to manage your iPhone's audio, and surprise, surprise, it's not just about media playback. iOS lets you control how loud your headphones and built-in speaker can get, what volume your ringtone, alarm, and system sounds play at individually, and which mode your microphone should be set to, among plenty of other things.
These audio settings are typically hidden in plain sight, so you might not even realize they existed in the first place. But that makes them all the more worth exploring, especially if you want to take more control over how your iPhone plays and records audio. We'll walk you through five other ways to manage audio without even touching your iPhone's volume buttons and its hidden features.
Set a limit for how loud your built-in speaker and headphones can be
Constant exposure to loud volume is an easy way to damage your hearing. But when you're in the zone, you can easily forget to be mindful about the volume on your iPhone's speaker or connected headphones. Before you realize it, you've already set it to the maximum limit. To avoid doing so in the future, iPhones come with an audio setting to limit how loud the volume can be. This works for both the built-in speaker and headphones, so you're protected whichever way you're listening.
Here's how to set a limit for your iPhone speaker and headphones:
- In the Settings app, navigate to Sounds & Haptics.
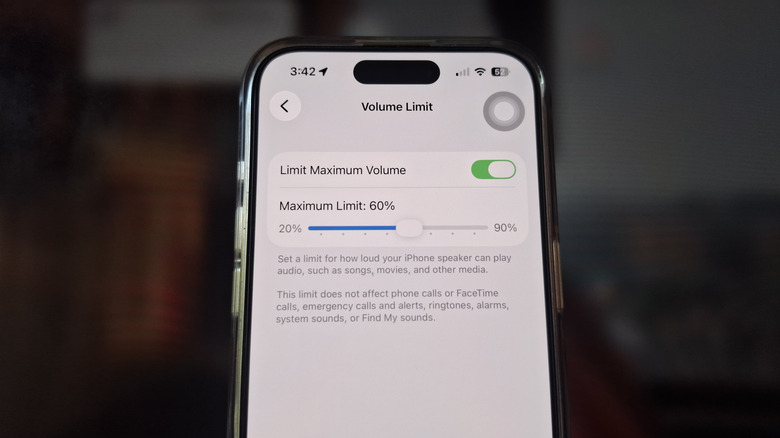
- Under Built-In Speaker, press Volume Limit.
- Turn on Limit Maximum Volume.
- Choose a limit between 20% and 90%. The slider moves in 10% increments only.
- Go back to the main Sounds & Haptics page.
- Still under Built-In Speaker, enable Reduce Loud Sounds. This makes loud sound effects softer, but you'll still get the original quiet parts.
- Under Headphones, select Headphone Safety.
- Toggle on Reduce Loud Audio.
- Move the slider to your preferred decibel level between 75 dB and 100 dB. You'll see a comparison of the decibel level in real life scenarios (e.g., 75 dB is as loud as a vacuum cleaner, 90 dB is as loud as a motorcycle).
From here, whenever you set your iPhone to the maximum volume, the sounds would be noticeably softer than they were before.
Adjust the volume on your alarm, ringtone, and system sounds separately
iPhones have long integrated ringtones and alarm sounds into a single volume control. This seems convenient on paper — after all, you'll only need to set up the volume once and it will be applied to all your system sounds (not your media sounds). But in practice, this merged functionality is actually quite annoying. You'll want to hear a blaring alarm for cooking your meals in the kitchen, but you don't want your incoming calls to be just as loud, especially when you're out in public.
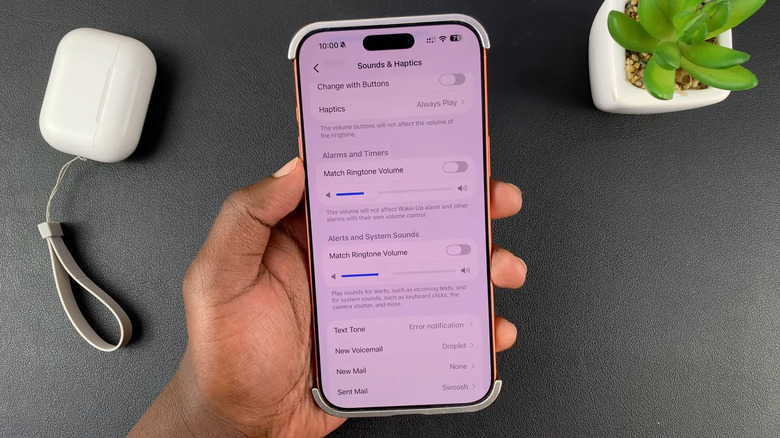
Thankfully, one of the best features coming to your iPhone with iOS 27 is separate volume control. Instead of just one volume slider, you get three: one for alarms and timers, one for ringtones, and another for alerts and system sounds (things like sent texts, keyboard clicks, and the camera shutter sound). Note that Wake-Up alarms can use their own volume settings that are separate from the system-wide slider for alarms and timers.
To set the volume levels individually on iOS 27, here's what you need to do:
- Launch the Settings app.
- Open Sounds & Haptics.
- Under Ringtone, change the volume to your preferred level.
- Under Alarms and Timers, toggle off Match Ringtone Volume.
- Drag the Alarms and Timers volume slider to your level of choice.
- Under Alerts and System Sounds, disable Match Ringtone Volume.
- Set the volume slider to whatever level you like.
Keep in mind that this iPhone audio feature won't be available to the general public until fall 2026. But if you're interested in trying it out before its official release, you can install the beta software for iOS 27 at your own risk.
Use a custom ringtone for your incoming calls
Your iPhone already comes with over 25 preset ringtones for your incoming calls, all of which are pretty distinct and easy to recognize. But sometimes, you might prefer to use a popular sound you heard on TikTok or a custom ringtone you made yourself. Before iOS 26, setting a custom ringtone for your iPhone involved a multi-step process with the help of an app called GarageBand. Unfortunately, it was more trouble than it was worth, so you probably just stuck with the preset options.
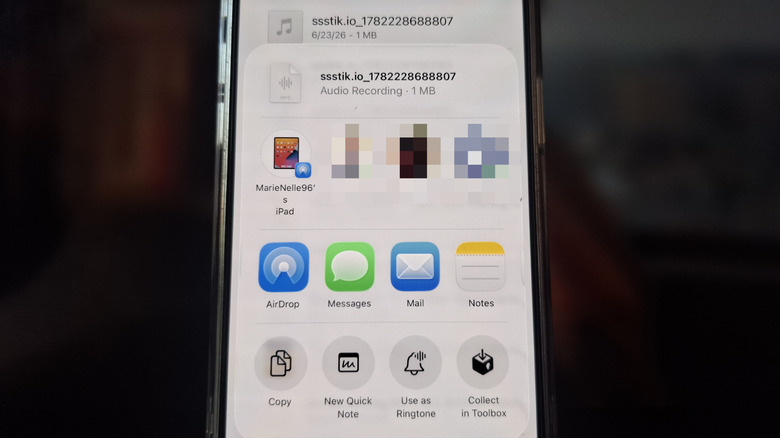
With iOS 26, though, you can easily set a custom iPhone ringtone right from the Files app. All you have to do is transfer the audio file to Files, long-press on it, tap Share, and select Use as Ringtone. You'll then be redirected to the Ringtones section in the Settings app, where the audio file is automatically selected as the new ringtone.
It's important to note that the audio files need to be 30 seconds or shorter. If you try choosing a file that's longer than 30 seconds, you'll get a "File Too Large" error. You can always trim the file using the Toolbox by Paperclip app. In the Audio section of Toolbox, tap on Trim, pick your file, and then cut the audio to 30 seconds or less.
Custom ringtones you add to your iPhone can still be deleted once you no longer want them. In the Settings app, head over to Sounds & Haptics and open Ringtone. Then, simply swipe left on the file you'd like to remove.
Monitor the decibel level of the audio while using headphones
Sometimes, you might wonder whether the volume of your headphones while watching on Disney+, listening on Spotify, or just browsing on TikTok is actually safe for your hearing. Well, you don't need to guesstimate on the iPhone. There's a useful iPhone feature hidden in the Accessibility settings that tells you exactly what your headphone audio level is in decibels and whether it's "OK" or "Loud."
To see this headphone audio level assessment, you'll have to add the Hearing button to your Control Center first. Follow these steps:
- Go to the Control Center.
- Touch and hold an empty space.
- Tap on Add a Control.
- Search for "Hearing."
- Select the Hearing tile with an ear icon.
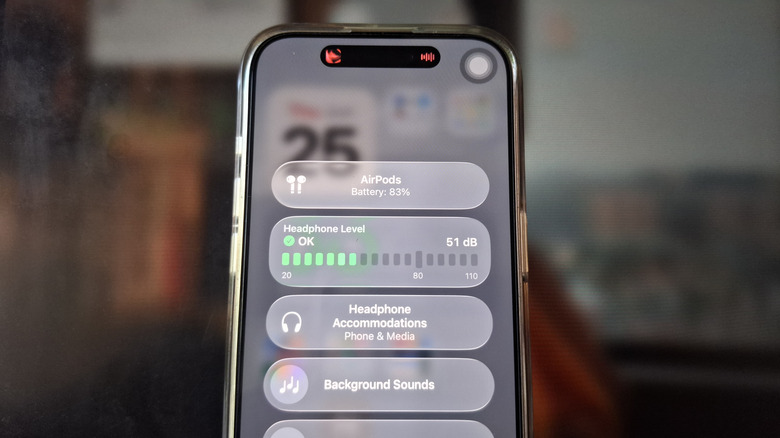
You can then start playing your media. While listening to the audio playback, open the Control Center and tap on Hearing. A panel will pop up with a Headphone Level section showing you a decibel meter ranging from 20 dB to 110 dB. As the audio plays, you'll see some bars reacting to the changes in the decibel level. If the volume is safe, an "OK" label is shown with the reactive bars in green. If the volume is too loud, the bars turn yellow, and a "Loud" label is displayed instead. It's recommended that you lower the volume until you reach the "OK" decibel range.
Conveniently, your headphone audio levels are saved to your iPhone under the Hearing section in the Health app. This way, you get to review your audio exposure in the past week and know how to better control the audio on your iPhone.
Choose a Mic Mode for the current app
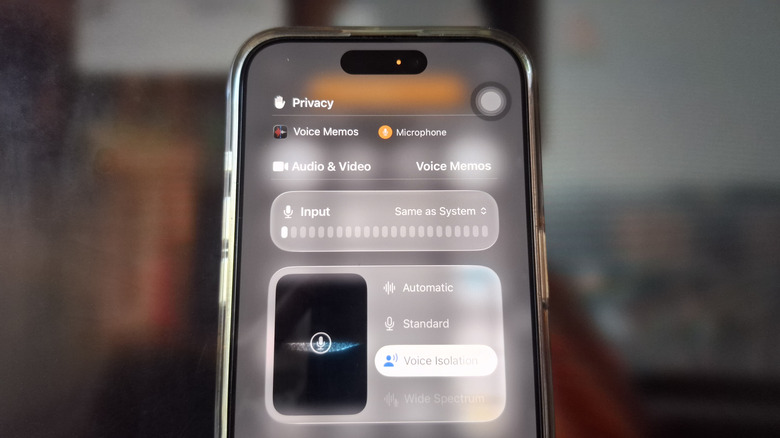
Your iPhone's microphone generally works fine for most tasks, but there are instances when you want it to do more. That's where iOS' Mic Modes come into the picture. Mic Modes, just as the name suggests, are modes for the microphone. You have four options to choose from: Automatic, Standard, Voice Isolation, and Wide Spectrum. Automatic selects the most appropriate Mic Mode based on the use case. Standard relies on standard voice-processing techniques. Voice Isolation improves the clarity of your voice by blocking ambient sound from your surroundings. And finally, Wide Spectrum lets others hear a wide spectrum of sounds, including background noise.
Not every Mic Mode is available for every situation, though. For instance, you can't set the microphone to Wide Spectrum while you're on a phone call. You'll also need to be on at least an iPhone XR and be updated to the latest iOS version in order to use Voice Isolation and Wide Spectrum. If you have a supported iPhone, follow these steps to select a Mic Mode for the app you're currently using:
- Start a voice or video recording or answer or make a call.
- Go to your Control Center.
- Tap the orange or green control button at the very top of the screen.
- Under Audio & Video, choose your preferred Mic Mode.
- If you're using a wired microphone, adjust the input gain level by moving the slider under Audio Input.
- If you have a connected microphone like on your AirPods, set your preferred mic by tapping on the value next to Audio Input.
Mic Mode isn't universal — a mode you apply to one app won't automatically be used for another app. So if you want this level of microphone customization elsewhere, you'll have to set the Mic Mode for each of the relevant apps.