11 Things Your iPhone's Notes App Can Do (Besides Taking Notes)
Apple Notes started out as a simple notetaking app. You quickly jot down your thoughts, add some images, make lists, share your lectures, and that's it. But over the years, the Notes app has developed into a powerful knowledge management system. There are better, faster ways to take notes, complete with context and links. You can even link notes to create your own little knowledge base for your college notes or your work projects.
Plus, there are options to lock down your notes, organize them using tags, and dynamically pool them using smart folders. With the integration of Apple Intelligence, the Notes app can help fine-tune your writing and help you summarize and transform your text. This is no longer just a digital version of the yellow legal pad.
But despite these updates, most iPhone users barely scratch the surface of what is possible to do with the Notes app. Instead of using complex apps like Notion or Obsidian, try exploring what's possible with the Notes app. With a customized folder setup and extra features like scanning documents, you can create the ultimate notetaking system that's customized to you, works on all your Apple devices, and is completely free to use.
1. Lock your notes using Face ID or Touch ID
Your notes contain everything from your shopping list to your most private "Dear Diary" confessions. It's best to protect your notes using a password or biometrics for Face ID and Touch ID. The easiest way to do this is to protect your Apple Notes with the device passcode, linked to your Face ID. But you have some choices here.
Go to Settings > Apps > Notes > Password. Here, you can choose between Use Device Passcode or Use Custom Password. If you want extra security, only then go for the Custom Password option. If you forget it, there's no easy way to unlock the notes. Here, you can also enable or disable Face ID scanning (forcing you or anyone who has access to your iPhone to enter the device passcode).
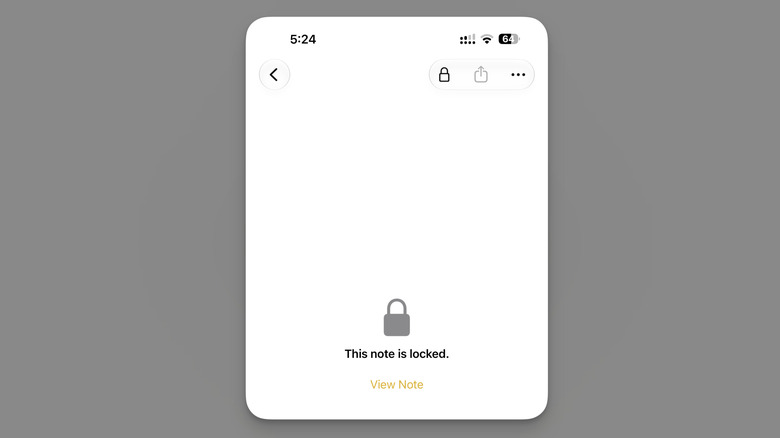
To lock a note, open the Notes app and find the note in question (Apple will only let you lock notes that are on iCloud or on your device, and if they don't have attachments like PDFs). Tap the three-dotted Menu button on the top-right corner of the screen, and choose the Lock option. To remove a lock, go back to the Menu button and tap the Remove option. To unlock a note, tap the View Note button and authenticate with biometrics or your password. When you unlock a note, Apple will unlock all notes for a few minutes, so it's easy to copy and paste data between locked notes.
2. Pin important notes and organize using folders

You may realize that your Apple Notes list is a mess. It might be filled with hundreds of notes collected over the years, and the only real way to find useful notes is by using the Search feature. While that's quite fast, a little organization can go a long way.
First, use the Pin feature to pin the most important, long-running notes to the top of the list. Things like your travel plans, lecture notes, or checklists. To pin a note, tap and hold on a note, or swipe right, then tap the Pin icon. This note will now be pinned to the top of the list.
Another way to organize notes is by using folders. You don't need to worry about organizing all your hundreds of notes into logical folders. This is just for the important notes. You can group your lecture or project notes into one folder so they're always easy to access (and you don't drown in a barrage of small, new notes). Go to the Folders list in the Apple Notes app, and tap the New button up top. Give it a name, and tap the Done button. Next, move all relevant notes to the folder. Tap and hold a note, then choose the Move option and select the newly created folder as the destination.
3. Record and transcribe phone calls
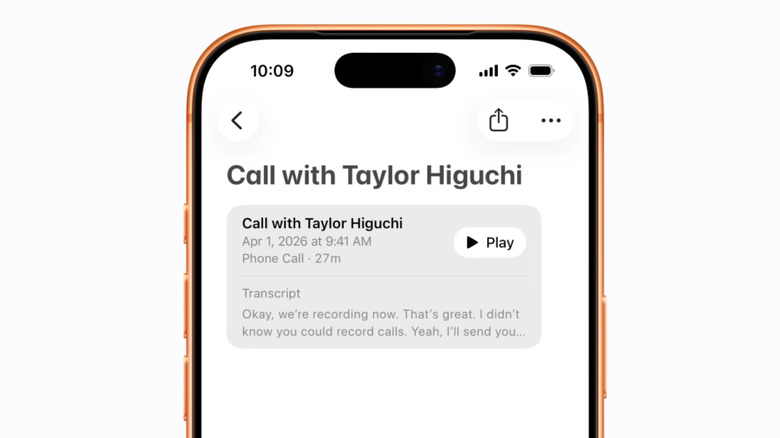
Your iPhone can not only record calls but also transcribe them. In supported regions, Apple has an option to transcribe a call in the Notes app. When you're on a phone call, tap the three-dotted Menu button and choose the Call Recording option. Both parties will hear an audio alert that the call is being recorded. When you're done, tap the Stop button or end the call. Once the call ends, you'll find the call recording in the Call Recordings folder in the Notes app.
In the Call Recordings folder, you'll find all your recorded calls. Tap the Play button to hear a call recording. Below the Play button, you'll also see the transcript. It might take some time to appear after the recording ends. If you're using one of the supported languages, you'll see the transcription right there. Apple should be able to transcribe all the spoken words. If you have Apple Intelligence enabled, you'll also get an AI summary of the call recording.
If it's a long transcription, tap the Menu button and choose the Find in Transcript option to search through the transcript. From the Menu button, you'll also find the option to copy the transcript, share the audio recording, and save the audio recording to the Files app.
4. Scan and sign documents in the Notes app
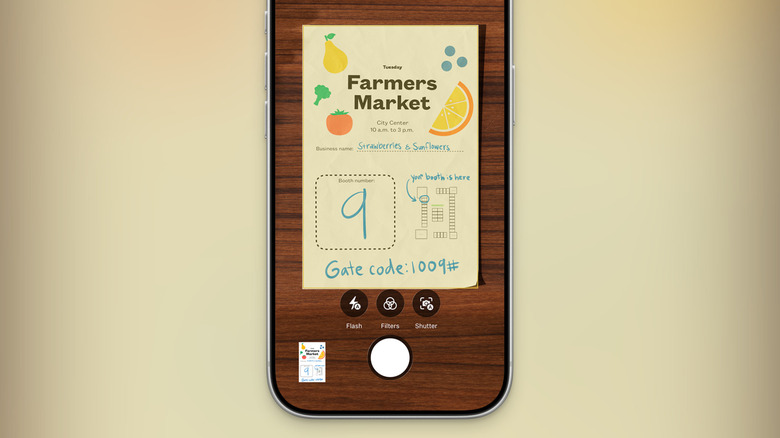
There's no need for a scanner anymore. Apple Notes has a fast, built-in document scanning feature. After opening a note, tap the Attachments button and choose Scan Documents. Then, point your iPhone camera towards the document that you want to scan. You also have the option to enable flash in dim lighting and use an image filter.
The scanning itself will happen automatically. Your iPhone will detect the edges of the document, and when you hold it still for a couple of seconds, it will automatically snap a picture, crop it, and enhance it to make it look more like a digital scan rather than an image. If the auto mode isn't working as you want, you can take the manual approach as well. Tap the Shutter button or use one of the volume buttons to capture the scan. Then, you can manually crop the edges to remove any background. Tap the Keep Scan button to add the scan to your pile, and carry on with the next scan. When you're done scanning, tap the Done button at the top.
Once you're done, you'll notice that the scans are uploaded to the note in PDF format. You can now tap on the PDF to annotate it however you like. Importantly, though, you can use Apple's signature feature to digitally sign the document. Tap the Markup button, then go to Add > Signature and choose one of your saved signatures (if this is your first time using this feature, use the create a new signature that can be reused across the OS). Place the signature wherever you want, and tap Done.
5. Organize notes using Tags
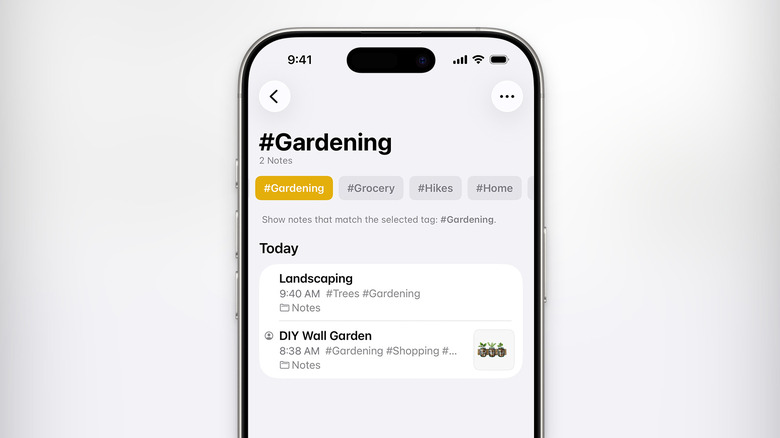
Tags are yet another easy way to organize and find related notes. You might be used to tagging files in the Finder app or using Hashtags in Reminders. The Notes app works on the same principle. To create a new tag, just use "#" followed by the tag name. Tags in Apple Notes need to be a single word, so spaces won't work. Instead, you can use hyphens or underscores.
Then use the Space bar or press Enter. The hashtag will change color, and that's how you know the tag has been created. You can create new tags anywhere in a note, and they will be added to the Notes app's repository.
To view all your tagged notes, go to the Folders screen in the Notes app, swipe all the way down until you find the Tags section. You will now see a selection of all your tags, and an All Tags button as well. Tap on a tag to see all the notes associated with the tag. You can also select multiple tags to only show notes that include all selected tags. To untag a post, simply delete the tag from the note (it's best to tag notes in the title for easier access).
6. Link notes together to create your own knowledge database
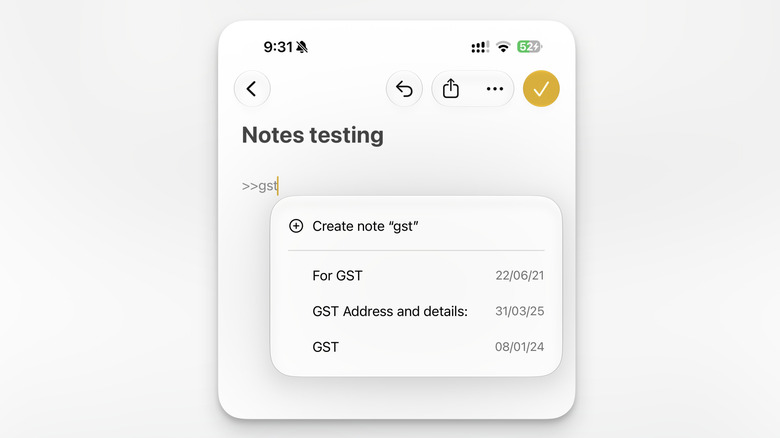
A great way to provide context and sources for your research notes is to use links. You can highlight any text and choose the Add Link option to hyperlink the text. But this feature isn't just limited to web links. Apple Notes also lets you link notes with each other, so you can open a note with just a tap. And you don't even need to find the sharing link for a note.
In the Notes app, type ">>" followed by the title of the note. It will now show you all the available notes that match the title. Select a note that you want to embed, and the Notes app will add the note title in yellow hyperlink text. Tap and hold on the link to preview it, and tap on it to directly jump to the note in question. If you want to embed the note as plain text (and not see the note title), you can use the Add Link feature we talked about above. Instead of the link, enter the note title in the URL section, and make sure that the "Use Note Title" feature is disabled. Tap Done to save the link. Now, what looks like a regular link will take you to your linked Apple Note.
7. Use the Quick Notes shortcut to the Control Center
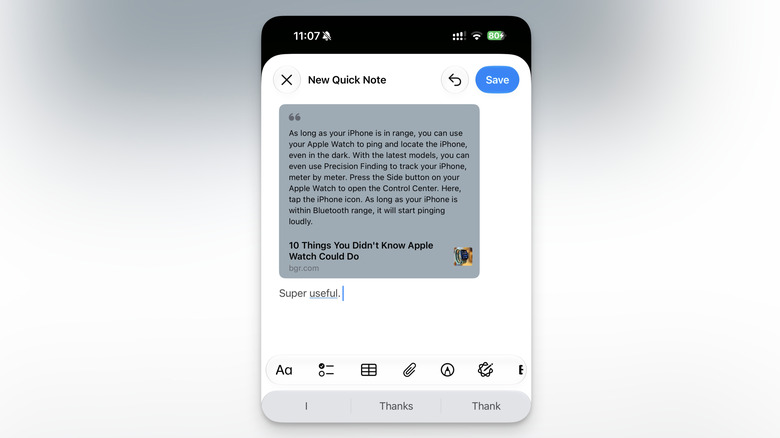
Quick Notes is one of the best hidden features on the iPad, and there's a version on the iPhone as well. Of course, there's no Apple Pencil gesture here, but you still get an option to quickly create a note, with added context. On the iPhone, you can add a Quick Notes shortcut to the Control Center that opens up a new floating note on top of your screen, perfect for quickly capturing phone numbers, addresses, or fleeting ideas.
To set this up, go to Control Center, tap the Plus button in the top-left corner, then choose Add a Control. Now, search for and add the Quick Note toggle and save the configuration. Tapping the Quick Note toggle will bring up a floating notes screen where you can jot down anything you want. Tap the Save button to save the note. You'll find the note in the Quick Notes section in the Notes all (and in the all notes list).
If you invoke the Quick Note feature in Safari, you'll also get an option to add the link to the current page to the note. You can also add text from the webpage as context. Select the text, and from the pop-up menu, choose the New Quick Note option. The Quick Note will start you off with the selected text and the link to the site, ready to go.
8. Use Smart Folders to reduce notes fatigue
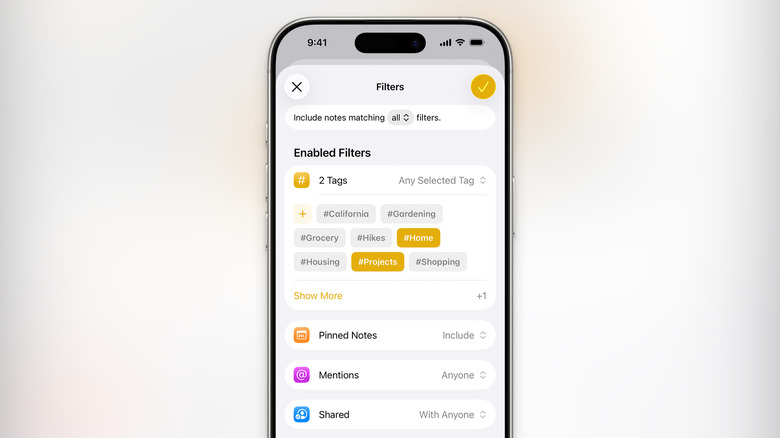
Once you've made a couple of folders for important files, the folder fatigue will set in. That is where Smart Folders can help you. Smart Folders are dynamically updating folders based on parameters you can set. For example, you can create a smart folder that contains all notes tagged with #Chemistry. When you create new Chemistry notes, they will automatically show up in this folder.
But that's not it. You can filter notes based on when they were edited (last week), if they're in a particular folder, if they have unchecked list items, attachments, and more. And all these filters can work together to create a smart folder that only shows you the relevant notes. To get started, tap the New Folder button at the top of the Folders list, and choose the Make Into Smart Folder option. Now, add all the filters that you want (tags, mentions, and so on). Once you're done customizing, tap the Done button. Tap the Done (Tick) button to save the smart folder.
The new folder will show up in your list and will be updated dynamically based on the input. You are free to edit the filters at any point, though. Tap and hold a Smart Folder and choose the Edit Smart Folder option to change the filter settings.
9. Do simple to complex math in text form
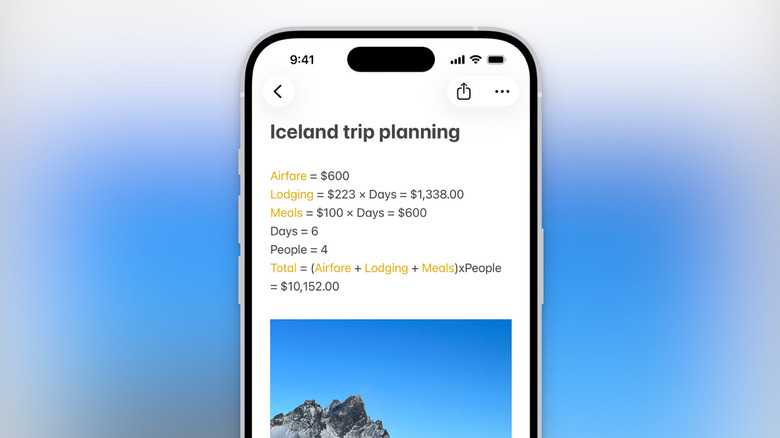
Apple Notes has a built-in feature called Math Notes that lets you perform complex mathematical calculations on your iPhone. You can solve equations, use variables, and even plot graphs using your own data. But you don't need to be a mathematician to make use of this feature.
Think of this feature as a notes version of a calculator. If you're planning costs for renovations or estimating your travel budget, you can use this feature for an easier way to tally the expenses. It's visually laid out, and it's editable. First, write down all your expenses or variables that you want to calculate. Next, write your equation at the end (it can be something like Hotels + Flights + (Meals X 2) =). When you use the "=" symbol, the Notes app will automatically suggest the answer. Tap on it to add the answer (it will be yellow in color).
10. Use Apple Intelligence to improve your writing
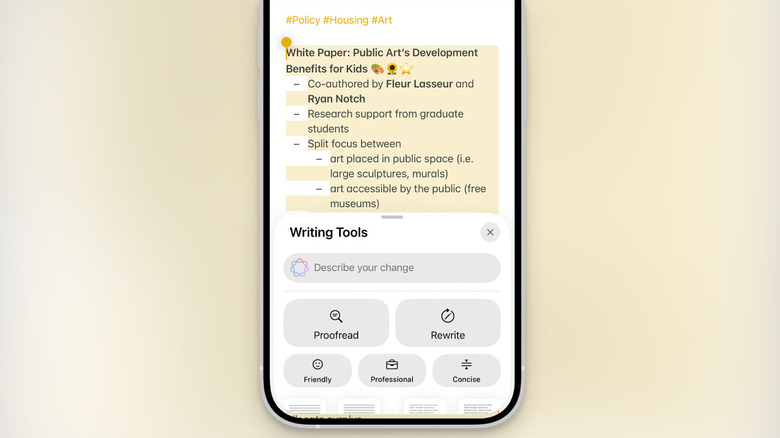
Apple Intelligence, Apple's suite of AI tools, is integrated directly into the Notes app. The Writing Tools feature is designed to help you improve your writing and your notes, instead of generating them. The Notes app offers built-in tools for proofreading your text, rewriting to make it sharper, and even using a different tone (making the text sound more friendly, professional, or concise).
If you're dealing with a long note or a long article that you've pasted into the Notes app, you can also use the Summarize feature to generate a short summary. To make sense of long paragraphs, there's also an option to convert long meandering texts into clean bullet points.
Start by selecting the text you want to change, and then tap the Apple Intelligence button from the toolbar. A new Writing Tools menu will appear. Use one of the options for enhancing your note. If you have a specific request (like make the text exactly two paragraphs long), you can use the Describe a Change feature up top.
11. Easily export and share notes
Apple Notes features a built-in collaboration tool that lets you share notes with your friends, family, and coworkers. As simple note sharing goes, it's quite capable. You can track changes and even mention note members in lists. But that's not the only way to share notes on Apple Notes.
If someone doesn't use Apple Notes, you can share the text with them effortlessly. Tap the Share button, and you'll see the option to simply Copy the text, Copy as Markdown, and Print the note. If you just want to share the text over email or another messaging app, using the Copy option works quite well. If you are familiar with the Markdown syntax and you use a Markdown writing app, you can also export a Markdown file. When opened in another supported notes app, it will preserve all your formatting and headings just as you customized them.
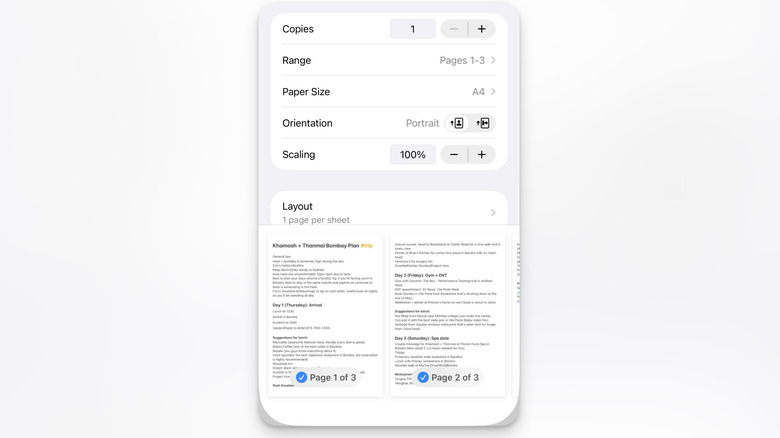
The Print option is also quite useful, even if you don't have a printer. The Notes app lets you customize the paper size, scaling, and layout of the print. From here, you can also just save the file as a PDF instead of printing it out. If you like backing up your notes to the Files app, or you want to share your notes with someone who doesn't have an iPhone, this can be a useful feature.